
Have you ever wanted to add a unique, personal touch to your keys? Are you ready to take your keychain game up a notch? If so, you’ve come to the right place! Making tassel keychains is the perfect way to do that – not only are they fun and eye-catching, but they’re also surprisingly easy! In this blog post, we’ll show you how to create custom DIY tassel keychain designs.
In this blog post, we’ll be exploring how to make tassel keychains that will have all your friends admiring your creative style. We’ll walk you through each step of creating these lovely decorations with all sorts of colors and patterns.

Whether your style leans towards delicate or bold, making a tassel keychain is a great chance for anyone who loves working with their hands – no punch machines or fancy tools are needed. Get ready for some crafting fun – it’s time to make some fabulous tassels!
The Benefits of Making Tassel Keychains
1 Add Style
Making tassel keychains is the perfect way to express your unique style. With lots of colors, fabrics, and ribbons available, the possibilities are nearly endless! Tassels also make for great conversation starters – you can be sure that your friends will be curious about how you made them. Plus, they’re inexpensive, and everyone loves a good DIY project.
2. Fun to Make
Creating your own tassel keychains can be a fun and rewarding activity, even if you’re not particularly crafty. Crafting your own keychain also gives you the satisfaction of creating something that is truly one-of-a-kind. Plus, it’s an easy way to customise plain keys into something unique and modern.
3. Easy to Make
Making tassel keychains is incredibly easy – all you need is some fabric, thread, a key ring, and a few other supplies! There are plenty of tutorials available online that will walk you through the process step-by-step. With practice, it won’t be long before you’ve mastered the art of making tassel keychains.
Required Items
To make your own tassel keychains, you’ll need the following items:
- Fabric of your choice
- Thread to match fabric (or contrast for an interesting look)
- Scissors
- Keyring
- Jump rings (optional but recommended for durability)
- Lighter (to singe the ends of the tassel)
- Needle and thread (to attach the tassel to the keyring)
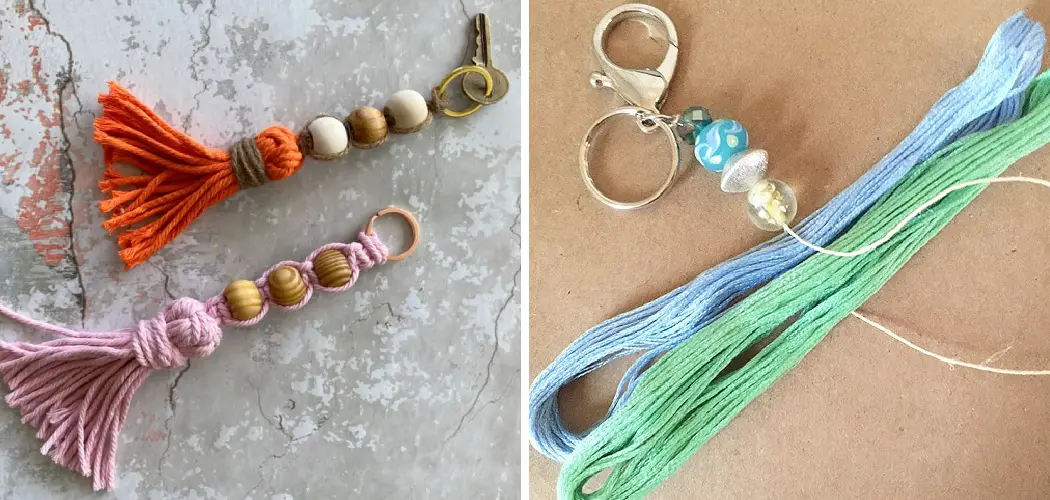
How to Make Tassel Keychains in 8 Easy Steps
Step 1: Cutting Fabric
The first step in making your own tassel keychains is to cut your fabric into strips. Start by folding your fabric in half lengthwise, then use a ruler or other straight edge to measure the width of your strips.

Generally, a tassel strip should be about 1/4 inch wide. You can make them thicker or thinner if you prefer. Once you’ve determined the size of your strips, use scissors to cut along the length of your fabric.
Step 2: Making Tassels
Once you have all your fabric strips cut, it’s time to make the tassels. To do this, tie a loop of thread around the middle of your fabric strip and tie another knot at the top. Next, take one end of the fabric strip and start wrapping it in a circular motion around the thread holding it together. Once you have wrapped all of the fabric around the thread, tie another knot to secure it.
Step 3: Trimming Tassels
Once your tassel is finished, you’ll need to trim the bottom. The best way to do this is by using scissors or a rotary cutter. Make sure to cut evenly along the bottom so all of the ends are even and uniform.
Step 4: Adding Charms and Jump Rings
Adding charms or jump rings to your tassel keychains is a great way to make them extra special. Charms can be found at any craft store, and jump rings come in a variety of sizes. To attach the charm or jump ring, simply slip it over the top loop of thread on the tassel.
Step 5: Attaching Tassles to Key Ring
This step is relatively simple – all you need is a needle and thread. Start by threading the needle with your chosen color of thread, then tie a knot in one end to secure it. Make sure to leave about 8 inches of extra thread at the other end.
Next, insert the needle through the top loop of thread on your tassel, then pull it through until the tassel is close to the key ring. With the needle still in place, wrap the extra thread around both loops at least 3-4 times, then tie a knot in the end to secure.

Step 6: Singing Thread Ends
This is an optional step, but it’s recommended if you want your tassel keychain to be extra durable. To do this, use a lighter to quickly singe the ends of the thread on your tassels. This prevents them from fraying and adds a nice polished look to the finished product.
Step 7: Adding Finishing Touches
At this point, your tassel keychains are almost finished! To add a nice finishing touch, you can trim the extra thread or tie a few decorative knots. You can also add ribbons around the loops for extra flair and color.
Step 8: Enjoying Your Keychains
Once you’ve completed all of the steps above, you’re finally done! Congratulations – you’ve just made your own tassel keychains! Enjoy displaying them for everyone to admire, and feel proud of yourself for creating such unique pieces.
Now that you know how to make tassel keychains, why not try making a few for your friends or family? Not only is it a great way to show off your creative side, but it’s also a thoughtful and unique gift that they will surely love. Have fun experimenting with different fabrics and colors, and don’t be afraid to get creative.
8 Common Mistakes to Avoid When Making Tassel Keychains
Tassel keychains are an easy way to keep your keys organized while adding a fun touch to your style. But, there are several common mistakes and pitfalls that can ruin the look or even damage your tassel. Avoid these eight simple mistakes when making your own tassel keychains, and you’ll have something that you can be proud of.

- Using the wrong type of string is a common mistake one makes. Using a synthetic or plastic tie will weaken over time and not hold as well as a cotton or silk tie, leading to your tassel unraveling easily.
- Choosing an adhesive that is not strong enough can cause the tassel to come undone with just a little tugging. You’ll want to choose an adhesive that will firmly attach the tassel to the keyring and still be flexible enough for movement.
- Not cutting your strings evenly can create a lopsided, unbalanced look. Use a ruler or straight edge to make sure that you’re cutting the strings evenly for a professional-looking tassel.
- Not paying attention to size when making your tassel can create an awkward-looking keychain. Make sure there is enough room on your keyring for the length and width of the tassel you are making.
- Not knowing how to tie a proper knot can lead to your tassel unraveling quickly. Make sure that you tie the strings securely in a double knot so that they won’t come undone easily.
- Incorrectly attaching the loop can make it difficult for the keyring to stay firmly attached. Use a jump ring to attach the loop securely to the keychain so it won’t come undone.
- Using too many strings can make your tassel look bulky and weighed down. Stick with a few strands of string for a lighter-looking, clean finish.
- Making an overly long tassel can take away from the overall look. Aim to keep the tassel length no longer than four inches for an aesthetically pleasing look.
Making a tassel keychain is not difficult but you need to keep these mistakes in mind so that your keychain looks its best. With these tips, you’ll be able to make a stylish and beautiful tassel keychain that will last for years to come.

Conclusion
Making a tassel keychain is a surprisingly straightforward process that adds pizzazz and personality to your keys. Not only is this a great way to express yourself, but it also makes it easier to spot your set of keys and makes them harder to misplace.
Plus, the added benefit of being able to switch out the color or accessories as you please gives a lot of creative control and allows you to customize it however you’d like.
Best of all, this customized keychain can be made with inexpensive materials or ones that you already have around the house, so you can make one without spending a fortune!
With just basic supplies and minimal time and effort, anyone can make these fun and whimsical tassel keychains in the comfort of their own home. Just follow the tips on how to make tassel keychains and you’ll have the perfect tassel keychain in no time.