
If you’ve ever wanted to learn how to make scrunchies without a sewing machine, look no further! Whether you’re new to the craft of making accessories or already have a few projects under your belt, this blog post has all the information you need.

From gathering fabric and supplies to understanding techniques for forming the perfect scrunchie shape—we’ll walk through each step in detail on how to make scrunchies without sewing machine so that by the time you’re done reading, you’ll be an expert at creating stylish hair accessories with ease. Read on for some helpful tips and tricks for making gorgeous DIY scrunchies!
What Are Scrunchies?
Scrunchies are a type of hair accessory that is used to hold a ponytail or bun in place. They typically consist of an elastic band and a piece of fabric that’s gathered around the elastic. Scrunchies come in all sorts of colors, patterns, fabrics, and sizes, allowing you to create many different looks depending on your style preference.
Gather Supplies
The supplies you’ll need to make scrunchies without sewing can be found in any craft store or online, and surprisingly enough, this project barely requires anything at all! Here’s what you’ll need:
- Fabric of Your Choice
- Hair Elastic
- Hot Glue Gun or Fabric Glue
- Ruler and/or Scissors (Optional)
10 Step-by-step Instructions on How to Make Scrunchies Without Sewing Machine
Step 1: Cut the Fabric
Start by cutting a strip of fabric that is 3 to 4 inches wide and 12 to 16 inches long. This size should create scrunchies that are about 3 to 4 inches in diameter once they are assembled. It’s important to make sure that the fabric you use is not too thin as it could fray or tear easily. But if you’re using a thicker fabric, it could be hard to make small enough scrunchies.
Step 2: Fold the Fabric In Half
Fold the fabric in half lengthwise so that it’s folded along the long side and you have a rectangle shape with two equal lengths on either side. If you’re using a patterned fabric, make sure the pattern is facing outward. This will be the visible part of your scrunchie once it’s assembled.

It’s important to note that you don’t need to use a ruler or other measuring tool for this step—just eyeball it so that the length is even on both sides.
Step 3: Start Gathering Material
Start gathering material from one end of the folded fabric and continue gathering until you reach the other end. Make sure to pull tightly as you gather so that all of your scrunchie pieces look uniform when finished.
If you’re using a patterned fabric, it helps to pull the pattern along as you gather so that it appears on both sides of the scrunchie. But if you’re using a plain fabric, it doesn’t matter which end you start gathering from.
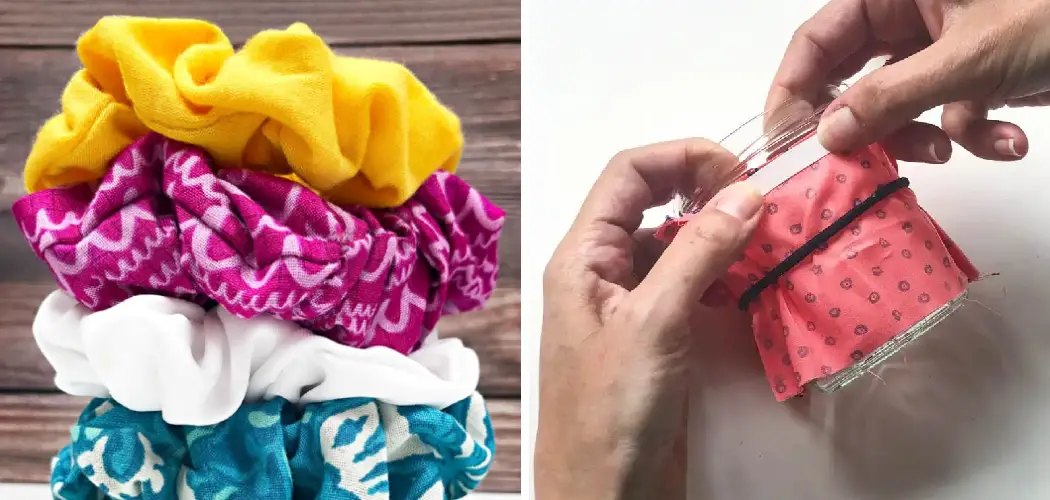
Step 4: Secure Gathered End With Elastic Band
Place an elastic band at one end of your gathered fabric and secure it tightly using a knot or wrapping it around a few times. This will help keep your scrunchie in place while you’re working on it. It is also the point where you can adjust the size of your scrunchie, depending on how much fabric you have gathered.
However, it is important to note that the elastic should fit snugly around your wrist—a scrunchie that’s too tight or too loose won’t work.
Step 5: Add Glue
Apply some hot glue or fabric glue along the seam where your elastic is secured. This will help keep it in place and give you a sturdy scrunchie when completed. It’s important to apply the glue evenly so that the scrunchie doesn’t become misshapen while drying.
But if you’re using a hot glue gun, be sure to use it sparingly as the excess can cause problems when drying. If you’re using fabric glue, it’s best to use as little as possible so that the scrunchie doesn’t become stiff and hard.

Step 6: Tie off the Loose End With an Elastic Band
Now tie off the other end of your gathered fabric with another elastic band so that it’s secure and won’t come undone easily. Make sure to pull tightly as you tie so that all of your pieces look uniform when finished. It also helps to tie the elastic bands in different directions so that they don’t slip off once you put your scrunchie on.
Step 7: Wrap Fabric Around the Elastic Band
Start wrapping the gathered fabric around the second elastic band, making sure to cover the entire circumference of the band completely. Secure the fabric together by tying a knot or wrapping it around a few times. This will help keep your scrunchie in place and give it an extra bit of stability. You can also use some glue here to make sure that the fabric stays in place.
Step 8: Cut Excess Fabric
Once your scrunchie is secure, trim off any excess fabric that may be sticking out from the sides and discard. If you’re using a patterned fabric, make sure to leave a little extra so that the pattern shows on both sides. That way, your scrunchie will look uniform and professional. Otherwise, you can leave the edges slightly uneven if you prefer a more rustic look.
Step 9: Secure with Glue
Apply some hot glue along all of the seams where you’ve tied off the elastic bands. This will help keep everything in place and give you a good, sturdy scrunchie when completed.
You can also use fabric glue if you prefer, just make sure to not use too much as it can make the scrunchie stiff. But if you’re using a hot glue gun, make sure to use it sparingly as too much can cause problems when drying.
Step 10: Trim Any Excess Threads
If there are any loose threads from your elastic bands or other areas, simply trim them away with scissors and discard them. It’s important to make sure that all of the edges are clean so that your scrunchie looks professional and can last a long time.
But if there are any frayed edges or loose threads, make sure to trim them away before wearing them. It’s best to do this step when your scrunchie is not being worn as it can be difficult to get a clean, even trim while it’s being worn.
Following these 10 easy steps on how to make scrunchies without sewing machine, you’ll be able to make beautiful DIY scrunchies without a sewing machine! So get your supplies ready and let’s get crafting! Good luck with your projects and enjoy the satisfaction of creating something handmade. Have fun!

Do You Need to Use Professionals?
No, you don’t need to use professionals. You can make scrunchies without a sewing machine using supplies from craft stores or online with relative ease. With the step-by-step instructions provided in this blog post, you’ll be able to create beautiful DIY scrunchies for yourself or as gifts. If you need help understanding any of the steps, look for online tutorials or ask an experienced crafter.
Frequently Asked Questions
Q: What Type of Fabric Should I Use for My Scrunchies?
A: You can use any type of fabric, though materials such as cotton, linen, or velvet will give you the best results.
Q: How Do I Make Sure My Scrunchies Stay Secure?
A: To make sure your scrunchies stay secure, use hot glue or fabric glue to secure all of the seams and knots you’ve made when assembling your scrunchie. This will ensure a strong bond between all of the pieces and will help them last longer.
Q: Can I Use Different Types of Elastic Bands?
A: Yes—you can use any type of elastic band that you like for making scrunchies! Depending on the look and feel that you want for your scrunchie, choose an elastic band that is either thin or thick.
Q: What Are Some Other Ideas for Making Scrunchies?
A: You can get creative with your scrunchie-making and create unique looks by pairing different fabrics, colors, and textures. You can also add ribbons, bows, or beads to the scrunchies for a fun touch.

Now that you know how to make scrunchies without sewing machine, there’s no limit to what types of stylish hair accessories you can create! So grab your supplies and get started on creating some beautiful DIY scrunchies today! Good luck crafting!
Conclusion
With the step-by-step instructions above, you now know how to make scrunchies without a sewing machine. Not only is it fun and creative, but it also offers a cost-effective way to customize your own accessories with unique fabrics. And if you’re looking for a similar type of project, why not check out “How To Make Pajama Shorts” next?
Challenges like these give us the opportunity to showcase our creativity and develop helpful skills that can be applied in other projects as well. So get those scissors ready and enjoy this process. There’s no limit to what you can create once you start crafting. Thanks for reading this article on how to make scrunchies without sewing machine.