
Relaxed Roman shades are a classic and stylish window treatment that adds an element of sophistication and coziness to any room. Their soft, gentle folds create a relaxed and inviting atmosphere, making them the perfect choice for both formal and casual spaces. If you’ve been searching for a DIY project to elevate your home decor, making your own relaxed Roman shades is a rewarding and cost-effective option.

In this step-by-step guide, we’ll walk you through the process of creating these beautiful window coverings, allowing you to customize them to match your style and complement your interior design. Embrace your creativity, and learn how to make relaxed Roman shades that will add a touch of timeless elegance to your windows while providing functionality and privacy to your living spaces.
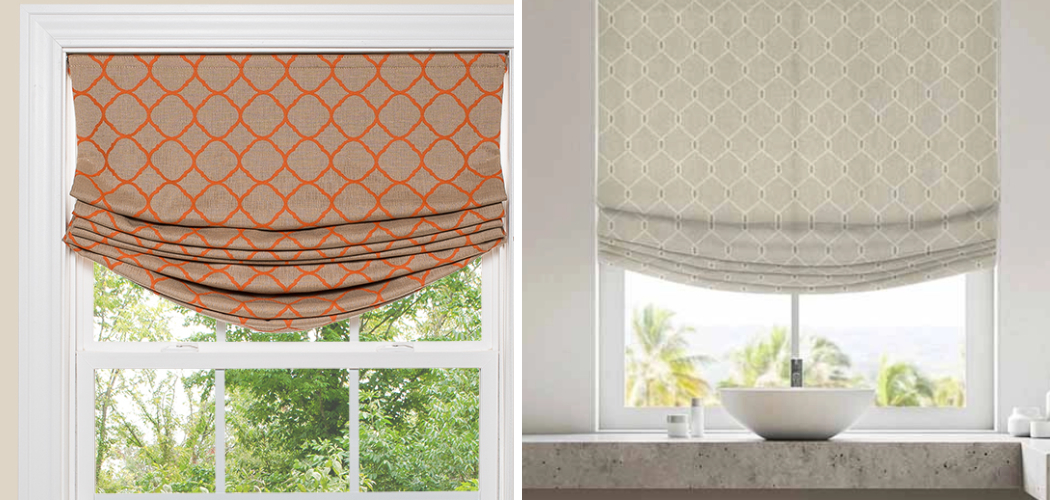
Introduction to Relaxed Roman Shades
Relaxed Roman shades are a great way to add texture, style and privacy to any room. They provide an easy solution for window treatments that can be tailored to match your existing decor. Plus, the installation is simple and you don’t need a lot of tools or materials! Here’s how to make relaxed Roman shades in just a few steps.
Benefits of Making Your Own Window Treatments
Making your own window treatments is a great way to personalize your space and save some money. DIYing your window treatments also gives you the opportunity to choose the exact fabric, color and style that suits your tastes. Relaxed Roman Shades are a simple project for anyone who is comfortable with basic sewing projects, and they look stunning when finished!
Materials You’ll Need
Before diving into the methods, gather the following materials to get started with your relaxed Roman shade project:
Fabric: Choose a fabric that complements your decor and fits the dimensions of your window. Lighter fabrics work well for a more ethereal and airy look, while heavier fabrics create a rich and luxurious feel.

Lining Fabric: Opt for lining fabric to add opacity, durability, and sun protection to your shades. Lining fabric also ensures that the shade hangs beautifully and maintains its shape over time.
Cord Lock System: Select a cord lock system that allows you to easily raise and lower the shades. Cord locks provide smooth and reliable operation for adjusting the height of the shade.
Cord Cleats: For securing the cords and keeping them out of reach from children and pets. Cord cleats ensure safety while maintaining a tidy appearance.
Wooden Dowels: Use wooden dowels to add structure and create the soft folds in the shade. The dowels provide stability and help the shade maintain its relaxed appearance.
Ring Tape or Rings with Eyelets: For attaching the cords to the shade. Ring tape or rings with eyelets create a smooth and friction-free surface for the cords to glide through.
Thread and Sewing Machine: To sew the fabric and lining together, creating the shade. A sewing machine ensures sturdy and even stitches for a professional finish.
Mounting Hardware: Choose the appropriate mounting hardware for your shade installation. The hardware should be strong enough to support the weight of the shade.
Scissors and Measuring Tape: Essential tools for cutting and measuring fabric accurately. Precise measurements are crucial to ensure the shade fits your window perfectly.

Iron and Ironing Board: For pressing the fabric and creating neat seams. Ironing helps to achieve a polished and professional look for your shade.
10 Methods How to Make Relaxed Roman Shades
Method 1: Measure and Cut the Fabric
Begin by measuring your window’s dimensions to determine the required fabric size. Add a few inches to the width and length measurements for seam allowances and hems.
Carefully mark and cut the main fabric and lining fabric to the desired size, ensuring they are equal in width and length. The lining fabric should be slightly smaller to create a border around the shade, providing a clean and finished appearance.
Method 2: Sew the Fabric and Lining Together
Place the main fabric and lining fabric together, right sides facing. Pin the edges and sew along the sides and bottom, leaving the top open. Turn the fabric right side out and press it flat with an iron. This step creates a neat and polished appearance for your relaxed Roman shade, ensuring it looks professionally made.
Method 3: Attach Wooden Dowels
To create the soft folds in the shade, insert wooden dowels into the lining side of the fabric. Space the dowels evenly along the length of the shade, ensuring they are securely positioned. Wooden dowels provide stability and structure to the shade, allowing the soft folds to form gracefully when the shade is raised.

Method 4: Add Ring Tape or Rings with Eyelets
Next, attach the ring tape or rings with eyelets to the lining side of the shade. The rings will be used to thread the cords that raise and lower the shade. Sew the ring tape or rings in a straight line along the width of the shade, evenly spacing them to ensure the cords move smoothly and effortlessly.
Method 5: Install the Cord Lock System
Mount the cord lock system at the desired height on the lining side of the shade. The cord lock system allows you to raise and lower the shade effortlessly to control light and privacy. Make sure to follow the manufacturer’s instructions for proper installation to ensure smooth and reliable operation.
Method 6: Thread the Cords
Thread the cords through the rings or eyelets on the shade, starting from the bottom and working your way up. Attach the cords to the cord lock system, making sure they are taut and secure. Thread the cords through the cord cleats to keep them out of reach from children and pets. The cord cleats not only add a neat and tidy appearance but also ensure safety in your home.
Method 7: Create the Soft Folds
Gently pull the cords to raise the shade and create the soft folds. Adjust the tension of the cords to achieve the desired appearance of the relaxed Roman shade. The soft folds will give your shade a casual and inviting look, adding a touch of elegance to your windows.
Method 8: Hem the Bottom
Fold and hem the bottom edge of the shade to create a clean and finished look. Use a sewing machine or hand-sew the hem, ensuring it is secure and neatly done. Hemming the bottom also adds weight to the shade, allowing it to hang beautifully and maintain its relaxed appearance.
Method 9: Mount the Shade
Attach the mounting hardware to the top of the shade. Depending on your preference, you can mount the shade inside the window frame for a more streamlined look or on the outside for a statement-making effect. Follow the manufacturer’s instructions for proper installation to ensure the shade is level and securely attached.

Method 10: Enjoy Your Relaxed Roman Shade
Congratulations, you’ve successfully made your own relaxed Roman shade! Now, sit back and enjoy the beautiful transformation it brings to your window and living space. Adjust the cords to raise and lower the shade as needed for privacy and light control.
Your handmade relaxed Roman shade will be a charming and functional addition to your home, providing an elegant and cozy atmosphere for years to come.
Things to Consider When Making Relaxed Roman Shades
Before you start on your relaxed Roman shade project, there are a few things to consider.
The first thing is the fabric. You’ll want to pick a lightweight linen or cotton fabric for your shades. It should be a light enough weight that it hangs gracefully but still thick enough that there’s enough material to create nice, full folds. If possible, buy a bit extra in case of any errors.
Next, you’ll want to make sure your measurements are correct. You’ll need enough fabric for the width of the window plus a few inches and also enough lengthwise so that there’s plenty of material when it’s folded up.
Another important factor is how much light comes through. If you want privacy, choose a fabric that’s not too sheer. If you like more light to come in, then pick something lighter.
Finally, consider the hardware you’ll need to hang your shades. You’ll need either rings or tabs for the top of the shade and a continuous cord loop system or decorative hardware for the bottom. Make sure all of your materials are compatible and that you have the right tools to install them.
Conclusion
Decorating your home with relaxed Roman shades is an affordable and easy way to give any room a more inviting atmosphere. By following this guide, you should have no problem winding up with a window covering that looks like it was professionally crafted but at a fraction of the cost. As always, have fun with it and explore colors and textures that complement your existing decor.
Be sure to take that extra step and line the shade to create an even more beautiful look. Don’t forget to post pictures of your finished product in the comments below so we can all see what you’ve done! Thanks for reading, and we hope this has given you some inspiration on how to make relaxed roman shades!
You Can Check It Out to Sew a Lining Into a Crochet Bag