
Are you looking for an exciting way to add a unique touch to your crafts? Look no further than polymer clay transfer paper! With the help of this incredibly versatile and easy-to-use material, you’ll be able to take text or artistic designs and easily apply them to any surface.

Whether it’s clothes, accessories, or even entire 3D objects —the possibilities are endless with this incredible crafting technique. In just a few steps, you can learn how to make polymer clay transfer paper. Read on for instructions on how to create one-of-a-kind works of art with custom images that will last forever.
Necessary Items
To get started on your polymer clay transfer paper project, here are the materials you will need:
- Polymer Clay: Choose your preferred brand and colors. We recommend using a mix of white and translucent clay to allow for more variety in color options.
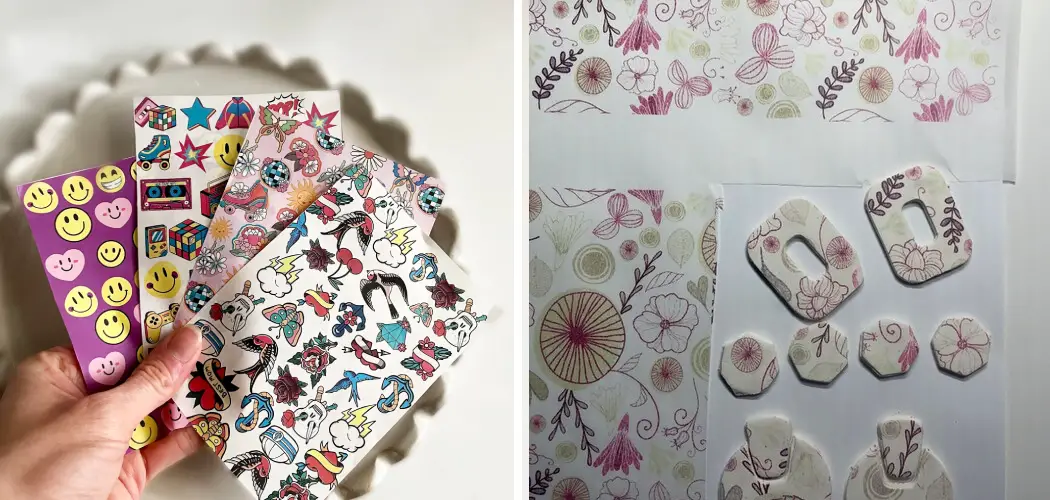
- Image or Text Transfers: You can either print out your desired images onto regular printer paper or use pre-made transfer sheets specifically for polymer clay. It’s important to note that if you print your images, reverse them before printing to ensure they come out correctly on the final product.
- Roller or Pasta Machine: This will help you evenly roll out your clay to the desired thickness.
- Baking Tray and Parchment Paper: To bake your creations in the oven without them sticking to the surface.
- Oven: To bake your creations at the recommended temperature and time indicated on your chosen polymer clay brand.
- Acrylic Roller or Brayer: To smooth out any air bubbles and ensure proper adhesion of the transfer paper onto the clay.
- Cutting Tools: A sharp knife, scissors, or a clay cutter to cut around your design.
- Optional: Soft-bristled brush, water, and a small dish for wetting the transfer paper. This can help with any air bubbles that may appear during application.
10 Steps on How to Make Polymer Clay Transfer Paper
Step 1: Condition Your Clay

Before beginning your project, it’s essential to thoroughly condition your clay by kneading it until it’s soft and pliable. This will make it easier to work with and prevent cracks or breaks in the final product.
Step 2: Roll Out Your Clay
Using a pasta machine or roller, roll out your chosen polymer clay color into a thin sheet. The thickness can vary, but we recommend around 1/8 inch for best results. Make sure the sheet is large enough to fit your desired design.
Step 3: Prepare Your Image or Text Transfers
If using pre-made transfer sheets, simply cut out your desired design. If you are printing your images, remember to reverse them before printing and then cut them out. You can also use a cutting machine like a Cricut to cut out intricate designs.
Step 4: Wet the Transfer Paper (Optional)

If you use regular printer paper for your transfers, lightly brush or spray water onto the back of the design. This will help prevent air bubbles from forming during application.
Step 5: Place Your Design onto the Clay
Carefully place your transfer paper on top of your rolled-out clay, with the image facing down onto the clay. Use your acrylic roller or brayer to smooth out air bubbles and ensure proper adhesion.
Step 6: Bake Your Creation
Place your design onto a baking tray lined with parchment paper and bake according to the recommended time and temperature on your chosen polymer clay brand.
Step 7: Let it Cool
Once baked, remove your creation from the oven and let it cool before handling. This will prevent any warping or damage to the design.
Step 8: Remove the Transfer Paper
Gently peel off the transfer paper from your clay, revealing your beautifully transferred design. If any areas do not fully communicate, you can reapply the design and bake again for a few minutes.
Step 9: Cut Out Your Design
Using a sharp knife or clay cutter, carefully cut around your transferred design to create your desired shape. You can also leave it as a flat piece for other projects.
Step 10: Enjoy Your Creation!
Your polymer clay transfer paper creation is complete and ready to be used! Attach it to jewelry, home decor, or other surfaces for a unique and personalized touch. Get creative with different designs, colors, and shapes for endless possibilities.
Congratulations, you have now learned how to make polymer clay transfer paper! This fun and easy craft technique can add a special touch to your projects. Experiment with different designs and color combinations to create truly unique creations. Enjoy the endless possibilities with polymer clay transfer paper! Happy crafting! So go ahead and try it out for yourself, and see what notable works of art you can create with polymer clay transfer paper. And remember to have fun and let your creativity run wild!
8 Care Tips for Your Polymer Clay Transfer Paper Creations
1. Avoid Excessive Heat or Direct Sunlight
Polymer clay can become soft or even melt in high temperatures, so keep your creations away from direct sunlight or other heat sources. This will help maintain the shape and integrity of your transfers.
2. Handle with Care

Although polymer clay is durable, it can still break or crack if mishandled. Be gentle when handling your creations to avoid any damage.
3. Avoid Contact with Water
Polymer clay is not waterproof, so it’s best to avoid getting your transfers wet. This can cause the design to smudge or fade.
4. Store in a Cool and Dry Place
To prevent any accidental damage or changes to your creations, it’s essential to store them in a cool and dry place. This will help maintain their shape and prevent any warping.
5. Use a Soft Cloth to Clean

If your transfers get dusty or dirty, simply use a soft cloth to wipe them clean gently. Avoid using harsh chemicals or cleaners as they can damage the design.
6. Keep Away from Children and Pets
While polymer clay is non-toxic, it’s best to keep your creations away from young children and pets. They may mistake it for food or toys, which can be harmful.
7. Handle with Clean Hands
Before handling your transfers, make sure your hands are clean and free of any lotions or oils. This will help prevent any smudges or fingerprints on the clay.
8. Display Your Creations with Care
If you plan on displaying your polymer clay transfer paper creations, use a sturdy and stable surface. Avoid placing them near the edge of shelves or tables to prevent accidental falls or damage. Overall, taking proper care of your transfers will ensure they last for years to come and continue to impress others with their unique and beautiful designs.
Polymer clay transfer paper is a versatile and fun crafting technique that allows you to create unique and personalized designs on your polymer clay creations. With just a few simple steps, you can make beautiful transfers that add a special touch to your projects. And by following our care tips, you can ensure your creations last years.
Frequently Asked Questions
Can I Use Regular Printer Paper for My Transfers?
Yes, you can use regular printer paper for your transfers. Just be sure to lightly wet the back of the design before placing it onto the clay to prevent air bubbles.
Can I Cut Out My Transfers Before Baking?
Yes, you can cut out your transfers before baking for a more precise shape. Just be sure to use sharp scissors or a craft knife to prevent any damage to the design.
How Long Should I Bake My Creations for?
The recommended time and temperature for baking polymer clay varies by brand. Check the instructions on your chosen brand for the best results. So go ahead and have fun experimenting with polymer clay transfer paper, and don’t be afraid to let your creativity shine!
Conclusion
In this tutorial, we have covered the step-by-step process of how to make polymer clay transfer paper, from choosing the right design and printing it onto transfer paper to correctly applying it to your polymer clay creations and taking care of them for long-lasting results. Now, you can create unique and personalized designs on your projects with ease! So gather your materials and get ready to make beautiful and one-of-a-kind polymer clay transfer paper creations.
Remember always to have fun and let your creativity guide you in all of your crafting endeavors. So go ahead and try out this technique for yourself, and see what notable works of art you can create with just a few simple steps. And don’t forget to share your creations with us – we would love to see them!
Happy crafting! So what are you waiting for? Get started on your polymer clay transfer paper journey today, and let the creativity flow. The possibilities are endless with this versatile and fun technique. Have fun, stay creative, and happy crafting! Finally, don’t forget to share your creations with us – we would love to see them!