
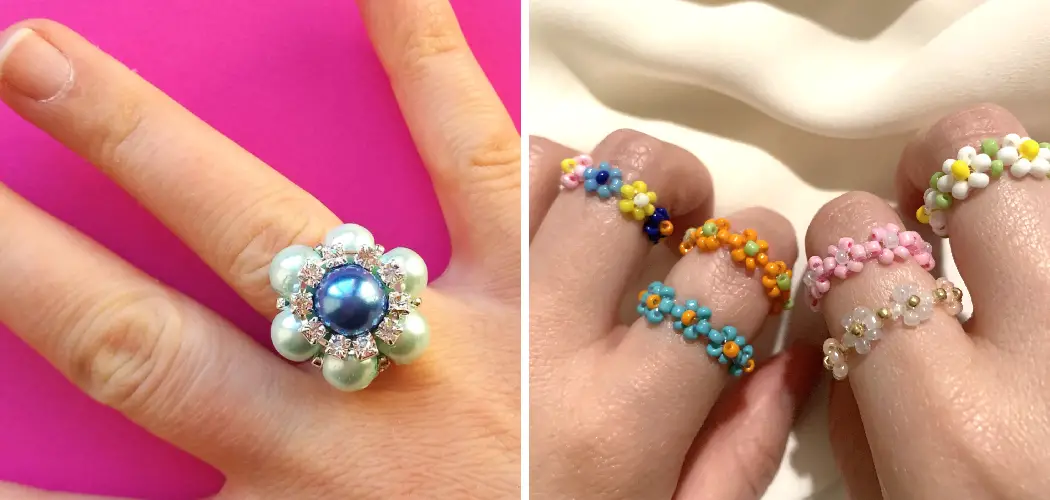
If you’re looking for a creative new project, why not try making a beaded flower ring? Making beaded flower rings is a great way to accessorize any jewelry piece. Whether you’re looking for something eye-catching, cheerful, and oh-so-stylish or just looking to add some sparkle to your everyday look, an easy DIY beaded flower ring might just do the trick.
These simple rings are sure to add some wonderful color and sparkle to your wardrobe or even as a way to dress up other accessories.

Beading is an incredibly versatile craft that allows anybody with patience and some basic supplies the ability to make beautiful pieces of jewelry. This particular project requires just a few materials and can easily be done within an afternoon. With just some simple supplies and steps — you’ll have gorgeous handmade creations in no time.
In this blog post, we will show you how to make a beaded flower ring using beads, thread, glue, and wire cutters. Grab your materials, and let’s get started on mastering a timeless craft that even novice crafters can feel proud about creating!
Required Materials
- Seed Beads in your desired colors
- Stringing Material such as Nylon Thread, Soft Flex Wire, or Beading Wire
- Glue (optional)
- Jewelry Pliers or Wire Cutters
10 Instructions on How to Make a Beaded Flower Ring
1. String the Beads
Start by stringing the beads onto the thread/wire that you have chosen. You can use the same color or different colors, depending on the look you’re going for. The number of beads you use will depend on the size of your ring and how full you want it to be. Try to make sure all of the beads are facing in one direction, as this will give a more polished appearance.

2. Create the Ring Shape
Once all of the beads have been strung, create a ring shape with your thread/wire. Securely tie off both ends together in an overhand knot and make sure it is tight enough so that the ring won’t unravel but not too tight that it will be difficult to slide onto your finger.
3. Secure and Cut the Thread/Wire
Once you have a secure knot, use glue to secure it in place if desired (this is optional). Then, use wire cutters or jewelry pliers to trim both ends of the thread/wire so they are level with each other and the knot is no longer visible (or use glue to secure the knot and hide it from view).
4. Wrap the Ring
Wrap the ring with more thread/wire, creating a beaded border around the entire circumference of the ring. This will help to reinforce it as well as create an even more attractive design. Securely tie off both ends in an overhand knot and glue if desired.
5. Cut Excess Thread/Wire
Once the border is in place, use wire cutters or jewelry pliers to trim any excess thread/wire so that it is level with the ring’s circumference. Again, you can also hide the knot using glue.
6. Create the Flower Center
Now that your ring is complete, it’s time to create the flower center. Start by using a few seed beads to make an outer circle around the middle of the ring. Then, string additional beads onto the thread/wire to fill in the gaps between each bead on the outer circle. Securely tie off both ends at the back of the ring in an overhand knot and glue if desired.
7. Create Petals
To create petals, use additional seed beads to make a circle around the flower center. Once you have your outer circle complete, string more beads onto the thread/wire to fill in any gaps between each bead on the outer circle. Securely tie off both ends at the back of the ring in an overhand knot and glue if desired.
8. Complete the Petals
Now it’s time to complete your petals. To do this, start by stringing beads onto the thread/wire in a spiral pattern around each petal of the flower. Make sure you tightly wrap the thread/wire around each petal for a more secure design. When finished, securely tie off both ends at the back of the ring in an overhand knot and glue if desired.

9. Cut Excess Thread/Wire
Once all of the petals are complete, use wire cutters or jewelry pliers to trim any excess thread/wire so that it is level with the ring’s circumference. Again, you can also hide the knot using glue.
10. Your Beaded Flower Ring is Complete!
Congratulations! You’ve just completed your beaded flower ring and are now a master crafter of this timeless and beautiful jewelry piece. Wear it proudly and show off your amazing craftsmanship to all of your friends and family!
With these easy steps, you should have no trouble making a beaded flower ring that looks just as gorgeous as any store-bought version. Enjoy the creative process of customizing your ring’s design to make it truly unique and perfect for you.
8 Tips to Make the Ring Look Unique and Special
1. Choose a variety of colors that will look striking together. Try using different shades of the same color for contrast or to create an ombre effect on your ring. Different colors will also add depth and texture to your design.
2. Choose beads in different shapes, sizes, and textures for a more interesting look. Mix round beads with faceted ones to create eye-catching designs. Mix and match different sizes to add dimension and texture to your ring.
3. Shape your beading wire into a circle or use an adjustable ring base for easier assembly. You can also find ready-made rings with a flat center, allowing you to easily apply beading designs onto the surface.
4. Secure each bead in place using jewelry pliers before adding the next one. This will help prevent beads from shifting out of place when the ring is worn. Securing each bead will also keep it from becoming loose over time.
5. Think about the size of your ring when planning out your design. Too many beads can make the ring too bulky, so use fewer beads for a sleeker look or create patterns with larger elements instead.
6. Create patterns and designs that are unique to you. Incorporate elements such as stars, hearts, and geometric shapes for a more personalized touch. Creating patterns can also add texture and interest to your ring.

7. Use jewelry findings or charms to give your ring an interesting focal point. Charms in different shapes, sizes, and colors will look great when incorporated into the design of the ring. Remember to secure the charms tightly in place with jewelry pliers.
8. Finish off your ring with a layer of clear nail polish or jewelry sealant. This will help protect the beads and wire from wear and tear, ensuring that your ring stays looking beautiful for longer.
With these tips, you can create a stunning beaded flower ring that looks one of a kind. Have fun and get creative with your design!
Frequently Asked Questions
What Types of Beads Are Best for Rings?
When making a beaded flower ring, it’s important to choose beads that are small and lightweight. Seed beads and perforated metal beads work well for this purpose. If you want the flower design to have more of an effect, larger glass or pearl beads can also be used. Also, keep in mind the size of the ring you plan to make – bigger beads may not fit around a smaller ring.
How Many Beads Are Needed for a Ring?
The number of beads needed will depend on how large or small your flower design is and how many petals you’d like it to have. Generally, you’ll need at least 10-15 beads per petal. You should also make sure to have enough extra beads to finish the ring off nicely.
How Do I Determine the Size of the Ring?
The size of the ring should be determined by measuring around your finger. To do this, wrap a piece of string or ribbon around your finger and mark the length. You can also use a ring sizer to help you find out your exact size. Once you have determined the circumference of your finger, you’ll need to adjust the pattern size of the flower accordingly.

Conclusion
Crafting a beaded flower ring can be both a fulfilling and rewarding experience. It may seem intimidating at first, but following the steps on how to make a beaded flower ring outlined above will help guide you through the process of creating your own beautiful piece of jewelry. Not only is it fun to create, but you can use different colors to express your personality and creativity.
This type of craft is also a great way to bond with friends or family or even as a thoughtful DIY gift. So why not put those extra beads to good use and make yourself something beautiful? You’ll be sure to have heads turning every time you show off your handmade beaded flower ring!