
If you’re looking for something fun and unique to do this winter, why not create some beautiful peppermint plates? This easy craft project doesn’t require a lot of supplies – just a few basic items from the dollar store and some creativity. With minimal time and effort involved, these charming holiday decorations will certainly be an eye-catching addition to your home!
Get ready to customize each plate with different shades of paint and festive decorations like glitter glue, buttons, or fabric scraps. Plus learn how you can even add scents if desired! Read on for all the details on how to make peppermint plates this holiday season.

Tools and Materials You Will Need to Make Peppermint Plates
- Plastic plates
- Acrylic craft paint in various colors
- Paint brushes
- Glitter glue (optional)
- Fabric scraps (optional)
- Buttons (optional)
- Essential oils like peppermint, cinnamon, or vanilla (optional)
Step-by-Step Guidelines on How to Make Peppermint Plates
Step 1: Begin by Prepping Your Plate
Start by cleaning your plate with a damp cloth so it’s free of dirt and debris. This step is important to ensure the paint adheres properly. Preparing the plate also allows you to add scents if desired. Simply add a few drops of essential oils to the damp cloth and wipe down the plate before painting.
Step 2: Apply Paint to Your Plate
Once your plate is prepped, it’s time to get creative with paint! Use different colors and techniques such as dry brushing, sponging, or stencils to create your desired design. You may also opt to use glitter glue or buttons for an extra touch of sparkle and texture. You can even add fabric scraps for extra texture and color.

Step 3: Allow the Plate to Dry
When you’re finished painting, allow your plate to dry completely before handling it. This may take several hours, so plan accordingly. If desired, use a hairdryer to speed up the drying process. This will help create a longer-lasting and more durable plate. Keep in mind, you may need to apply a sealant once the plate is dry if you plan on using it as more than just a decoration.
Step 4: Enjoy Your Creation!
Once your peppermint plates are dry, you can display them in your home as decorative holiday decorations! They’re sure to make a festive statement this season. Plus, since they were created with non-toxic paint, they’re safe for your family and guests. Enjoy!
Congratulations, you’ve now made your one-of-a-kind peppermint plates! This easy craft project is great for getting creative this winter. And as always, don’t be afraid to experiment with different colors and decorations – the possibilities are endless!
With just a few supplies from the dollar store, you can create beautiful and unique holiday decorations that you’ll be proud to display. Have fun!
Additional Tips and Tricks to Make Peppermint Plates
1. If you want a more intense peppermint flavor, add a few drops of peppermint extract to the chocolate.

2. For an even more festive presentation, sprinkle crushed candy canes on top of the melted chocolate before it sets.
3. If you are making your plates in the oven, be sure to watch them closely as they will burn quickly.
4. If you are using wax paper, be sure to use a non-stick spray so that the plates won’t stick.
If you want to add more decorations, try adding sprinkles or other festive candies before the chocolate sets.
5. For added stability and presentation, serve your peppermint plates on a plate or cutting board with a festive cloth underneath.
6. If you plan on storing the peppermint plates, make sure to wrap them tightly in plastic wrap or an airtight container so they don’t stick together.
7. If you are giving your peppermint plates as a gift, try packaging them in clear bags with colorful ribbons for a fun and festive look.

8. For an extra special touch, try adding a personalized message on the bottom of each plate.
9. For an even more festive presentation, try using different colored chocolates for your peppermint plates. Red and green are traditional holiday colors, but you can also use dark or white chocolate depending on your preference.
10. For a unique look, you can cut the plates into different shapes like stars or snowflakes.
11. If you want to get creative, try adding different toppings to the peppermint plates like nuts, sprinkles, coconut flakes, crushed cookies, or mini marshmallows. Let your imagination run wild and have fun with it!
12. Finally, don’t forget that presentation is key when it comes to making peppermint plates. Be sure to arrange your plates on a festive holiday platter for maximum impact!
Following these tips and tricks will help make your peppermint plates look and taste amazing. Whether you’re giving them out as gifts or simply wanting to impress your family and friends, these festive treats are sure to be a hit!
Precautions Need to Follow for Making Peppermint Plates
- Make sure to sterilize all of your cooking utensils before starting the recipe.
- Work in a clean and dry environment, making sure not to introduce any contaminants into the peppermint mixture.
- Place parchment paper on the baking sheet when pouring out the mixture. This will ensure that there are no sticking issues when you go to remove the plates from the sheets.
- Be sure to use a food thermometer when cooking the peppermint mixture, and do not exceed the recommended temperature for it.
- After pouring out the peppermint mixture, make sure to spread it evenly and allow enough space between each plate so that they can cool properly without sticking together.
- Allow the plates to cool completely before attempting to move or remove them from the parchment paper.
- Once the plates are completely cooled, they can be served with a variety of toppings and dips such as hot fudge, whipped cream, or ice cream. They also make great holiday gifts! Enjoy!

Following these precautions will ensure that you have a safe and successful experience with making peppermint plates. With the right ingredients and tools, you can make delicious plates that everyone is sure to enjoy. So get in the kitchen and get creative! Happy baking!
Frequently Asked Questions
What Type of Peppermint Do I Need to Make These Plates?
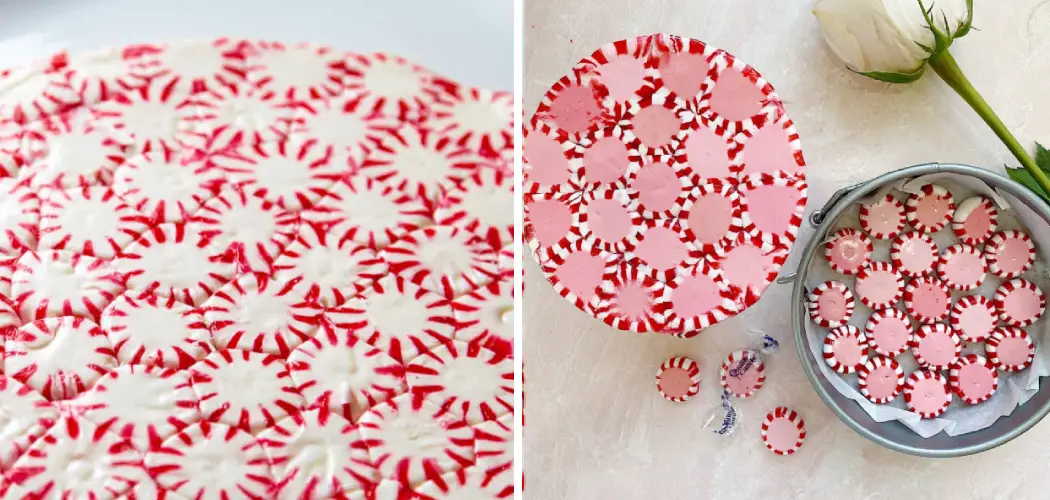
You can use any type of peppermint for this recipe, but the most common variety is candy canes. The key thing to remember is that you’ll need enough pieces to cover the entire plate. For a 9-inch round plate, about 12-20 pieces should be sufficient.
Is There a Substitute for Peppermint in This Recipe?
Yes! If you don’t have access to peppermint, you can use other hard candies such as Jolly Ranchers or Life Savers. You can also try using gummy worms, licorice bites, or peanut butter cups for a different flavor. Just make sure that your candy is cut into small pieces to fit the plate.
What Else Can I Add To The Plate Besides Peppermint?
The possibilities are endless! You can add sprinkles, edible glitter, nuts, chocolate chips, crushed pretzels, or crushed Oreos for extra crunch. If you’re feeling adventurous, try adding a layer of melted white chocolate or peanut butter before adding the peppermints. This will add an extra layer of flavor and texture to your plates.
Are These Plates Suitable For Parties?
Absolutely! They make excellent decorations for any event, including birthdays, holidays, weddings, or other special occasions. The peppermint plates can also be used as edible favors for guests; just make sure to wrap them up securely so that the peppermints don’t melt or become soggy.
How Do I Store The Plates?
The best way to store your peppermint plates is in an airtight container, away from heat sources such as ovens and hot water bottles. This will help to keep the candy from melting and becoming sticky.
You can also wrap them in parchment paper for extra protection against moisture. If you plan on serving your plates at an event, make sure to assemble them shortly before they will be served so that they stay fresh and crunchy.
Conclusion
With the right supplies and a few steps, you can now create your unique peppermint plates. Whether you want to give them out as gifts or keep them for yourself, these homemade dishes are sure to bring cheer to your holiday season.
Not only can this project be enjoyable to make with family and friends, but it also allows you to make something special that can be treasured for years. What’s more, it’s budget-friendly and doesn’t take much time.
So why not try making your peppermint plates today? For helpful tips and tricks on how to assemble decorations like this one, be sure to check out our other posts: How To Make Peppermint Plates! Who knows—with some hard work and dedication, these plates could become the next must-haves of the festive season.