
Are you looking for a fun and easy craft project with your kids? Or perhaps you want to add some tropical vibes to your home decor? Look no further because making paper palm leaves is a simple and enjoyable activity that can serve both purposes.
Creating paper palm leaves is a crafty, creative way to bring the beauty of tropical foliage into your home easily. You don’t have to sign up for an expensive holiday just to witness these lovely palms in person: you can make these leafy artworks in the comfort of your home with items from around the house.

In this blog post, I will provide step-by-step instructions on how to make paper palm leaves! With this simple guide, you can decorate your space — no matter which season it is — with fun and bright Southeast Asian flair all year round.
What Will You Need?
Before we get started, gather the following materials:
- Green construction paper or cardstock
- Scissors
- Pencil
- Glue or tape
- Optional: markers or paint to add color and details to your leaves.
Once you have everything you need, let’s dive into the instructions!
10 Easy Steps on How to Make Paper Palm Leaves
Step 1: Draw Your Leaf Template
Start by drawing a leaf shape on your green construction paper or cardstock. You can make it as large or small as you’d like, depending on how big you want your palm leaves to be. If you need inspiration, try searching for images of real palm leaves and use them as a reference.
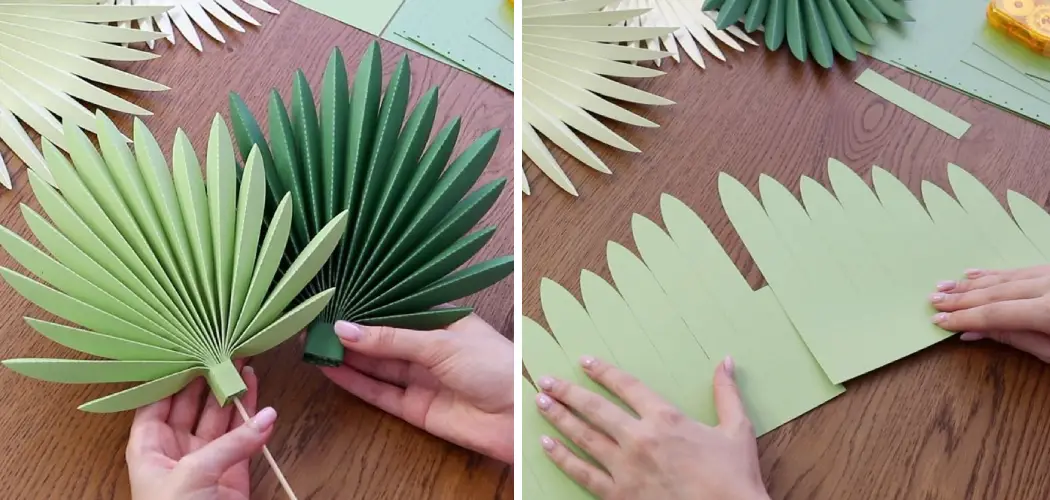
Step 2: Cut Out Your Leaf Template
Once you’ve drawn your leaf shape, use your scissors to cut it out carefully. Be sure to follow the outline to maintain the leaf’s detailed shape. This will be your template for making additional leaves if necessary, and forms the base structure for your paper palm leaf. Remember, don’t rush this step, as a smoothened cutting will result in a more realistic-looking leaf.
Step 3: Create the Leaf Veins
To give your leaf a realistic look, we need to add veins. Take your pencil and draw a straight line from the base to the tip of your leaf. This represents the central vein. Next, draw smaller, slightly curved lines branching out from the central line to the edges of the leaf.
These represent the side veins. Remember, the lines don’t have to be perfectly symmetrical or straight a bit of irregularity will make your leaf look more natural.

Step 4: Enhance the Leaf Veins
Now that you’ve drawn the veins, it’s time to make them stand out. Fold your leaf in half along the central vein. Crease it well so the fold stands out. Next, gently fold along each side vein in an alternate pattern – one folded inwards, the next folded outwards. This gives your leaf a more three-dimensional look.
Step 5: Add Details to Your Leaf
Consider adding color details if you want your paper palm leaves to look even more authentic. Use markers or paint to shade the edges of your leaf and the areas around the veins.
You can utilize shades of green or even add a hint of yellow or brown to mimic a natural, slightly aged look. Remember, the beauty of this craft lies in your ability to customize each leaf to your preference.
Step 6: Prepare the Leaf Stem
To create a stem for your leaf, cut a strip of the same green construction paper or cardstock you used. The strip should be about an inch wide and long enough to serve as a sturdy stem. Fold this strip in half lengthwise, giving it a slight crease in the middle to provide additional strength and stiffness.
Step 7: Attach the Stem to the Leaf
Apply glue along the creased side of the stem and attach it to the bottom of your leaf, aligning it with the central vein. Ensure to press firmly and let the glue dry completely. If you prefer, you can use tape for a quicker option.
Step 8: Reinforce the Stem
To ensure that your stem stays in place and can support the weight of the leaf, you should reinforce it. You can do this by applying an additional layer of glue around the base where the stem and leaf meet or by adding a strip of tape around the same area. Let it dry completely before moving on to the next step.
Step 9: Create More Leaves
Now that you’ve mastered making a paper palm leaf, it’s time to create more! Repeat the steps above until you have your desired number of leaves. Remember, varying the size and color details of your leaves will add to the realistic and vibrant look of your paper palm leaf display.

Step 10: Assemble Your Paper Palm Leaves
Finally, it’s time to assemble your paper palm leaves. Gather the stems in a bouquet and secure them with a ribbon or tape. Alternatively, you can attach them to a real or artificial branch to mimic a mini palm tree. However you choose to display them, your paper palm leaves will surely add a touch of tropical charm to your home!
Congratulations on crafting your paper palm leaves! These vibrant, hand-crafted decorations can brighten up any room and give a feel of the tropics all year round.
5 Additional Tips and Tricks
Tip 1. Experiment with Different Paper Types:
While we used green construction paper or cardstock in this guide, don’t hesitate to experiment with different types of paper. Tissue, crepe, and even patterned scrapbook paper can all work wonderfully in creating unique and colorful palm leaves.
Tip 2. Utilize Real Leaves as Reference:
If you have access to real palm leaves, use them as a reference for your craft. Notice the leaves’ shape, color variation, and vein patterns to make your paper versions look more natural.
Tip 3. Add Texture with Crumpled Paper:
For an extra touch of texture, try crumpling your paper leaves before cutting them out. This will give them a more realistic and natural-looking texture.
Tip 4. Play with Sizes:
Palm trees have a variety of leaf shapes and sizes, so don’t be afraid to experiment with different sizes when creating your paper palm leaves. This will add to the overall visual appeal of your display.
Tip 5. Get Creative with Display Ideas:
Besides using a branch or stem, you can also attach your paper palm leaves to a wreath, frame them as wall art, or use them as place cards for a tropical-themed party. The possibilities are endless, so get creative and have fun with it!

With these additional tips and tricks, you can create a unique and personalized paper palm leaf display that will add a touch of the tropics to any space.
5 Things You Should Avoid
1. Using Thin Paper:
While it can be tempting to use thin or flimsy paper because it’s more pliable, it may not hold up well over time. Always opt for sturdier paper like construction or cardstock to ensure your palm leaves don’t tear or lose shape.
2. Making All Leaves the Same Size:
If all your leaves are the same size, it won’t look as natural. Try to vary the sizes of your paper palm leaves for a more authentic look.
3. Rushing the Drying Process:
While it might be tempting to rush the drying process, it can cause your leaves to warp or the colors to bleed. Always allow adequate time for your leaves to dry completely.
4. Neglecting the Veins:
The veins are what give the leaf its realistic look. Don’t overlook this detail or rush through it. Take your time to make the veins look as realistic as possible.
5. Ignoring the Stem:
The stem holds your leaf together and allows it to stand upright. Don’t forget to reinforce it to ensure it can support the weight of the leaf. A weak stem can cause your leaf to flop or fall apart.
Avoiding these common mistakes will help you create beautiful and long-lasting paper palm leaves you can be proud of.

Conclusion
Crafting your paper palm leaves is a fantastic way to add a creative touch to any event, from baby showers to weddings. It’s also an economical and sustainable decoration, requiring fewer resources and waste than plastic fronds.
As you can see, this fun craft is quite simple at home, so go ahead and try it! You don’t need much materials or skills, making it perfect even for novice DIY-ers. The design possibilities are endless; use your creativity when creating these tropical roles of art.
With some patience and dedication, you’ll see how quickly you can make these enjoyable decorations that will transport you to a Caribbean paradise! In just a few hours spent snipping and curling, your house will be full of ambiance and personality — the joys of handmade decor! Remember: practice makes perfect, so keep those scissors handy and start crafting away!
Hopefully, this guide on how to make paper palm leaves has provided you with all the necessary tools to make your own paper palm leaves. Remember to have fun and let your creativity flow as you bring a little piece of paradise into your home!