
Are you looking for a fun and creative way to light up your home this summer? What better way than by making paper fireflies? This craft is the perfect addition to any centerpiece or wall hang, creating an enchanting atmosphere with its twinkling lights. Not only will these decorations add sparkle and charm to your decor, but they’re also easy to make with common household items!

In this blog post, we’ll provide all you need to know about how to make paper fireflies – from gathering the materials necessary and deciding on a shape design to cutting out the luminescent forms and adding them together into glowing creations. Read on for step-by-step instructions on creating delightful decorative accents that will truly brighten your space.
What Will You Need?
To begin, you’ll need to gather the following supplies and materials:
- Paper in a variety of colors, shapes, and sizes (preferably thin sheets, such as construction or origami paper)
- Scissors or other craft cutting tools
- Glue or tape
- LED lights (optional)
Once you’ve collected all these items, you’re ready to get started on your paper fireflies!
10 Easy Steps on How to Make Paper Fireflies
Step 1. Deciding on Your Design and Shape
There are many creative ways to design your paper fireflies. Consider how you might want them to look when deciding on how to cut out your shapes. Common forms include butterflies, moths, stars, flowers, dragonflies – really any shape that inspires you to light up your space in a fun, whimsical way.
Step 2. Choosing the Colors
Once you’ve chosen a shape for your paper fireflies, think about how many colors you’ll want to use. For example, if you’re making butterflies, try mixing different shades of blue and green together – this will create a beautiful display of lively colors that will really stand out against your decor. You may also choose to go with monochromatic designs by using only one color per fluttering form.
Step 3. Cutting Out Your Shapes
Next, begin cutting out pieces of paper in your chosen shapes and sizes. Try various cutting techniques, such as folding or twisting the paper before cutting, to create unique edges and interesting textures. Be careful to ensure that your cuts are precise and even, as this will help your paper fireflies to stand out once they’re assembled.
Step 4. Assembling Your Fireflies
Once you’ve created all your shapes, it’s time to assemble them into paper fireflies! Depending on how many pieces you have and what kind of design you want to achieve, there are a variety of ways you can put these luminescent forms together. For example, if you have several small pieces of paper, try taping or gluing them together in a linear pattern for an elegant trail of fluttering lights. Or, for a more sculptural form, arrange smaller pieces into larger shapes such as spheres or cubes, that will make beautiful centerpieces or wall hangings.

Step 5. Adding LED Lights (Optional)
If you want your paper fireflies to shine and light up your space truly, consider adding small LED lights into the design. These can be placed in the center of larger paper forms or wrapped around the outside of smaller shapes to add a soft glow. Just be sure to keep your LED lights away from any open flames, as they may cause fires or burns if they come into contact with hot glue or other flammable substances.
Step 6. Hanging Your Paper Fireflies
Now that you’ve created your paper fireflies, how will you display them? Choose a spot in your home where these gorgeous decorations will shine and truly stand out. You might hang them from the ceiling, place them on tabletops or shelves, or simply hang a garland along a wall for an eye-catching accent. Either way, your paper fireflies will liven up any space and bring an air of whimsy and enchantment to your home.
Step 7. Enjoying Your Paper Fireflies
As you sit back and admire your beautiful paper fireflies, take a moment to appreciate how incredibly fun, easy, and unique they are. You can make these decorations any time you want for as little or as much money as you like – no matter how many pieces or how elaborate your design is, creating paper fireflies is always an enjoyable experience that’s sure to bring a smile to anyone who sees them in action.
Step 8. Repurposing Your Paper Fireflies
Once your fireflies have served their purpose, don’t throw them out! There are many fun ways to repurpose these paper decorations. You can use the leftover bits and pieces of your fluttering forms to make more fireflies or turn the whole thing into an art and craft project for kids (or yourself!).
Step 9. Inspiring Others
As you continue to enjoy how easy, fun, and beautiful it is to make paper fireflies, consider how you might inspire others to do the same. Talk about how you made yours, post a picture on social media with a caption about how much you love them, or even start a small online community where people can share their own paper firefly designs and creations. No matter how you do it, spreading the inspiration behind these amazing decorations will brighten up someone else’s day!
Step 10. Try Different Shapes, Sizes, and Colors
While paper fireflies are traditionally made with simple black or white pieces of paper, don’t be afraid to experiment with different colors, shapes, and sizes to create truly unique looks. Whether you stick with the classic design or try something new and unexpected, creating paper fireflies is a fun craft project that will always delight and amaze you. It will be a truly enchanting addition to any space!

By following these simple steps, you can easily learn how to make paper fireflies. Whether you want to create a trail of glowing lights or an artistic sculpture, this versatile craft project is fun and easy to do. So what are you waiting for? Start making your own beautiful paper fireflies today!
You Can Check It Out To Make a Flower Crown With Paper
5 Additional Tips and Tricks
- To make your paper fireflies truly glow, paint them with a thin layer of glow-in-the-dark paint.
- To give your paper fireflies a more authentic appearance, add small pieces of felt or other textured material to their bodies.
- If you want to hang your paper fireflies in a window or another dark place, try using string or a fishing line instead of twine. This will help keep them in place and prevent them from being blown away by the wind.
- Another fun way to decorate your paper fireflies is by drawing on them with markers or paints – this can create all sorts of interesting patterns and designs!
- Finally, if you’re making these paper fireflies for a party or special event, consider including them in a larger display or decoration. You can string them together, attach them to paper lanterns, or create other fun and festive displays!
Overall, if you want to make your own beautiful paper fireflies, there are many different ways to do so. Whether you’re looking for a simple craft project or something more elaborate, these tips and tricks will help ensure that your paper fireflies look amazing and truly glow!
You Can Check It Out To Glue Paper Without Wrinkles

5 Precautions You Can Take While Making Paper Fireflies
Here are a few tips to help ensure the safety of yourself and others while creating your own paper fireflies:
- Always wear protective gloves when handling craft supplies such as glue, scissors, and drafting tools. These materials can sometimes cause skin irritation or allergic reactions, so it’s important to take extra care when using them.
- Work in a well-ventilated area whenever possible to minimize exposure to fumes from certain craft supplies, such as paint or glue.
- Always keep small children and pets away from your crafting area, as these materials can sometimes be dangerous if ingested.
- If you’re working with fireflies or other insects for your paper firefly craft, make sure to properly quarantine them before using them in any projects. This will help prevent the spread of unwanted diseases or pests to other areas of your home or workspace.
- Finally, give yourself plenty of time to complete your paper firefly project – rushing through it can lead to careless mistakes and a less-than-perfect final result!
By planning ahead and taking the necessary precautions, you can create stunning paper fireflies that are both safe and beautiful.

Conclusion
Making your own paper fireflies is a great activity to do with kids of all ages. It’s simple, and inexpensive, and you can make as many or as few as you want. With just a little time and effort, you can add some fun and whimsy to your home or party decorations. Give it a try!
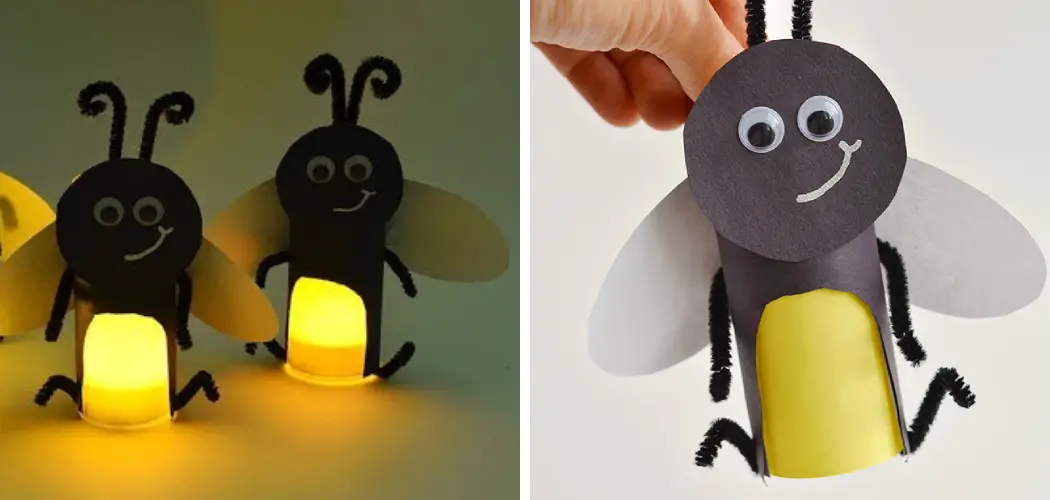
Now that you know how to make paper fireflies, it’s time to put your new skills to the test. Get creative and see what other shapes and colors you can create. If you want to add a little more personality to your fireflies, try customizing them with Googly eyes or pipe cleaners for antennae. Once you’ve made a handful of these cute critters, turn off all the lights in your house and enjoy watching them light up the room. With summer just around the corner, there’s no better time than now to start making some magic of your own.
You Can Check It Out To Make Mistletoe Out of Paper