
Do you want to know how to glue paper without creating wrinkles and bubbles? Have you ever tried using traditional methods, such as tape or liquid adhesive, only to find that the result is an uneven surface filled with unwanted creases and blemishes? Don’t worry – there’s a simple solution!

Discovering the right adhesive to keep your paper project wrinkle-free may be frustrating, but with a bit of practice and the best glue to use, you’ll have attractive projects that will look perfect every time. Whether you’re looking for ways to cover journal pages or to decorate other items such as wood or metal, by employing useful tips and products specifically designed for gluing paper, it’s much easier than you ever imagined!
In this blog post, we’ll go over how to glue paper without wrinkles and provide helpful advice on choosing the correct supplies and materials.
Why Traditional Methods Don’t Work
Before we dive into the best methods for gluing paper without wrinkles, it’s essential to understand why traditional techniques often fail to produce satisfactory results. Most commonly used adhesives such as tape and liquid glue, have a thick consistency that can cause bubbles or wrinkles when applied unevenly. They also require a significant amount of drying time, which can result in the paper shifting or moving during the process. Additionally, certain types of tape can leave behind a residue that is difficult to remove and can ruin the appearance of your project.
What Will You Need?
1. Glue: Choose an adhesive that is thick enough to create a strong bond between the two surfaces yet flexible enough not to cause creases or bubbles as it dries. Some good options include rubber cement, gel glue sticks, and white school glue.
2. Surface: When working with paper, fabric, wood, or some other material, make sure your surface is clean and dry before applying the glue.
3. Applicator: A foam brush or padded craft roller makes applying the adhesive in a thin coat easy without creating unwanted marks or lines.
4. Heat Tool (optional): If you want to speed up the drying process for an extra-crisp finish, consider using a heat tool with adjustable settings to prevent overheating delicate materials.

Once you have gathered all of these essential supplies, simply follow these steps to ensure that your paper projects come out looking their best.
10 Easy Steps on How to Glue Paper Without Wrinkles:
Step 1. Cut the Paper:
Before applying the glue, make sure to measure and cut your paper carefully to the desired size. You can use a straight edge, craft knife, or paper trimmer to achieve clean and accurate cuts. Be careful not to wrinkle or damage the paper during this step. It’s also a good idea to practice cutting on scrap paper before working on your final project. You can also use decorative scissors or punches to add a unique touch to your project edges.
Step 2. Apply Adhesive:
Once your paper pieces are ready, apply a thin layer of glue to one side using either a foam brush or padded craft roller. You want to avoid any heavy globs of adhesive that can get stuck in creases and create bumps once the project dries. You can take your time to ensure a smooth and even coat. It’s also essential to work on a flat and clean surface to avoid accidentally transferring dirt or debris onto your paper.
Step 3. Position the Paper:
Carefully position your paper pieces on the desired surface, leaving enough room for any additional layers or embellishments. If you are working with multiple pieces of paper, ensure they line up correctly before sticking them down with the adhesive. Try to use as few wrinkles and creases as possible. You can use a ruler or other straight edge to smooth out any bubbles or imperfections.
Step 4. Smooth Out the Paper:
Once the adhesive is in place, it’s important to ensure that there are no air bubbles or unwanted creases by gently smoothing the paper with your hands or a soft cloth. This will help ensure that all surfaces of the paper adhere securely to your surface without puckering or bubbling up. If necessary, use a heat tool with adjustable settings to gently dry the paper and help prevent any unwanted movement or shifting. But be careful not to overheat the paper, as this can cause it to wrinkle or even warp.

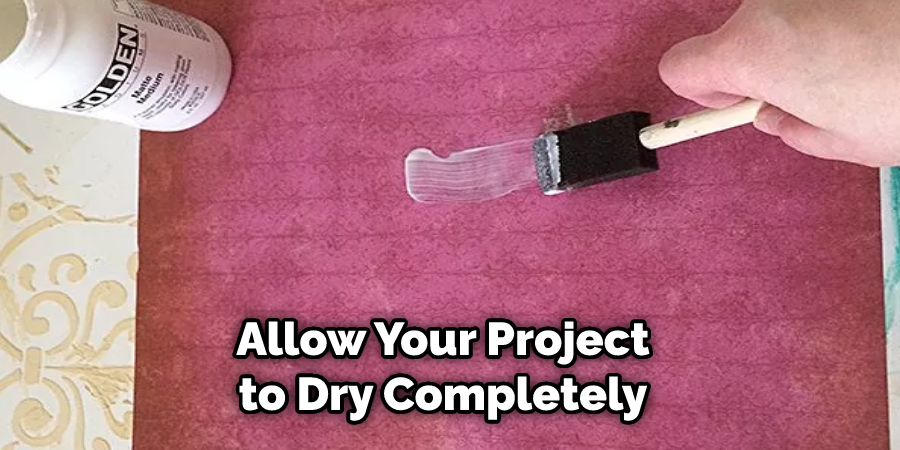
Step 5. Let It Dry:
Once you are satisfied with your paper’s position, leave it alone to dry completely before adding any additional layers or embellishments. Depending on the glue you used, this process may take a few minutes to several hours. Use a soft brush to ensure all the glue has been absorbed into the paper. Although it may be tempting to speed up the drying process, be patient and let the glue dry naturally for the best results.
Step 6. Trim or Cut:
If the paper is still a bit wavy, apply light pressure with your hands or a ruler and wait for it to become flat and wrinkle-free. You can also trim any excess paper from the sides of your project using a pair of well-oiled scissors, although be careful not to cut through the adhesive itself. Be careful not to disturb any parts of your project until it is fully dry, as this can cause creases and wrinkles. Otherwise, you may have to start the process all over again. If you are working with delicate materials, consider using a heat tool to speed up the drying process.
Step 7. Add Additional Layers or Embellishments:
Once your glue has dried completely, you can continue adding layers or embellishments to finish off your project. Just be sure not to apply any additional adhesive in areas where the paper is already glued down, as this can cause unwanted wrinkles and creases. If you are working with fabric or other materials, make sure to treat those separately and avoid getting glue on other parts of the project. You can also use a heat tool to help bond any layers or embellishments without having to wait for traditional adhesives to dry.
Step 8. Finish off the Project:
Once you have completed your paper project and added any additional touches that you desire, it’s important to carefully seal down all edges with a light coating of spray adhesive. This will help prevent any accidental bumps or marks as you handle your finished piece and keep water or other liquids from seeping into the details of your design. Another, more temporary option is to use packaging tape to seal the edges of your project, although this will not offer the same level of protection from moisture. If desired, you can also add a final layer of decorative paper to the back of your project to give it a more polished look.
Step 9. Display Your Finished Piece:
Now that your project is complete, be sure to find a safe place to display it – whether it’s in the living room, den, or office. You can hang it from the wall, prop it up on a shelf or table, or even set it down on a desk. No matter how you choose to display your finished piece, it will surely get lots of admiring glances for its beautiful and professional-looking design! It’s also important to remember that paper crafts often look great in frames, so don’t hesitate to find the perfect frame and give your project a professional touch.

Step 10. Enjoy Your Project:
Once your project is fully dry and sealed, you can proudly display it for all to see! Whether you choose to hang it up on a wall or place it in a frame, take pride in knowing how you created such a beautiful piece using nothing but paper and glue. Congratulations on your handiwork – and enjoy! Remember to have fun with your paper crafting and don’t be afraid to try new techniques and experiment with different materials. The possibilities are endless when it comes to creating unique and beautiful projects with just paper and glue. So go ahead, let your creativity flow, and enjoy the satisfaction of creating something truly special!
By following these simple steps, you can easily create beautiful paper projects that look professional and perfectly crafted. Whether you are working on a scrapbook, a greeting card, or an art project of your own design, the key to success is using the right adhesive and taking care to smooth out your paper without creating wrinkles or other unwanted imperfections.
With patience and practice, you can learn how to glue paper without wrinkles and create gorgeous pieces that will last for years!
5 Additional Tips and Tricks:
1. Be sure to use the right type of glue. Many different types of glue are available, including liquid glues, stick glues, and spray glues. Each type has its own unique characteristics, so be sure to choose one that is best suited for your project.
2. Use a clean, flat surface when working with your paper. This will help ensure that there are no wrinkles or creases in your glued edges once you’re done.
3. Work in small sections at a time and ensure that each section is thoroughly coated with glue before moving on to the next. If you try to rush through the process or spread out your glue too thinly, you risk creating unsightly wrinkles or air bubbles in your final product.
4. Make sure that your paper pieces are firmly pressed together after gluing to avoid any potential wrinkles or creases from forming. You can press the glued edges down with a flat object, such as a book or a piece of cardboard, until you’re sure that they have fully dried and adhered to each other.
5. Allow your project to dry completely before moving on to the next step or handling it too much. This will help ensure that all the glue has had time to set and bind your paper pieces together without leaving any unwanted marks or creases.
With these tips and tricks, you should be able to create crisp, wrinkle-free paper projects with ease easily!
What Kind of Glue Doesn’t Wrinkle Paper?
There is no one-size-fits-all answer to this question, as different types of glue work better for different paper projects. Some options to consider include liquid glues, stick glues, and spray glues, all of which are designed to adhere to paper surfaces while minimizing the appearance of wrinkles or other imperfections.
However, it is important to carefully read the instructions and test each type of glue on a small section of your project before using it more extensively to ensure that it works well with your specific materials and design.
Ultimately, choosing the right kind of glue will depend on your individual preferences, skill level, and specific project requirements. With some experimentation and practice, though, you should be able to find a solution that works well for you and helps you create beautiful paper projects that look professional and polished.
You Can Check It Out To Make a Rug With Yarn by Hand
How Much Will It Cost?
The cost of creating paper projects will vary depending on the materials and tools you choose to use, as well as the complexity and size of your project. However, one of the great things about paper crafting is that it can be a relatively inexpensive hobby compared to other types of crafts.
Basic supplies such as glue, scissors, and paper can be found at most craft stores for a reasonable price. You can also save money by using recycled or upcycled materials, such as old magazines or newspapers, to create unique and eco-friendly projects.
Remember, the most important investment you can make when it comes to paper crafting is your time and creativity. So don’t be afraid to experiment and have fun with your projects – even if they don’t turn out exactly as you planned, the process of creating something with your hands is priceless! So whether you’re a seasoned paper crafter or just starting out, don’t let cost be a barrier to exploring this fun and versatile hobby. With some patience, practice, and creativity, you can create beautiful paper projects without breaking the bank.
You Can Check It Out To Add a New Skein of Yarn When Knitting
Frequently Asked Questions:
Q: Can I Use Regular School Glue for Paper Projects?
A: School glue can work well for certain types of paper projects, but it may not be the best choice for more intricate or delicate designs. Additionally, it is important to make sure that the glue is fully dried and set before handling the project to avoid any unwanted wrinkles or creases. It is always recommended to test a small area first before committing to using regular school glue for your project.
Q: How Can I Prevent Wrinkles and Creases on My Paper Project?
A: There are several steps you can take to minimize the appearance of wrinkles and creases on your paper project. These include using the right type of glue, working in small sections, pressing the glued edges firmly together, and allowing your project to fully dry before handling it. It is also important to work on a clean, flat surface and take care when smoothing out paper to avoid creating unwanted imperfections.
Q: How Can I Display My Finished Paper Project?
A: There are many ways to display your finished paper project, depending on its size and design. Some options include hanging it on a wall, propping it up on a shelf or table, framing it, or setting it in a display case. Be sure to choose a safe and secure location that allows your project to be seen and admired without risk of damage. Alternatively, you could also consider gifting your finished project to someone special as a unique and personal keepsake. The possibilities are endless! Get creative and have fun with it.
Q: Can I Mix Different Types of Glue?
A: It is generally not recommended to mix different types of glue, as they may react differently and cause unwanted effects on your project. It is best to stick to one type of glue for each project or test a small area first before committing to using a combination of glues. Mixing different types of glue can also affect the overall strength and durability of your project, so it is best to stick with one type for optimal results. If you do decide to mix glues, be sure to carefully read and follow all instructions and use caution when applying them together.
Conclusion:
Suppose you’re looking for a way to glue paper without wrinkles; consider one of the methods above. Each has its own benefits and drawbacks, so be sure to choose the one that’s right for your project. With a little care and attention, you can achieve professional-looking results.
Now that you know how to glue paper without wrinkles, there’s no limit to the crafts you can make! Gluing paper is a simple process, but it requires a few extra steps to ensure your project turns out wrinkle-free. With this technique, you’ll be able to create professional-looking projects that are perfect for gifts, scrapbooks, or home décor. So get creative and start gluing!
Hopefully, with these tips and tricks, you’ll be able to create stunning paper projects that look great and stay wrinkle-free. Good luck!
You Can Check It Out to Make Hot Air Balloon Out of Tissue Paper