
Are you ready to elevate your crafting skills and create something truly unique? Macrame feathers are an interesting and aesthetically pleasing way to spice up any project. Whether for home decor, fashion, or art installations, macramé feathers can bring texture and life into a prized piece of work.
With this guide as your creative inspiration, you’ll learn how to make macrame feathers that will capture the eye of all who lay sight of them. So let’s get crafting!

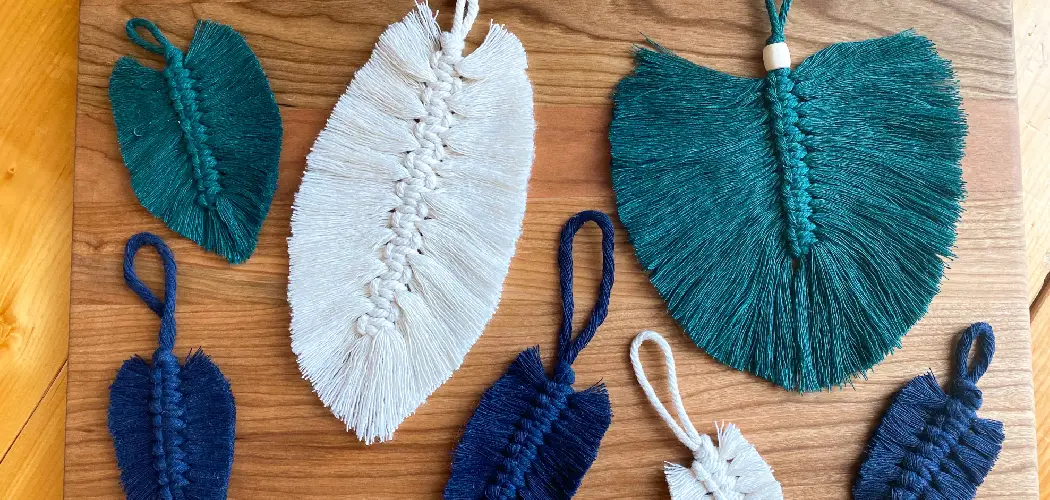
What is Macrame Feather?
Macrame is a type of textile made with knotting techniques. It’s characterized by sturdy and intricate patterns that give its projects an eye-catching appeal. Macramé feathers are simply macramé knots woven into the shape of a feather, which gives them their unique texture and visual interest. These can be used in a variety of projects from jewelry and home décor to fashion.
Needed Tools and Materials
Given below are the materials and tools you’ll need to make macramé feathers:
- Cotton rope
- Scissors
- Tape
- Beads (optional)
- Jewelry pliers (optional)
11 Step-by-step Guidelines on How to Make Macrame Feathers
Step 1: Cut the Rope
The first step is to cut the cotton rope into the size and shape of the feather you desire. You can measure, mark, and then cut it with scissors. If needed, add pieces of tape to the ends so it doesn’t fray. But make sure the tape isn’t too wide or it will affect the knotting.
Otherwise, you can also buy pre-cut macrame rope from a craft or yarn store. It’s up to you. You can also use different colors of cotton rope for a multi-hued macramé feather.
Step 2: Create a Slip Knot
Make a slip knot at one end of the rope. The knot should be tight and secure enough to not come loose. It will be used as the base for your macramé feather. But don’t make the knot too tight, as it may be difficult to work with. This is the most important step in making macramé feathers, as it will be used to tie all the other knots.

Although it may seem difficult at first, this knot will become easier with practice. it can be a bit tricky at first but with practice & time you will get the hang of it. But don’t worry, with this guide and some practice, you’ll be able to get it right in no time!
Step 3: Make a Lark’s Head Knot
Make a lark’s head knot at the base of your slip knot. This will help keep the rope from unraveling and also give you a starting point to begin weaving your feather. To make a lark’s head knot, take the rope and fold it in half so that both ends meet.
Then pull the folded end through the loop of the slip knot, and pull tight. You can also add beads or shells to this knot for a decorative touch. It’s up to you and your creativity. This knot should be secured tightly. If you make it too loose, the whole feather could unravel.
Step 4: Start Weaving
Now you can start weaving your macrame feather. Take one of the ropes and begin weaving it in an up-and-down motion, creating a pattern. Make sure that each strand is going up or down in alternation with the other strands, to create texture and depth.

But be careful not to pull the knots too tight, as they can become difficult to work with. This is the point where you can also add beads and shells for a unique look. You can also experiment with different weaving techniques to create interesting patterns and textures. It’s all up to your creativity.
Step 5: Add Beads
Add beads for visual interest by threading them onto the rope while you weave. This will give your feather a nice sparkle and some added color. But be sure not to pull the knot too tight, or it could be difficult to add more beads onto the rope.
It’s best to start with a few beads and gradually increase as you become more comfortable working with them. However, beads are totally optional and it’s perfectly fine to make a macramé feather without them.
Step 6: Continue Weaving
Continue the weaving motion until you’ve reached the desired size of your macrame feather. Make sure to keep the strands tight and secure, as this will ensure that it stays in shape when it’s finished.

You can also add beads to the next few rows for a bit more sparkle and texture. It’s all up to your creativity. But remember not to pull the knot too tight as it will be difficult to add more beads. It’s best to start with a few, and gradually add more as you become comfortable.
Step 7: Secure the Ends
Once you’ve reached the desired size of your macramé feather, it’s time to secure the ends. To do this, take one strand and loop it through the slip knot at the base. Then, take that same strand and loop it back through the lark’s head knot. Finally, pull the end of the rope through the loop and tighten it up.
This will help ensure that all of your knots stay secure. You can also use jewelry pliers to make sure the knot is extra secure. But be sure not to pull too hard, as this could damage the rope or the knot.
Step 8: Trim Excess Strands
Once you’ve secured the ends of your macramé feather, trim away any excess strands with scissors. Make sure not to trim too much, as you don’t want to lose the texture of your feather. Otherwise, if you’ve used beads, make sure to leave some of the rope for extra security. This will help ensure that your feather stays in shape after it’s finished.

Step 9: Shape Your Macrame Feather
Gently shape and bend your macramé feather to give it a more natural look. This can be done by simply twisting, curling, or bending the strands in different directions. You can also use jewelry pliers to help create a more defined shape. If you’ve used beads, make sure to leave some of the rope for extra security.
But be sure not to pull too hard, as this could damage the rope or the knot. This will help give your feather a more natural, organic look. You can also use this opportunity to make any adjustments or tweaks that you feel are necessary. It’s all up to you and your creativity.
Step 10: Hang it Up
Hang your macramé feather up using string or rope, so you can admire it in all its glory! It’s important to let the feather hang freely so that it doesn’t lose its shape. Although this step is optional, it’s a great way to display your work and show it off. You can also give the feather as a gift or use it for special occasions such as weddings or parties. Whichever you choose, your macramé feather will surely be admired by all!

Step 11: Enjoy Your Macrame Feather
There you have it, your very own macramé feather! Show off your masterpiece in whatever way you desire and share its beauty with others. Always remember to take pride in your work and have fun with the process.
Macramé feathers are a great way to express your creativity and show off your skills. With some patience, practice, and dedication you can create many more of these beautiful works of art! Have fun & happy knotting!
With these eleven steps on how to make macrame feathers, making macramé feathers is a breeze. With just some basic supplies and a bit of creativity, you can make beautiful pieces of art. So get your supplies ready and start crafting your very own macramé feathers! Good luck, and have fun!
Tips for Making Macrame Feathers
- Choose a Cotton Rope That is Strong but Still Flexible Enough to Be Manipulated.
- Take Your Time When Weaving to Ensure That the Knots Are Secure.
- Don’t Trim Excess Strands Too Much, as This Will Reduce the Texture of Your Feather.
- Hang Up Your Feathers to Let them Dry and Hold their Shape.
- Have Fun! Making Macramé Feathers is an Enjoyable Creative Outlet.
Making macramé feathers is a creative and fun way to add texture and interest to any project. With this guide, you now have all the tools and knowledge to make your own beautiful macramé feathers that will be sure to turn heads! So get crafting and enjoy the creative process of creating something unique. Have fun!

Do You Need to Use Professionals?
If you’re looking for a more professional look, it’s best to hire a macramé artist who specializes in creating intricate and unique designs from a rope. Professionals can help you create something truly special that will last for years to come. They also have access to higher-quality materials and tools that result in superior outcomes.
At the end of the day, making Macramé feathers is a fun and creative process that anyone can enjoy! With this guide, you have all the tools and techniques to get started. So grab your supplies and start crafting your very own macramé feather. Have fun!
How Much Will It Cost?
The cost of making macramé feathers depends on the type of materials used and the complexity of the design. If you’re using basic materials such as rope, beads, and scissors, then it won’t be too expensive. However, if you want to use more intricate supplies such as gemstones or colorful ropes then it could get a bit more costly.
It’s also important to remember that you can always use upcycled materials such as old t-shirts or used ropes for a more cost-effective option. Regardless of the material, making macramé feathers is an enjoyable and creative activity that won’t break the bank. So start crafting and have fun!
Frequently Asked Questions
Q: What Types of Projects Can I Use Macramé Feathers For?
A: Macramé feathers can be used in a variety of projects from jewelry and home décor to fashion. It’s best to use them for small projects because they can be quite delicate. But with the right supplies and technique, you can make large and intricate pieces as well!
Q: Are There Other Ways To Make Macramé Feathers?
A: Yes! There are many different macramé techniques that can be used to create feathers of various sizes and shapes. Experiment with different knots, patterns, and textures to come up with your own unique designs. It’s all about getting creative and having fun!
Q: How Can I Make My Macramé Feathers Last Longer?
A: To make sure that your macramé feathers last longer, make sure to use high-quality supplies and take your time when completing the knots. Also, hang up the feathers to let them dry properly and store them away from direct sunlight or moisture. This will help ensure that they last for years to come!
Q: Is Macramé Difficult To Learn?
A: Not at all! Macramé is relatively easy to learn and you can find plenty of tutorials online. With a bit of practice, you’ll get the hang of it in no time! Remember, have fun and be creative– that’s what macramé is all about.
Conclusion
Crafting macrame feathers can be an incredibly rewarding and creative experience. You can make these feathers as gifts for special occasions, or just as a unique way to show off your own personal style and flair. With a little practice, you’ll soon have the perfect feathers of your dreams.
Take this opportunity to challenge yourself, learn something new, and create something beautiful. Remember, being creative involves experimenting and making mistakes; by trying new techniques and gradually improving your skills, you will develop priceless confidence in your abilities.
So don’t be afraid to challenge yourself; when you look back at the end result of your work with pride, it will all be worth it! Thanks for reading this article on how to make macrame feathers.