
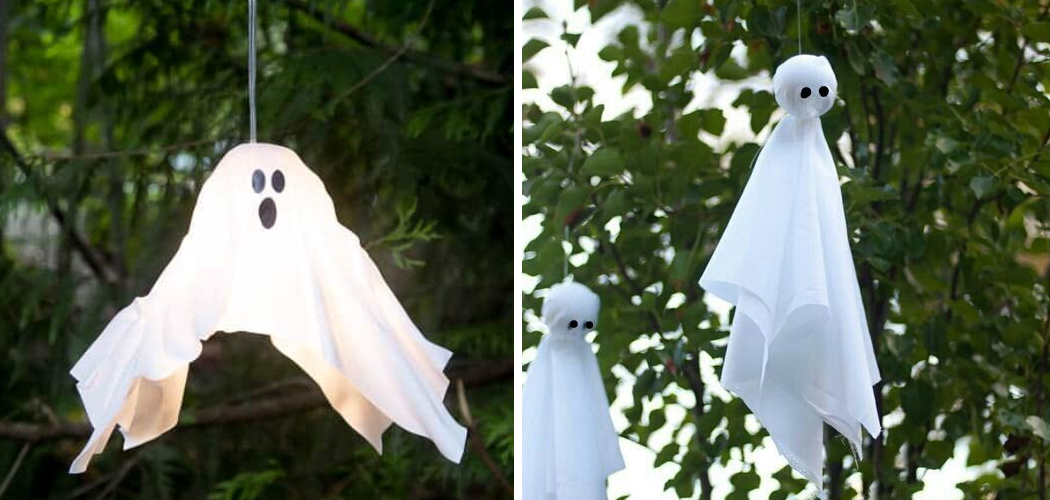
Who doesn’t love a good Halloween decoration? Ghosts are a classic go-to for creating that spooky ambiance you want for your front yard. Even better, making your own ghosts to hang in trees is an affordable and fun activity for the whole family. With a few simple materials and these 12 easy-to-follow steps on how to make ghosts to hang in trees, you’ll have a fun Halloween decoration that’s sure to draw attention.

Safety Precautions
Before you get started, it’s important to keep safety in mind. Working with wire can be dangerous and always keep children away from sharp objects or small parts that could pose a choking hazard. It’s also important to make sure that your ghost decorations are secured properly and won’t blow away in the wind. But if you follow these simple safety precautions, you’ll be ready to create a spooky Halloween display in no time.
Step-by-step Guidelines on How to Make Ghosts to Hang in Trees
Step 1: Gather Your Materials
Before you get started, you’ll need some materials. To make your own ghosts to hang in trees, you’ll need:
- How Twhite Sheets or Fabric
- Wire Hangers
- Scissors or Wire Cutters
- Hole Punch (Optional)
- String or Large Fishing Line
- White Paint (Optional)
Step 2: Cut the Sheet
Using your scissors, cut a sheet into a square big enough to cover whatever you’ll be using as the “head” of your ghost. It should be large enough to fit around the circumference of the “head” and have enough excess material for you to tie off your ghost.
But don’t cut too much material, as it will make the ghost look disproportionate. It’s best to err on the side of cutting less rather than more.

Step 3: Attach the Sheet
Place your sheet over the object that will be the ghost’s head. This could be a ball, a balloon, or even just a wadded-up piece of newspaper. Tie a knot or secure the sheet with string around the neck area. This will help keep the sheet in place.
It’s also a good idea to use a hole punch to make two holes through the sheet and head, as this will give you something to attach your string or fishing line for hanging. But if you don’t have a hole punch, it’s still possible to hang your ghost without one.
Step 4: Cut the Second Sheet
Using another sheet, cut a long strip to wrap around the “neck” and provide a base for the rest of the ghost. It should be long enough to wrap around the neck a few times and still have extra material on either end.
Wrap the strip around the neck in a double- or even triple-layered fashion, tying it off with string or securing it with a tap. Although this step is optional, it’s a great way to make your ghost look more substantial and give them a realistic “neck”.
Step 5: Cut Fringe
Using your scissors, fringe the bottom of your long strip. This will help create the illusion of flowing fabric. It’s a good idea to make the fringes as even as possible, but don’t worry if they’re not perfectly straight. This will add some character and charm to your ghost.
But be careful not to cut too far up the strip, as this could cause your ghost’s “head” to come loose. It’s also a good idea to add some white paint to the fringe, as this will make it look more realistic.
Step 6: Secure the Fringe
Wrap your fringed strip around the base of the “head” and tie it off with string. The fringed strips should fall around the head to create the effect of hair. This will help add some personality to your ghost. It’s also a good idea to use a hole punch here, as this will give you something to attach your string or fishing line for hanging.

However, you can also hang your ghost without one. If you choose to do this, make sure the string or fishing line is secure and will not come loose.
Step 7: Cut Eyes and Mouth
Using the black felt, cut eyes and a mouth for your ghost. Don’t worry too much about perfection here – the more lopsided the face, the better! It adds character and makes your ghost look more playful. You can also use a hole punch to make two small holes for the eyes if you wish. This will help make them appear more realistic.
It’s important to note that this step is optional, as you can create a great-looking ghost without eyes or a mouth. This can be a fun way to add some mystery or eeriness to your ghost.
Step 8: Attach Eyes and Mouth
Glue or tie the eyes and mouth in place on the “head” of your ghost. This is an important step, as it will give your ghost some character and life. Make sure the eyes and mouth are secure so they won’t come loose when hanging in the tree.
It’s also a good idea to tie a knot through the eyes and mouth if you plan on using a hole punch for hanging your ghost. But if you don’t have a hole punch, it’s still possible to hang your ghost without one.
Step 9: Cut Arms
Cut two long strips of fabric to serve as the ghost’s arms. These should be long enough to hang down from the “head” and create an elegant, flowing effect. It’s a good idea to make them uneven in length, as this will give your ghost some personality.
However, you don’t want them to be too short or too long, as this could look awkward when hanging in the tree. You can also add some white paint to the arms for a more realistic look. It’s important to note that this step is optional, as you can create a great-looking ghost without arms.

Step 10: Attach Arms
Secure the arms in place on the “head” of the ghost. You can use glue or tie them off with string. Make sure they’re secure enough so they won’t come loose when hanging in the tree. It’s also a good idea to tie a knot through the arms if you plan on using a hole punch for hanging your ghost.
But if you don’t have a hole punch, it’s still possible to hang your ghost without one. It’s important to note that this step is optional, as you can create a great-looking ghost without arms.
Step 11: Add String
Depending on how you plan to hang your ghost in a tree, you may need to attach some strings. Tie or glue string to the “neck” area of your ghost. If you plan on using a hole punch for hanging, make sure the knot is tight enough so it won’t come loose.
But if you don’t have a hole punch, it’s still possible to hang your ghost without one. Just make sure the strings are secure and will not come undone. This is important to ensure your ghost does not fall out of the tree. It’s also a good idea to tie a knot at the end of your strings for extra security.
Step 12: Hang Your Ghost
Find a tree or other appropriate location and hang your ghost! You can use a ladder or even just a pair of sturdy stilts. And if you are hanging your ghost outdoors, make sure it is out of reach from the elements (such as wind and rain). This will help keep your ghost looking great for a long time.
Always remember to be safe when hanging ornaments, and never attempt to hang a ghost in an unsafe environment. With these tips, you can create a spooky and unique decoration for your Halloween festivities!

Step 13: Enjoy Your Ghost!
Hang your ghost with pride – you’ve created something truly special! It’s always best to admire your work and be proud of what you have achieved. You can also add additional decorations to make your ghost more festive. It’s a great way to show off your creative side and add some fun and excitement to the Halloween season.
With a little bit of creativity, you can create something truly unique that will leave an unforgettable impression on all who see it! Have fun and enjoy your Halloween decorations! Happy Haunting!
Follow these simple steps on how to make ghosts to hang in trees and you will be able to create a unique ghost decoration for your Halloween festivities. Have fun and enjoy the spooky season!
Frequently Asked Questions
Q: What Kind of Fabric Should I Use?
A: Any lightweight and sheer white fabric will work. Sheets, tulle, or organza are all great options. But if you don’t have any fabric on hand, even a white plastic trash bag will do the trick! It’s important to make sure the fabric is lightweight enough so your ghost won’t be too heavy when hanging in a tree.
Q: Can I Use a Balloon for the Head?
A: Absolutely! Balloons or other objects make great substitutes for traditional heads. Just make sure whatever you use is lightweight enough to be supported by your string and fabric strips.
Q: Is Glue Necessary?
A: No, glue is not necessary. You can use hot glue or fabric glue to attach pieces if desired, but it’s just as easy to tie them in place with string. This is a great way to make sure your ghost can be disassembled and stored away easily when Halloween is over.
Q: How Can I Make My Ghost Glow at Night?
A: For added effect, you can spray your ghost with glow-in-the-dark paint or attach small battery-powered lights. Both will give your ghost a spooky, illuminated look at night! This is a great way to add some extra fun and excitement to your decoration.

Have more questions about how to make ghosts hang in trees? Feel free to reach out and we would be happy to help! Happy Haunting!
Conclusion
There you have it! These easy steps to make your own ghosts to hang in trees will have your yard looking spooky and fun in no time. Customize your ghost by trying out different materials and designs – the possibilities are endless!
With a little creativity and some imagination, you can create a truly unique Halloween decoration that is sure to impress. Happy DIY-ing! Thanks for reading this article on how to make ghosts to hang in trees.