
Are you ready to be taken on a journey of astronomical proportions? Join us as we explore the secrets of creating a beautiful galaxy within the comfort of your own home. With our simple tips and tricks, you’ll be able to tap into your innermost creativity and create something truly magnificent in only an hour’s time.

From understanding why galaxies have so many stars twinkling throughout their vast expanse, to how you can achieve that look yourself with just one jar full of random objects; by the end of this tutorial on how to make galaxy, not only will you understand all the breathtaking beauty associated with galaxies but also know exactly how to make powerful visual statements with them. So turn off any distractions, clear out some space on your table and let’s get started on this fascinating journey!
What is a Galaxy?
Before we dive into the making of galaxies, let’s first understand what they are. A galaxy is essentially a group of stars, gas, and dust held together by gravity. These celestial objects can range in size from dwarf galaxies with only a few million stars to giant galaxies with over 100 trillion stars. It is estimated that there are over 100 billion galaxies in the observable universe, each with its own unique features and characteristics.
Why Make a Galaxy?
Galaxies have captivated human imagination for centuries, with their mesmerizing spiral arms and bright clusters of stars. Making a galaxy can be a fun and creative activity that allows you to explore different colors, textures, and shapes. It’s also a great way to learn about the astronomical world and gain a deeper appreciation for the vastness of our universe.
Needed Ingredients
- Acrylic Paint in Black, White and Desired Colors
- Canvas or Thick Paper
- Large Jar or cup
- Toothbrush
- Old Toothbrush Holder (Optional)
- White Gel Pen (Optional)
- Glitter or Sequins (Optional)
11 Step-by-step Guidelines on How to Make Galaxy
Step 1: Preparing the Base
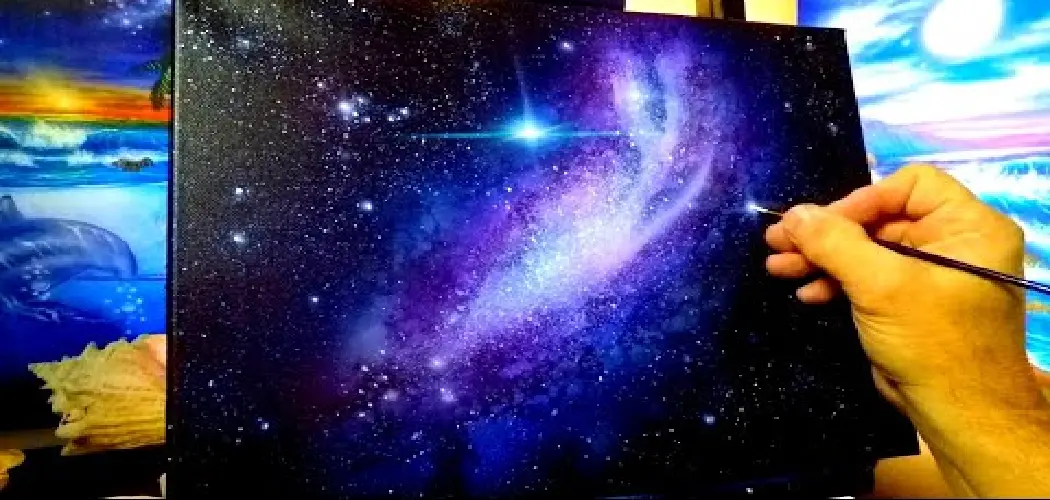
To make our galaxy, we’ll need to start with a black base. Take your canvas or thick paper and paint it black using your acrylic paint. You can also use a sponge to achieve a smoother texture. It’s important to make sure the entire surface is covered evenly.

But don’t worry if it’s not perfect, imperfections will only add to the uniqueness of your galaxy. You can also add some glitter or sequins to the wet paint for a sparkly effect. It’s completely optional but it will add some extra dimension to your galaxy.
Step 2: Mixing the Colors
Next, we’ll need to mix our desired colors for the galaxy. You can choose any colors you like, but for a classic look, we recommend using shades of purple, blue, and pink. Take small amounts of each color and mix them together in a separate container. You can also add a dash of white to give the colors a pastel effect. But don’t mix it too much, we want the colors to blend naturally on the canvas.
Step 3: Creating the Stars
Take your large jar or cup and dip it into the mixed colors. Make sure to completely cover the bottom of the jar with paint. Then, gently press it onto the canvas. This will create the stars in our galaxy.
Repeat this step a few times, varying the placement and size of the jar to create a scattered effect. It’s okay if the stars overlap, it will only add to the depth of the galaxy. It’s important to work quickly before the paint dries, so you can achieve a more blended and natural look.
Step 4: Adding Nebulae
To create the colorful clouds and gas in our galaxy, we’ll use a toothbrush. Dip your old toothbrush or toothbrush holder into some white acrylic paint and flick it onto the canvas. This will create a splatter effect similar to that of nebulae. You can also use different colors for a more vibrant effect. But be sure to use a light hand and not overdo it, as we want the stars to remain visible.
Step 5: Creating Bright Stars
For some added dimension, we’ll create some bright stars using white acrylic paint. Dip your toothbrush into the paint and then flick it onto the canvas. This will create larger and brighter stars scattered throughout the galaxy. You can also use a white gel pen to add some smaller stars or dots for a more realistic look. You can also add some glitter or sequins to these bright stars for an added sparkly effect.

Step 6: Blending the Colors
To create a more seamless and blended look, we’ll use our large jar or cup again. Dip it into some white acrylic paint and gently press it onto the canvas, overlapping with the previously painted stars. This will blend the colors and create a more natural-looking galaxy. You can also use different size jars to vary the intensity of the blending.
Step 7: Adding Depth
To add depth to our galaxy, we’ll use a darker color such as black or dark blue. Dip your toothbrush into the paint and then flick it onto the canvas, focusing on the outer edges of the galaxy. This will create a sense of depth and make the colors pop even more. If desired, you can also use a small paintbrush to add some intricate details and swirls. It’s all about experimenting and finding what works best for your galaxy.

Step 8: Creating the Milky Way
For a more realistic look, we’ll add the iconic Milky Way to our galaxy. Use a small paintbrush to create white lines that curve throughout the galaxy. You can also use some glitter or sequins to highlight these lines and add some shimmer. This step is completely optional, but it will add an extra touch to your galaxy. You can also use different colored lines to represent other galaxies or clusters.
Step 9: Finishing Touches
Once you’re happy with how your galaxy looks, it’s time for some finishing touches. Use a small paintbrush to touch up any areas that may need more color or detail. You can also add some extra glitter or sequins for some added sparkle. And don’t forget to sign your masterpiece! It’s always important to give yourself credit for creating such a beautiful galaxy.
Step 10: Let it Dry
Now that your galaxy is complete, it’s time to let it dry. Make sure to place it in a safe and flat area where it won’t be disturbed. It may take a few hours for the paint to fully dry, so be patient! You can also use a hairdryer on a low setting to speed up the process.

You want to make sure the paint is completely dry before moving on to the final step. It’s also a good idea to cover your work surface with some old newspapers or a drop cloth to avoid any mess.
Step 11: Display and Admire
Once your galaxy is completely dry, it’s time to display and admire your stunning creation. You can hang it on a wall or prop it up on a shelf for all to see. And don’t forget to share your masterpiece with friends and family!
Making a Galaxy is a fun and creative project that allows you to express your own unique style. So have fun with it and enjoy your beautiful galaxy! All the Best! Keep in touch… And, most of all, remember always: “Keep looking up!”
Following these steps on how to make galaxy, you know how to make your own beautiful galaxy. But don’t stop here, continue experimenting and trying new techniques to create different types of galaxies with varying colors and designs. The possibilities are endless! You can also try making a series of galaxies or even incorporate them into other art projects. Let your creativity run wild and create your very own universe on canvas.
Tips
- Be Patient and Work Quickly While Creating Your Galaxy to Achieve a More Natural and Blended Look.
- Don’t Be Afraid to Experiment With Different Colors, Techniques, and Designs.
- Use Different-sized Jars or Cups to Create Stars of Varying Sizes for a More Dynamic Effect.
- Add Glitter or Sequins for Some Added Sparkle and Dimension.
- Have Fun and Let Your Creativity Shine! Keep Looking Up and Reaching for the Stars. The Sky is the Limit!
- Remember, Making a Galaxy is All About Expressing Your Own Unique Style and Creativity. So Don’t Be Afraid to Make It Your Own! Keep Looking Up! The Sky’s the Limit!
Frequently Asked Questions
Q1. Can I Use Different Colors for My Galaxy?
Yes, definitely! You can use any colors you like to create a unique and personalized galaxy. Just remember to mix the colors well and work quickly to achieve a natural blend on the canvas. It’s all about experimenting and finding what works best for you.
Q2. Do I Have to Use Glitter or Sequins?
No, the use of glitter and sequins is completely optional. They can add some extra sparkle and dimension to your galaxy, but you can also achieve a beautiful result without them. Feel free to try out different materials such as metallic paints or even glow-in-the-dark paint for a fun twist on your galaxy.

Q3. Can I Make a Galaxy on Different Surfaces?
Absolutely! This tutorial focuses on creating a galaxy on canvas, but you can also use other surfaces such as paper, wood, or even fabric. Just make sure to adjust the materials and techniques accordingly for the best results. Have fun exploring different mediums and creating galaxies in various forms!
Q4. How Long Does it Take to Make a Galaxy?
The time it takes to make a galaxy depends on various factors such as the size of your canvas, how much detail you add, and how quickly you work. On average, it can take around 2-3 hours to complete a galaxy from start to finish. However, don’t rush the process and take your time to achieve the best result. Remember, creating art is meant to be a relaxing and enjoyable experience. So have fun with it!
Conclusion
To conclude learning how to make galaxy can be both endlessly creative and great fun. From constructing an open star cluster to nebula paints that beam with lush color, there is something for every type of space crafter here. Now it’s up to you to create something truly special!
Consider different types and sizes of galaxies, incorporate elements from your favorite movies or books, and put your own unique twist on the project. Take a chance and make a piece that you can be proud of! So what are you waiting for? Get out there and construct your very own galaxy!