
Are you creative with art projects and always looking for new ways to express your creativity? Do you want a fun activity that combines arts and crafts as well as practical teaching moments about science and the environment? It is important to know how to make fake water with tissue paper. Look no further – we’ve got just the thing! In this blog post, you’ll learn how to make fake water using tissue paper.

Not only is it tons of fun, but it teaches kids (and adults) some valuable lessons about the conservation of resources – without having to leave the comfort of their own homes. Plus, you can use all kinds of colorful materials like tempera paint or food coloring that will add beautiful hues to your project. Get ready for an afternoon full of learning and crafting – let’s get started!
Tools You Will Need:
Tissue Paper (Various Colors):
To make fake water, you will need tissue paper in various colors. Try to get a variety of shades and hues to mimic the natural color of water. You can use blue, green, and white tissue paper to create different effects.
Scissors:
You will also need scissors to cut the tissue paper into small pieces. This is where you can get creative and experiment with different shapes and sizes.
Bowl:
A bowl or container will be used to hold the fake water mixture. Make sure it is large enough to fit your desired project size.
Water:
To make fake water, you will need real water. This may seem counterintuitive, but trust us – it’s necessary!
PVA Glue:
PVA glue, also known as white glue, will be used to create the fake water mixture. This type of glue is ideal for this project because it dries clear and has a thick consistency that mimics water.
Paintbrush:
To mix the tissue paper into the PVA glue, you will need a paintbrush. Make sure it’s a brush specifically designed for crafts and not one for painting walls.
Optional Additions:
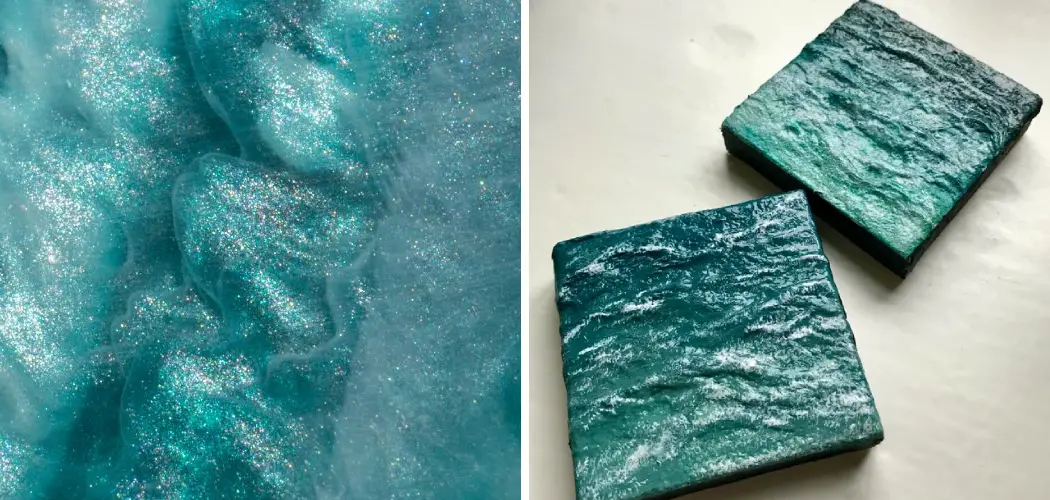
You can also add optional materials to your fake water mixture, such as glitter, beads, or small plastic toys. These additions will make your fake water project even more exciting and unique.
9 Easy Instructions Guide on How to Make Fake Water With Tissue Paper:
1. Cut the Tissue Paper
You can use as many different colors and patterns as you’d like to create a unique look.
Crafting with tissue paper can be a fun and creative way to bring life to any project. To begin, you’ll want to start by cutting the tissue paper into small one-inch squares. Depending on your desired design, you can use as many colors and patterns as you’d like.

Get creative and mix up both bold shades and subtle hues – the possibilities are virtually endless! Polychromatic designs suited to a vibrant occasion or subtle pastel colors for a more muted look – whatever aesthetic you choose, you’ll have no problem finding something to satisfy your crafting needs.
2. Allow the Paper to Soak
To begin, start by putting some tissue paper squares into a bowl. Pour water over the squares until they are completely saturated, and let them soak for a few minutes so the tissue paper is softer and easier to manipulate.
This simple step helps infuse color and texture into the art project you will be creating with these pieces of tissue paper. Once you have achieved your desired look, you can transform ordinary pieces of saturated paper into an extraordinary masterpiece!
It’s also worth noting that, for the best results, you should avoid using tissue paper with a design on it. Instead, opt for solid colors so that they can blend together without any distractions.
3. Start Layering It
Start from the bottom and work your way up, adding a few more squares each time.
When making a layered jar gift, the first step is to soften your tissue paper. This helps make it more pliable, so you can get those crisp edges when you layer them together. Once you’ve got that ready, you can begin adding the layers of tissue paper to your container of choice.
Make sure to start from the bottom and work your way up, slowly increasing the number of squares each time as you come around full circle – this will give your jar a nice symmetrical shape as well as look visually pleasing! To add an extra touch, top off your creation with some ribbon or embellishments, and voila, you’ve got yourself a thoughtful and beautiful layered jar gift!
4. Spray It With Water
Dampening the tissue paper is a crucial part of the process of container decorating. You want to ensure that all the pieces are soaked, so use as much water as needed from either a spray bottle or paintbrush.

Doing this guarantees that each piece is damp enough to mold and stick together, making your project look gorgeous! Additionally, it will also give your container an extra layer of protection against dirt and dust. Don’t forget this step together when creating your unique decoration – it can make all the difference.
You can also experiment here, adding more or less water to see how it affects the overall look. Don’t be afraid to play around and find out what works best for you!
5. Let It Dry
Now that you’ve got your tissue paper design created, it’s time to let the fake water dry. Don’t be tempted to try and speed up the process by using a hairdryer – this will only make the tissue paper wrinkle and take away from its intended effect.
Instead, place your project in an area where it can air dry. It will take a few hours to completely dry, so be patient and resist the urge to touch it until it’s ready! You can also speed up the drying process by using a fan or placing it in a warm, sunny spot.
It’s also essential to make sure that your fake water is completely dry before moving on to the next step. Any remaining moisture can cause the glue to become cloudy or create a stickiness that can ruin the final product.
6. Make the Fake Water Mixture
While your tissue paper is drying, you can start making the fake water mixture. In a separate bowl, mix together PVA glue and water in equal parts. For example, if you use one cup of PVA glue, mix it with one cup of water.
This will ensure your mixture has a thick consistency that is similar to real water. If the mixture is too thin, add more PVA glue, and if it’s too thick, add more water. You want it to be thick enough to hold the tissue paper pieces without dripping.
It’s also a good idea to mix in some food coloring if you want your fake water to have a specific color. You can use any color you’d like, depending on the look you are going for.
7. Add Optional Materials
If you want to make your fake water project even more unique, you can add optional materials to the mixture. For example, you could mix in some glitter for a sparkling effect or small plastic toys to create an underwater scene.
Be creative and experiment with different additions to see what works best for your project. Just make sure to mix these materials into the fake water mixture thoroughly before moving on to the next step.
It’s also a good idea to test the mixture on a small area of tissue paper first before applying it to your entire project. This will help you determine if the consistency is right and if the materials add the desired effect.
8. Mix In Your Tissue Paper
Once your tissue paper is dry, it’s time to mix it into the fake water mixture. Use a paintbrush to coat the tissue paper squares with the glue mixture, making sure they are completely saturated.
You can also use your hands for this step, but be careful not to rip or tear the tissue paper pieces. Continue adding tissue paper squares and coating them with the mixture until your project is complete.
There’s no specific way to arrange the tissue paper, so feel free to be creative and make your design as unique as you’d like.
9. Let It Dry and Enjoy!
Once your tissue paper is fully coated with the fake water mixture, let it dry for a few hours. You will notice that the tissue paper becomes translucent and resembles real water.
Once it’s completely dry, you can use your fake water creation as a decoration or in any other project that requires realistic-looking water. Enjoy your beautiful and unique fake water made with tissue paper! So there you have it – nine easy steps to create a stunning fake water creation with tissue paper.
Making fake water with tissue paper is a great way to teach kids about the value of conservation and preserving natural resources. Plus, it’s an enjoyable activity that will keep them entertained for hours on end – so get crafting!
9 Tips for Making Fake Water With Tissue Paper:
1. Gather the materials needed: tissue paper, bowl, water, spray bottle, or paintbrush.
2. Soak the tissue paper in a bowl of water for a few minutes until it’s saturated.
3. Begin layering the pieces into your container of choice, starting from the bottom and working up.
4. Spray or paintbrush the tissue paper with water to make sure it’s completely dampened.
5. Let the container sit for a couple of hours so that the tissue paper can dry.
6. Try experimenting with different colors of tissue paper for added effect.
7. Modify the size and shape of your jar or container depending on the desired effect.
8. Add embellishments or ribbon to top off your creation for a beautiful finishing touch.
9. Make sure to let kids handle the project, too!
Making fake water with tissue paper is a fun, creative way to spruce up any miniature garden. With the right materials and just a few steps, you can have your beautiful oasis in no time! So, the next time you’re looking for an easy and unique craft project, why not try this method? You won’t be sorry!

How to Create a Beautiful and Lifelike Lake or Water Feature with Tissue Paper
If you’re looking for an easy and stunning way to create a lake or other water feature in your next crafting project, look no further than tissue paper. This accessible material has the potential to add lifelike dimension and color to any craft. Simply take pieces of colored tissue paper and scrunch them together in a bowl or other shape according to your desired effect.
Then, simply glue it onto your surface or directly into place with a hot glue gun. Now you have a beautiful and realistic lake or water feature! With this creative yet simple technique, anyone can build something remarkable with ease.
Frequently Asked Questions:
Q1: Can I Use Different Colors of Tissue Paper to Create a Unique Effect?
A1: Absolutely! Experiment with various colors and see which combinations work best for your project. You can also layer different shades of the same color to create depth and dimension. It’s all about being creative and finding what works best for you.
Q2: Can I Use Tissue Paper to Create Other Water Features Besides Lakes?
A2: Yes, you can! You can use this technique to create rivers, oceans, and even waterfalls. Just follow the same steps and adjust the colors and shapes accordingly. The possibilities are endless! It’s all about using your imagination and having fun with it.
Q3: Can I Incorporate Other Materials into the Tissue Paper Mixture?
A3: Absolutely! You can add glitter, small toys, or other materials to create a unique effect. Just make sure to mix them in thoroughly with the tissue paper before adding the fake water mixture. This will ensure that everything sticks together properly and looks cohesive. Have fun experimenting with different materials to make your fake water creation even more unique!
Q4: Is This a Kid-Friendly Activity?
A4: Yes, it is! Of course, adult supervision may be needed for certain steps involving hot glue or sharp objects. Overall, this activity is perfect for kids and can even serve as an educational lesson about water conservation and the environment. Let your little ones join in on the fun and see what kind of creative projects they come up with.
How Long Does It Take for the Tissue Paper to Dry Completely?
When it comes to tissue paper, the drying process can take some time, depending on the thickness of the material. A thin layer of tissue paper should dry relatively quickly, typically no more than a few minutes. On the other hand, if the tissue paper is thicker and more absorbent, it can take much longer for it to dry completely — often up to several hours or even days in humid environments.
Furthermore, the speed of airflow around the tissue paper will also impact how long it takes for it to become completely dry. For best results and quickest drying times, many people recommend utilizing a fan or blow dryer set at low heat to accelerate the drying process.
Can You Modify the Size and Shape of Your Container Depending on Your Desired Effect?
When it comes to achieving a certain look or effect, the size and shape of the container you choose can have a big impact.

When packaging products, for instance, considerations such as cost, ease of shipping, and presentation factor into decisions about the size of containers. Similarly, when creating décor items with materials such as wreaths or flower arrangements, certain sizes and shapes are preferred to convey a particular style or theme.
Depending on the desired effect, larger containers create an impressive statement, while smaller ones can be used to add subtle details. So whether you’re crafting something special or moving merchandise, modifying the size and shape of your container may be key to making a lasting impression.
Are There Any Other Embellishments That Can Be Added for a Beautiful Finishing Touch?
Adding the right finishing touches to any project can truly set it apart and make its beauty stand out. An easy way to up your game without needing any artistry skills is by getting creative with embellishments! Adding beads, ribbons, flowers, feathers, or fringe to add texture and layers are all great options.
There are an endless number of embellishments available to get creative with – it’s just a matter of finding the one that speaks to you and will give your project the wow factor it deserves!
Conclusion
Making fake water with tissue paper is simple and only requires a few materials that can be easily found around the house. You should carefully determine how to make fake water with tissue paper. This project is perfect for those who want to create a realistic scene without getting their hands wet. By following these steps, you will have beautiful, sparkly water in no time.
You Can Check it Out to Crochet Primrose Stitch
You Can Check It Out To Make Doorstop