
Fabric pumpkins with real stems are a charming and rustic addition to your fall décor. These delightful creations infuse the warmth and spirit of autumn into your home. Using real pumpkin stems gives these fabric pumpkins an authentic touch and a unique appeal. In this comprehensive guide, we’ll lead you through the process of how to make fabric pumpkins with real stems, step by step.

From selecting the perfect fabric to ensuring a secure attachment of the stems, we’ll cover all the intricacies involved in this crafting venture. So, gather your materials, ignite your creativity, and let’s embark on a journey to craft these adorable fabric pumpkins that will bring the essence of fall to your living space.
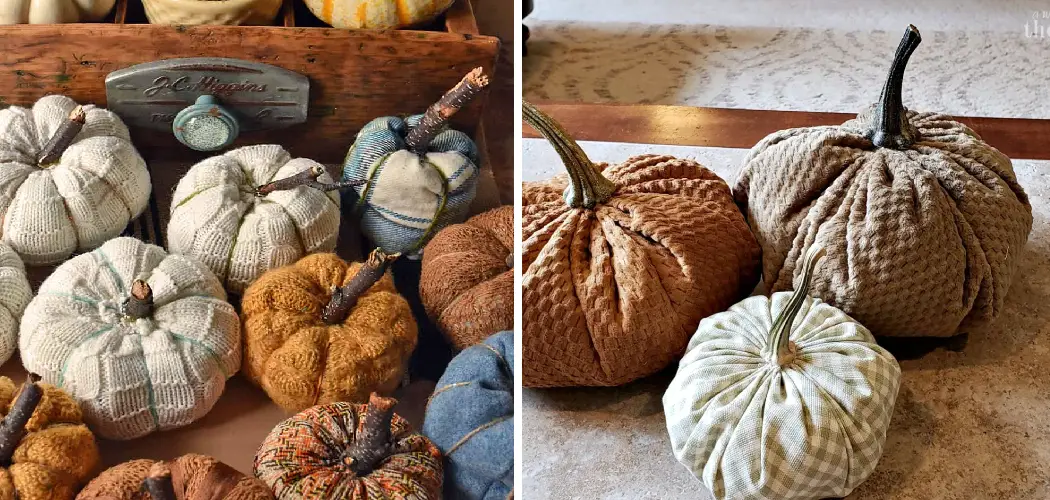
Types of Fabric Suitable for Fabric Pumpkins
There are several types of fabric that are well-suited for making fabric pumpkins with real stems. Some fabrics may work better than others, depending on the look and feel you want to achieve.
- Cotton – This is a popular choice for making fabric pumpkins as it is easy to work with and holds its shape well. It also comes in a variety of colors and patterns, making it easy to find the perfect fabric for your pumpkins.
- Linen – This material gives a more rustic feel to your pumpkins and is great for creating a country or farmhouse-style look. It has a textured surface that adds depth and interest to your pumpkins.
- Burlap – Another popular choice for creating a rustic or shabby chic look, burlap is a versatile fabric that can be used for both the body and stem of your pumpkin. It also comes in various colors and can be easily manipulated to create different shapes and sizes.
- Velvet – If you want a more luxurious feel to your pumpkins, velvet is the way to go. Its soft texture adds an elegant touch to any space and looks especially beautiful in rich, autumnal colors.
- Faux fur – For a fun and whimsical twist on traditional fabric pumpkins, try using faux fur. It adds a playful element to your decor and is perfect for creating cute, fuzzy pumpkins.
List of Materials Required for Making Fabric Pumpkins
To create your own fabric pumpkins, you will need the following materials:

- Fabric – Choose from cotton, linen, burlap, velvet, or faux fur, depending on your personal preference and the aesthetic you want to achieve.
- Real Pumpkin Stems – These can be obtained from real pumpkins or purchased from a craft store.
- Filler – Polyester fiberfill or any other soft stuffing material to give your pumpkin its shape.
- Thread – Choose a color that matches or complements your fabric.
- Sewing Needle – A basic sewing needle will work for most fabrics, but you may need a specialty needle for heavier materials like burlap or faux fur.
- Scissors – For cutting your fabric and thread.
- Hot Glue Gun (optional) – This can be used to secure the stem to the fabric, although it’s not necessary if you prefer to sew the stem in place.
- Fabric Marker (optional) – Useful for marking out the shape of your pumpkin on your fabric before you start cutting.
10 Methods How to Make Fabric Pumpkins with Real Stems
1. Gather Materials
To make fabric pumpkins with real stems, you will need several materials. These include a piece of fabric in the color of your choice, a stem from a real pumpkin, hot glue, scissors, a needle and thread, stuffing material such as cotton batting or polyfill stuffing, and an optional embroidery hoop. You may also want to have a ruler or measuring tape and pins on hand for accuracy.
2. Cut Fabric
Cut the fabric into two circles that are the same size. The size of the circles will determine the size of your finished pumpkin so choose accordingly. It is best to use a fabric that does not fray easily such as felt or fleece. You can also use an old t-shirt or sweater for a more textured look. Although, if you are using a t-shirt or sweater, you may want to cut four circles instead of two and sew them together for added thickness.
3. Sew Circles Together
Place the two circles on top of each other and sew them together using a running stitch around the edge of the circles. Leave an opening for stuffing and be sure to backstitch at both ends to secure the seam.
This is the body of your fabric pumpkin. If you are using different colors for the top and bottom circles, make sure to sew them together with right sides facing each other so that the seam will be on the inside of your pumpkin.
4. Stuff Pumpkin
Stuff your pumpkin with batting or polyfill stuffing until it is firm but not too tight. Be sure to stuff it evenly throughout so that it looks round when finished. Once you have stuffed it to your desired firmness, hand-sew the opening closed using a whip stitch or ladder stitch. Make sure to secure the thread well so that the pumpkin won’t come apart later on.

There are various ways to stuff your pumpkin depending on what materials you have at hand. Some people like to use rice, beans, or even old socks as filling for their fabric pumpkins. However, using batting or polyfill stuffing will give your pumpkin a more smooth and uniform appearance.
5. Attach Stem
Attach the stem to the top of your pumpkin by gluing it in place with hot glue or by sewing it on with thread and needle if you prefer. Make sure that you press down firmly on the stem while attaching it so that it adheres securely to the pumpkin body.
Alternatively, you can also use a small piece of wire to wrap around the stem and then insert it into the pumpkin for added stability. Experiment with different attachment methods to see which works best for your fabric pumpkin. However, do keep in mind that the stem should be securely attached to ensure that your pumpkin remains intact for years to come.
6. Create Seams
Create seams around your pumpkin by stitching along either side of each vertical line from top to bottom with embroidery floss or yarn in a contrasting color if desired for decoration purposes only. This will give your pumpkin added texture and dimension when finished.
You can choose to stitch in a straight line or add a bit of whimsy by stitching in a zigzag pattern. Make sure to leave the top of the pumpkin open for stuffing. Additionally, you can also add a seam around the top opening of the pumpkin to give it a more finished look.
7. Add Embroidery Hoop (optional)

If desired, add an embroidery hoop around your pumpkin for added texture and dimension by gluing it in place with hot glue or by sewing it on with thread and needle if preferred. This step is completely optional but adds an interesting touch to your finished fabric pumpkins!
Though it may take some extra time and effort, the end result will be worth it. Although embroidery hoops come in various sizes, we recommend using a 6-inch hoop for smaller pumpkins and an 8 or 10-inch hoop for larger ones.
8. Fluff Pumpkin
Fluff up your fabric pumpkins by gently pulling apart each sewn seam until they look full and round like real pumpkins! You can also add more stuffing if needed for extra plumpness. This step is important to give your pumpkins that realistic look and feel. Make sure to fluff all sides evenly, including the top and bottom.
9. Paint Stem (optional)
For added realism, paint your real stem in various shades of orange, yellow, brown, or red using acrylic paints. Allow time for drying before proceeding to the next step. This step is optional, but it can add a fun touch to your fabric pumpkins. While the stem is drying, you can work on the fabric pumpkin itself. Try to match the paint colors to the fabric you chose for your pumpkin for a cohesive look.
10. Finish Off Your Pumpkin

Finish off your fabric pumpkins by adding some extra details such as leaves, vines, tendrils, etc., using scraps of fabric or pieces of felt cut into shapes. Glue these pieces onto your pumpkin body using hot glue for a realistic finish! You can also add some additional embellishments such as buttons, beads or embroidery to give your pumpkin a unique touch.
Conclusion
In conclusion, crafting fabric pumpkins with real stems is a fun and creative way to add autumn flair to your home. All you need is a few basic supplies, some patience, and a little bit of practice. From start to finish, this craft takes about an hour or two depending on how detailed you want to make it. You can take the design further by adding scrapbook paper for extra textures or use different colors of fabrics to match any room’s décor.
The possibilities are endless when fabric pumpkins are involved! So why not give it a shot today? Show off your creative side and incorporate this lovely piece in your living room or entryway. Be sure to follow all instructions on how to make fabric pumpkins with real stems carefully, and always consult an expert when in doubt. Happy crafting!