
Creating binding strips for a quilt is an important skill for any quilter. Binding is the fabric strip that surrounds and finishes the edges of a quilt, giving it a clean and polished look. Making your own binding allows you to customize the color and fabric to complement your quilt design.

While it may seem daunting at first, with a few simple steps and basic sewing skills, you can easily create binding strips that add a professional touch to your quilt. In this article, we will guide you through the process of how to make binding strips for a quilt, providing you with clear instructions and tips to ensure a seamless and beautiful finish.
Get ready to learn how to make your quilt edges pop with perfectly crafted binding strips!
The Importance of Binding Strips in Finishing a Quilt
Binding strips are an essential part of a quilt. They provide the final touch to give your quilt a neat and polished finish, prevent fraying, and keep the edges from unraveling. Without proper binding strips in place, your beautiful quilt will not last as long or look as good over time.
Not only do binding strips help protect the longevity of the quilt, they also add a unique decorative element to it. Binding strips can be made with different fabrics that contrast or coordinate with the rest of the fabric colors. You can even choose to use some extra pieces from earlier projects in order to create an entirely new design with each project!
For those who want to take their creative abilities one step further, binding strips can also be used to make patterns within the quilt. This is especially helpful when working with a large quilt that has many fabric pieces. By taking the time to create interesting designs or patterns for the binding strips, you can add another layer of depth and detail to your project.
Definition and Purpose of Binding Strips
Binding strips are used to create a neat and finished edge around the edges of a quilt. The binding strips are cut and sewn onto the raw edges of the quilt, providing an attractive border while also protecting the quilt from fraying or other damage.

Binding strips can be made out of any type of fabric, depending on your preference – cotton, flannel, satin, wool, silk – all work well. When choosing a binding strip material, consider how it will look against the colors in your quilt as well as its durability and washability.
Once you have chosen your fabric for the binding strips, it’s time to start cutting them! For this project you will need:
- Fabric for the binding strips
- Scissors or rotary cutter
- Ruler
- Chalk or fabric marker Iron
- Sewing machine with matching thread
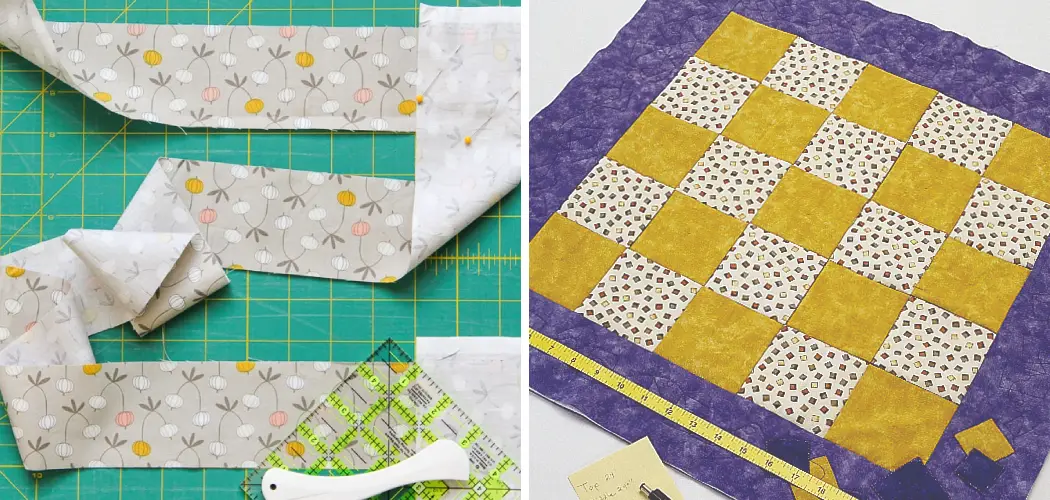
The first step is to cut the binding strips. Measure out 2½ inches wide for each strip, using a ruler and chalk or fabric marker. Use a rotary cutter if possible as this will make your job much easier. Cut enough strips to go all the way around the edge of your quilt plus an extra 6 inches for finishing at either end.
Once you have all of your strips cut, it’s time to sew them together! Place two strips right sides together and sew along one long side with a ¼ inch seam allowance.
Repeat this process until all of your strips are sewn together to make one long strip. To finish the edges, use an iron to press a ¼ inch fold along each short end, then pin and sew along the folded edge with a ¼ inch seam allowance.
Different Types of Binding Strips
Binding strips are a critical part of making a quilt. They keep the edges from fraying and ensure your quilt looks neat and tidy. There are several types of binding strips you can use for your quilt, including bias binding, single-fold binding, double-fold binding, straight grain binding, and mitered corners.
Bias Binding is the most commonly used type of binding strip. This method uses fabric cut on the diagonal to create a flexible edge that can be easily manipulated around curves and corners.

It’s best suited for curved or irregularly shaped quilts where straight grain fabric would struggle to match up with all the seams properly. Bias binding also provides an extra layer of support along the edges of your quilt, which is especially important for heavier materials.
10 Ways How to Make Binding Strips for a Quilt
1. Calculate the Binding Length:
To determine the length of binding needed for your quilt, measure the perimeter by adding the four sides’ measurements. It’s recommended to add around 10 to 12 inches extra for corners, joining, and overlap. This additional length will ensure you have enough binding to work with.
2. Determine the Binding Width:
Consider the desired width of your binding. Most quilters prefer binding widths between 2.25 to 2.5 inches. The width will depend on personal preference and the scale of your quilt. A narrower binding may be suitable for smaller quilts or those with intricate patterns, while a wider binding can add impact to larger quilts.
3. Choose the Fabric and Cut Strips:
Select a fabric that complements your quilt design and color scheme. Determine the number of binding strips needed by dividing the total binding length by the fabric width. It’s recommended to cut the strips on the bias (45-degree angle) to allow for flexibility and prevent stretching.
Cut the strips with a rotary cutter, ruler, and cutting mat. The width of the strips should be double the desired finished binding width, plus an additional ¼ inch for seam allowances.
4. Join the Strips:
Take two fabric strips and place them right sides together at a 90-degree angle, forming an “L” shape. Sew a diagonal line from one corner to the opposite corner, creating an “X” shape. Trim the excess fabric, leaving a ¼ inch seam allowance. Press the seam open or to one side.
Repeat this process to join all the strips together, creating one continuous binding strip. Press the seams flat to reduce bulk.
5. Trim and Press the Binding:
Trim any excess fabric from the beginning and end of the continuous binding strip. Square off the ends by folding the strip in half widthwise and cutting a straight line. This step ensures a clean finish when joining the binding ends later.
Next, fold the strip in half lengthwise, wrong sides together, and press it with an iron. This will create a crease along the center of the strip, serving as a guide during application.

6. Attach the Binding to the Quilt:
Starting in the middle of one side of the quilt, leave a 6 to 8-inch tail of binding strip. Align the raw edges of the strip with the raw edge of the quilt, right sides together. Pin or clip the binding in place.
Begin sewing the binding to the quilt using a ¼ inch seam allowance, starting at the edge of the quilt and backstitching to secure the stitches. Continue sewing until you reach approximately ¼ inch away from the first corner.
7. Miter the Corners:
To create mitered corners, stop sewing when you reach the corner, leaving the needle down in the fabric. Lift the presser foot and fold the binding strip up, away from the quilt, at a 45-degree angle. Then fold it back down, aligning the raw edge of the strip with the next side of the quilt.
Lower the presser foot and continue sewing along the next side, repeating the process at each corner. Mitering the corners creates neat and crisp edges on the finished quilt.
8. Join the Binding Ends:
When you approach the starting point, stop sewing a few inches away from the tail of the binding. Trim the excess binding, leaving a 6 to 8-inch tail. Open up the binding and fold back the tail. Lay the end of the binding strip over the tail, right sides together, and at a 90-degree angle.
Mark a diagonal line from corner to corner and sew along the marked line. Trim the excess fabric, leaving a ¼ inch seam allowance, and press the seam open. This creates a clean and secure join.
9. Finish Sewing the Binding:
With the binding ends joined, continue sewing along the remaining sides of the quilt, ensuring the binding is neatly folded and mitered at each corner. Take care to fold the binding smoothly around curves, using your fingers or a pin to ease the fabric. When you approach the starting point, stop sewing a few inches before the end, leaving a small gap.

10. Final Steps:
Fold the unsewn portion of the binding strip back on itself, creating a neat fold at the corner. Overlap it with the starting tail, aligning the raw edges. Trim the excess, leaving a ¼ inch seam allowance. Fold the binding over the raw edges of the quilt, encasing them completely.
Hand stitch the binding to the back of the quilt using a blind stitch or ladder stitch, securing it in place. Take small, even stitches, catching the folded edge of the binding and a tiny amount of the quilt’s backing fabric. Continue stitching until you reach the starting point, creating an invisible and durable finish.
Conclusion
This quilting technique is great for those who are just starting out in the craft, as well as experienced quilters. Making binding strips may seem intimidating, but with a few simple steps and these handy tips, you can make your quilting projects look professional. So take up some fabric and get creative!
With just a few scraps of fabric, you’ll be binding beautiful quilts in no time! Be sure to check out our website for more information on how to make binding strips and complete your next quilt project. Be sure to follow all instructions on how to make binding strips for a quilt carefully, and always consult an expert when in doubt. Happy quilting!