
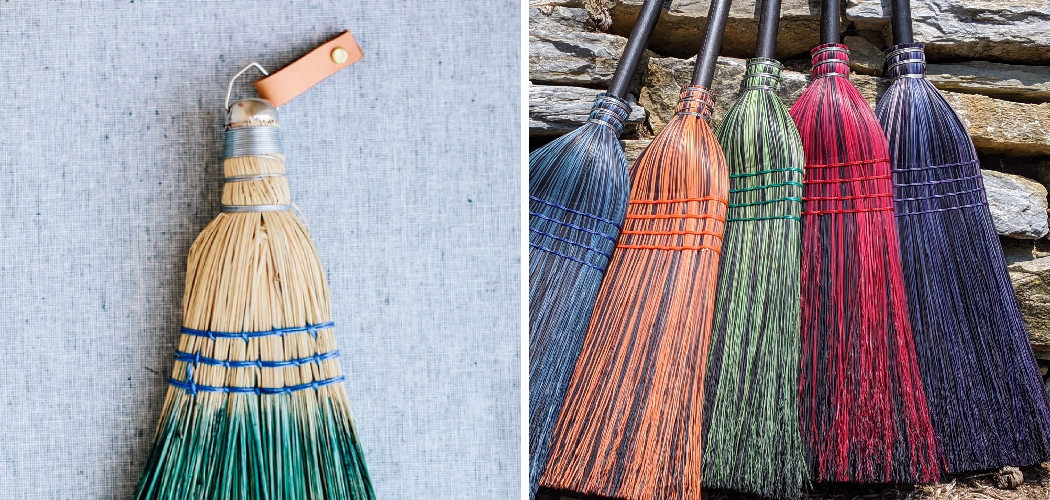
Do you want to add a pop of vibrant color to your handmade brooms or décor items? Are you interested in learning a traditional art form that has been practiced for centuries? Then you’ll be glad to know that dying broom corn is not only possible but easy and enjoyable!
Dyeing broom corn is an ancient craft passed down through generations of artisans. Dyeing your own broom corn gives you the freedom for unique custom colors that aren’t easily found elsewhere.

In this blog post, we will explore the process of how to dye broom corn and what supplies are needed. Readers will learn tips on color mixing, as well as rinsing and drying techniques, so they can experience beautiful results every time. With this comprehensive guide, anyone can learn about it! Let’s get started!
The Benefits of Dying Broom Corn
1. Add Vibrancy
The process of dyeing broom corn has many benefits. It adds color and vibrancy to any craft project, turning something plain into something truly unique and eye-catching. By dying your own broom corn, you are able to customize the colors that you use for specific projects. And since it’s derived from natural fibers like hemp or jute, dyeing broom corn can provide a unique texture and feel to any project.
2. Easy Process
It’s an easy process, with some basic supplies you can find in your local craft store or online. The steps are straightforward, and once completed the results will create beautiful pieces of art that are sure to last for years to come!
3. Inexpensive
The cost of dying broom corn is relatively inexpensive, especially when compared to other traditional dyeing processes. With a minimal investment in supplies, you can turn plain materials into vibrant and unique works of art that will impress everyone who sees it!
Supplies Needed for Dying Broom Corn
- Natural fiber broom corn
- Dye – either natural or synthetic
- Pot and stirring stick for dye mixing and application
- Plastic bags or containers for soaking and rinsing
- Clean cloths for wiping off excess dye
- Old towels or newspaper to protect work surfaces
- Gloves, protective goggles, and a respirator (for protection from fumes)
7 Ways How to Dye Broom Corn
1. Prepare Materials
Begin by preparing your materials. Sort, clean, and soak the broom corn in water for at least 30 minutes. Beginning with clean materials will ensure the best results. Materials that are too dirty may result in streaky and uneven colors.

2. Mix Dye & Water
Next, mix the dye with the water according to the directions on the package. The amount of water needed depends on how much color you want for your project. For a deeper color, use less water; for a softer hue, add more water.
3. Soak Broom Corn in Dye Mixture
Once the dye and water are mixed, it’s time to soak the broom corn in the dye mixture. Depending on the color you want, you can either completely submerge or partially dip your broom corn in the dye mixture. You can also use a brush or sponge to apply the dye.
4. Let Soak
After you have submerged or partially dipped your broom corn in the dye mixture, let it soak for 1-2 hours to allow the color to be fully set. As the broom corn soaks, periodically check on the color and remove it if the desired hue is achieved.
5. Rinse
Once the desired color is achieved, remove the broom corn from the dye mixture and rinse under running water until the water runs clear. If needed, repeat this step to make sure that all of the excess dye has been removed from the broom corn.
6. Dry
After rinsing, lay out your dyed broom corn on an old towel or newspaper and let it dry completely before using. If you are in a hurry, you can use a hair dryer to speed up the drying process. Also, remember to wear gloves and protective goggles when handling the dye.
7. Store
Once the dyed broom corn is completely dry, store it in a cool and dry place away from direct sunlight. This will help ensure that your colorful projects remain vibrant for years to come!

Now you know how to dye broom corn and can add vibrant colors to your crafting projects! Have fun and be creative and you’ll be creating beautiful pieces of art in no time.
8 Common Mistakes to Avoid When Dying Broom Corn
1. Not preparing materials properly. Make sure to properly sort, clean, and soak the broom corn in water for at least 30 minutes before dying. This helps ensure that you get even color saturation throughout your entire project.
2. Using too much dye. Remember, you can always add more dye, but you can’t take away color! Make sure to pay attention to the directions on the package and use the recommended amount of dye for your project.
3. Not letting materials soak long enough in dye mixture. For a darker color, leave materials in the dye mixture longer than the recommended time. For lighter colors, remove materials sooner than suggested.
4. Failing to rinse thoroughly. Make sure to rinse your broom corn until all of the excess dye has been removed. This will help ensure that you get even color saturation and prevent streaking in your finished project.
5. Not drying completely before storing or using in projects. Allow the broom corn to dry completely before using or storing it. If you don’t, it may cause discoloration over time and ruin your project.
6. Not protecting surfaces when working with dyes. Make sure to lay out old towels or newspapers on work surfaces to prevent staining from dye spills and drips. The surface should also be well-ventilated when working with dyes.
7. Not wearing gloves and protective gear. Make sure to wear gloves, a respirator, and protective goggles when handling the dye or applying it to your materials. This will help protect you from any chemical fumes that may be present in some dyes.
8. Not using color-safe containers. When storing or soaking broom corn in dyes, make sure to use plastic bags or containers made of materials that won’t react with the dye. This will help keep your colors looking vibrant and not discolored over time.

Now that you know how to dye broom corn and common mistakes to avoid, you can confidently get started on your next crafting project!
5 Maintenance Tips for Keeping Your Broom Corn Colorful and Vibrant
1. Keep materials clean and dry. Be sure to regularly sort, clean, and dry your broom corn to prevent discoloration over time. This will help keep the colors looking bright and vibrant for years to come!
2. Store in a cool & dry place. Make sure to store your dyed broom corn in a cool and dry place away from direct sunlight. This will help keep the colors looking their best and prevent fading over time.
3. Avoid contact with water or moisture. When storing, try to keep your broom corn away from moisture or water as much as possible to prevent discoloration. If it does get wet, be sure to let it dry completely before storing or using it in projects.
4. Don’t over-dye. Make sure to pay attention to the directions on the dye package and not over-dye the materials. Over-dying can result in colors that are too dark and muddy looking, so try to use just enough dye for your project.
5. Clean up spills immediately. When working with dyes, take care to clean up any spills or drips right away. This will help keep your work surfaces and materials looking their best.
With these tips in mind, you can be sure that your colorful projects look beautiful for years to come!
Frequently Asked Questions
How Long Will It Take to Finish the Project?
The time required to dye broom corn depends on the complexity of the project and how many colors you want to use. Generally, it takes about two to three hours for one color and up to four hours for multiple colors. It is important to also factor in drying time, which can take anywhere from 24-48 hours, depending on humidity levels.
What Types of Dyes Should I Use?
The best dyes to use for dyeing broom corn are acid or fiber-reactive dyes. Acid dyes are good for animal fibers, while fiber-reactive dyes are better suited to vegetable fibers like broom corn. When selecting a dye, you should also make sure it is suitable for the intended type of fabric and has good lightfastness.

Conclusion
Now you know how to dye broom corn and create your own brooms! You can find broomcorn in many craft stores or online, as well as the dyes and accessories needed for this craft. Creating your own brooms is not only a unique way to add personality and style to your home, but it is also a great way to exercise creativity.
Whether given as a special gift or kept for decoration, crafting brooms with dyed broomcorn adds both charm and character to any living space. So, don’t be afraid to try out something new! With the tips presented here, delve into the world of crafts with confidence and embark on an exciting journey of creativity- all the while adding intangible warmth and personalization into your home!