
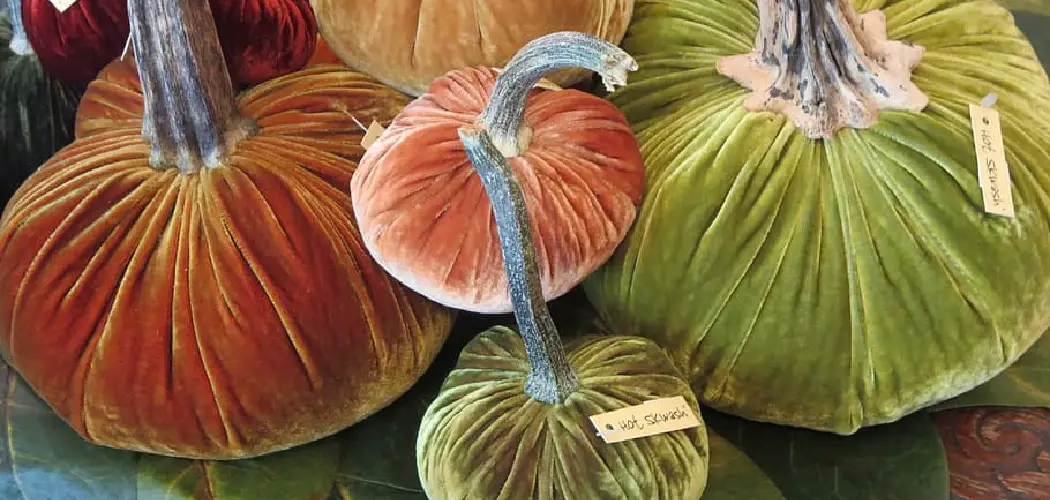
Fall is here and with it comes the quintessential sign of the season: pumpkins! Whether you’re a seasoned pumpkin carver looking for something new, or just getting into crafting for autumn, one project that is sure to elevate your pumpkin is to make it velvet.

With its luxurious fabric and pop of color, velvet will grab everyone’s attention – but don’t worry, you’ll be surprised by how easy this craft actually is. In this blog post on how to make a velvet pumpkin, we’ll go over everything you need to know about how to create a beautiful velvet-covered pumpkin perfect for any display. Let’s dive in!
11 Step-by-step Instructions on How to Make a Velvet Pumpkin
Step 1: Gather your supplies. To make a velvet pumpkin, you’ll need:
- A foam or real pumpkin
- Velvet fabric in your choice of color
- Paper or plastic cups
- Scissors
- Hot glue gun and glue sticks
- Twine or ribbon for the stem
- Fabric or acrylic paint (optional)
- Paintbrush (optional)
Step 2: Create a Pattern for Your Pumpkin
Use paper or plastic cups to create the desired size and shape of your pumpkin. You can use multiple cups to make different sizes, depending on how many pumpkins you want to make.
It’s best to start with smaller pumpkins if you’re new to this craft. It’s also recommended to have a few extra cups for trial and error. You can always adjust the pumpkin size and shape as you go. But it’s easier to have a general form in mind before you start covering your pumpkin with velvet.
Step 3: Cut the Velvet Fabric

Lay your fabric flat on a surface and place the cups on top. Trace around each cup, leaving about an inch of extra fabric around the edges. Next, cut out the circles, making sure to keep them stacked and in order so they match up later on. This will be the fabric for your pumpkin’s body.
It’s also a good time to cut out fabric for the stems and leaves if you plan on adding those details. It’s best to use a contrasting color for the stems and leaves so they stand out. But feel free to get creative and use any colors or patterns you like!
Step 4: Glue the Cups Together
Align the cups of each fabric circle and glue them together, leaving a small opening at the top for stuffing. You can also use pins to keep the cups in place while you work. You should end up with a shape similar to an accordion or fan.
This is the base for your pumpkin. Although it may look a little strange at first, once you stuff and shape it, it will transform into a beautiful pumpkin. But don’t worry, we’ll get there! This is also where you can add any paint or additional details to your fabric if desired.
Step 5: Stuff Your Pumpkin
Fill your pumpkin with stuffing until it’s nice and plump. You can use any type of filling – from cotton balls, old t-shirts or even plastic bags. Be sure to pack it in tightly so your pumpkin holds its shape.
You can also add a few drops of essential oils to the stuffing for a festive scent. You can use cinnamon, pumpkin spice or any other fall-inspired scent. It’s also optional to add a few pinecones or twigs for added texture.
Step 6: Close the Opening

Glue or sew the opening shut, making sure to secure all layers of fabric together. But don’t worry if a few small gaps are left – we’ll cover those up later. You can also use twine or ribbon to add a decorative touch and create a stem at the top of your pumpkin. Simply wrap it around and tie a knot to secure it in place.
Step 7: Create the Stem
To make the stem, you can either use twine or ribbon. Cut a piece about 6 inches long and wrap it tightly around the top of your pumpkin, leaving a small tail at the end to create a stem. This will give your pumpkin a more textured and realistic look.
You can also use brown or green paint to add lines or create leaf shapes on the stem for an extra touch of detail. It also recommends making a few extra stems with different colors so you can switch them out and change up the look of your pumpkin throughout the season!
Step 8: Paint Your Pumpkin (optional)
If you want to add some depth and texture to your pumpkin, you can paint it with fabric or acrylic paint. This is a great way to create a more realistic-looking pumpkin or add some personality with fun designs. It’s also a great option if you don’t have access to velvet fabric or want to use up some leftover pieces. But feel free to skip this step if you’re happy with the look of your velvet pumpkin as is!
Step 9: Add the Stem
Once your paint is dry, glue or tie the stem onto your pumpkin. You can also use a small piece of felt to cover any visible parts of the twine or ribbon. It’s also a good idea to add some glue or double-sided tape to the bottom of your pumpkin stem before securing it to the pumpkin. This will prevent it from sliding around or falling off.
Step 10: Display Your Velvet Pumpkin

Now that your pumpkin is complete, find the perfect spot to display it. You can use it as a centerpiece on your dining table or place it on a mantel for added fall décor. But feel free to get creative and use it as a prop for photos or incorporate it into your home’s autumn theme in any way you like! It’s also a great idea to make multiple pumpkins in different sizes and colors to create a stunning display.
Step 11: Make More!
Why stop at just one velvet pumpkin? Use different sizes and colors of fabric to create a whole collection. You can also add embellishments like glitter or sequins for some extra flair. Always remember to have fun and get creative with your pumpkin-making process! And don’t forget to share your creations on social media – we’d love to see them!
With these easy step-by-step instructions on how to make a velvet pumpkin, you’ll have a beautiful velvet pumpkin in no time. And the best part? It’s a craft that can be enjoyed by all ages – perfect for a fun fall activity with family and friends.
So go ahead and get creative with your own version of a velvet pumpkin! Keep the autumn spirit alive by trying out different patterns, colors and sizes to make your own unique velvet pumpkin collection. Happy crafting!
Things to Consider
- Don’t Limit Yourself to Traditional Orange Pumpkins – Try Using Different Colored Velvet Fabrics for a Unique Look.
- You Can Also Use Other Types of Fabric, Like Satin or Burlap, to Make Your Pumpkin Stand Out Even More. The Possibilities Are Endless!
- For an Added Touch, You Can Hot Glue on Some Faux Leaves and Vines to Give Your Velvet Pumpkin a More Realistic Appearance.
- If You’re Not a Fan of Painting, You Can Use a Marker or Fabric Pen to Draw on Your Pumpkin Instead.
- Don’t Be Afraid to Experiment With Different Shapes and Sizes – Try Making Long and Skinny Pumpkins for a Whimsical Touch. Keep in mind that the larger the pumpkin, the more fabric and stuffing you’ll need.
- Have Fun and Get Creative! This is Your Chance to Make a One-of-a-Kind Pumpkin for Fall. There are No Rules – Just Let Your Imagination Run Wild!
Frequently Asked Questions
Q1: Do I Have to Use a Foam Pumpkin or Can I Use a Real One?
A1: Either type of pumpkin will work for this project. Real pumpkins may be easier to find and cheaper, but foam pumpkins are reusable and can last longer. It ultimately depends on your preference and budget.
Q2: Is It Necessary to Paint the Pumpkin?
A2: No, painting your pumpkin is completely optional. If you prefer a more natural look, you can skip this step and still have a beautiful velvet pumpkin. You can also use different fabrics or patterns to add more visual interest.
Q3: Can I Use Different Types of Fabric?
A3: Yes, you can use any fabric you like for this project. Velvet just adds a luxurious touch, but you can experiment with different textures and materials to create your own unique pumpkins. Keep in mind that thinner fabrics may require more layers for a fuller pumpkin.
Q4: How Do I Store My Velvet Pumpkin?
A4: To keep your velvet pumpkin in good condition, store it in a cool, dry place when not on display. You can also wrap it in tissue paper or bubble wrap to protect the fabric and maintain its shape.

With proper care, your velvet pumpkin can be reused for years to come. That’s it! Now you know how to make a velvet pumpkin – a fun and easy DIY project that will add a touch of elegance to your fall décor. We hope this step-by-step guide has been helpful and inspired you to get creative with your own unique velvet pumpkins.
Conclusion
Crafting a velvet pumpkin is truly a unique way to get you in the fall spirit! With just a few simple steps and some creativity, your finished project will make for a beautiful addition to any room in your home.
The satin nature of the velvet ribbon gives the pumpkin an elegant touch while still being fun and inviting. Not only will you be proud of what you created, but it can also serve as the perfect fall decoration for friends and family alike.
If you find that you have leftover pieces after putting together your finished product, don’t forget that velvet pumpkins also make great presents for loved ones.
So, go ahead and stock up on ribbon in autumn shades – then get busy crafting away! It’s easy and it’s fun, plus you’ll have a lovely personalized piece worthy of displaying or gifting! Thanks for reading this article on how to make a velvet pumpkin.