
Are you looking for a creative and festive way to decorate your home for the fall season? Decorating foam pumpkins can be a fun and versatile craft project that allows you to add a personalized touch to your autumn decor. Whether you prefer traditional or unique designs, foam pumpkins offer a blank canvas for your imagination to flourish.

From painting and decoupage to embellishments and carving, there are countless ways to transform a simple foam pumpkin into a stunning centerpiece or eye-catching display.
In this article, we will explore various techniques and ideas on how to decorate a foam pumpkin. Get ready to unleash your creativity and embrace the spirit of the season as we embark on this festive and enjoyable crafting adventure.
The Versatility of Foam Pumpkins for Seasonal Decor
Foam pumpkins offer a unique and creative way to decorate for the fall season. With a variety of sizes, shapes, colors, and textures available, these foam pumpkins have proven themselves to be extremely versatile when it comes to crafting and decorating.
Whether you are looking to craft something special for the holiday season or just want to add an extra touch of whimsy to your home’s fall décor, foam pumpkins provide the perfect solution.
When it comes to decorating foam pumpkins, you have a number of options. You can paint them in different colors and patterns, add fabric or felt details, glue on buttons or other embellishments, use glitter for an extra sparkle, or even wrap them in light string for a glowing effect. The possibilities are endless!
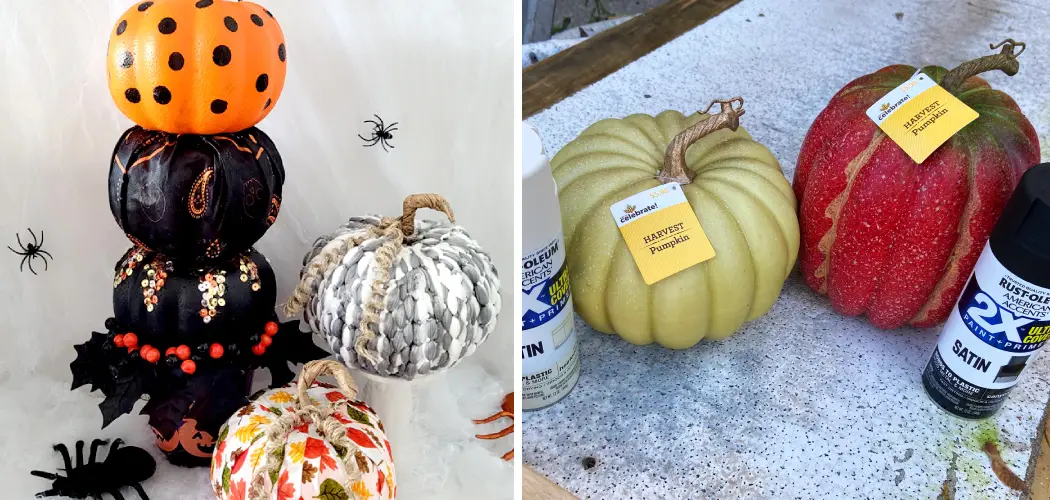
You can also use foam pumpkins to create unique centerpieces. For example, put a few small foam pumpkins together with some autumn leaves and acorns for a rustic look, or try stacking multiple sizes and shapes together for an eye-catching display. Another great way to highlight your foam pumpkins is by adding them to a floral arrangement – the pop of color will surely stand out.

Benefits of Decorating Foam Pumpkins
Decorating foam pumpkins offers a number of great benefits. For starters, they are much safer to work with than real pumpkins since there’s no chance of slicing your finger while carving or cleaning them out. They also last longer and don’t rot over time, so you don’t have to worry about replacing them every season.
Moreover, foam pumpkins are easy to customize in any way you like; you can paint them or glue embellishments on them without worrying about the mess that comes with using markers and paints on real pumpkins.
And finally, because they come in many sizes and shapes, you can make decorations for any space—from small tabletop decor to large door hangings—without having to search for the perfect pumpkin.
Decorating foam pumpkins allows you to express your creativity in ways that just aren’t possible with real pumpkins! So why not give it a try this Halloween season? It’s sure to be a spook-tacular experience!
10 Methods How to Decorate a Foam Pumpkin
Method 1: Paint with Acrylics
Begin by selecting acrylic paints in your desired colors. Apply a base coat of paint to the foam pumpkin, allowing it to dry completely. Once dry, use smaller brushes to add details, such as facial features, patterns, or designs.
Experiment with different brush strokes and techniques to achieve your desired effect. Consider incorporating metallic paints, stencils, or blending techniques to add depth and visual interest.
Method 2: Decoupage with Paper or Fabric
Choose decorative paper or fabric that suits your style and cut it into desired shapes or strips. Apply a decoupage medium, such as Mod Podge, to the foam pumpkin’s surface using a foam brush.
Carefully place the paper or fabric onto the pumpkin, smoothing out any wrinkles or air bubbles. Apply additional decoupage medium on top to seal the decoration. Allow it to dry completely before adding any additional layers or embellishments.
Method 3: Embellish with Glitter and Gems
Add a touch of sparkle to your foam pumpkin by embellishing it with glitter and gems. Apply a layer of adhesive, such as clear craft glue or a glue gun, onto the areas where you want to add glitter or gems. Sprinkle glitter over the adhesive and gently tap off any excess.
For gems or rhinestones, carefully press them onto the adhesive, ensuring they adhere securely. You can create patterns, cover specific areas, or go for an all-over dazzling effect.

Method 4: Carve with Hot Knife or Craft Knife
If you want to recreate the classic jack-o’-lantern look, consider carving your foam pumpkin using a hot knife or craft knife. Draw your desired design on the pumpkin’s surface using a washable marker. Carefully follow the lines and carve away sections of the foam to create openings. Take caution when using hot knives, ensuring you work in a well-ventilated area and practice safety measures.
Method 5: Wrap with Yarn or Ribbon
Transform your foam pumpkin by wrapping it with yarn or ribbon. Start by securing the end of the yarn or ribbon with a knot or a dab of hot glue. Begin wrapping the pumpkin, ensuring the yarn or ribbon is tightly wound and evenly spaced. Continue wrapping until you’ve covered the entire surface or achieved your desired look. Secure the loose end with another knot or glue to finish.
Method 6: Mosaic with Small Tiles or Glass Pieces
Create a stunning mosaic effect on your foam pumpkin using small tiles or glass pieces. Apply adhesive, such as a strong craft glue or mosaic adhesive, to the pumpkin’s surface in small sections. Carefully press the tiles or glass pieces onto the adhesive, creating patterns or designs. Fill in the gaps with grout or additional adhesive. Allow the adhesive to dry completely before handling.
Method 7: Stencil with Spray Paint
For a quick and stylish design, use stencils and spray paint to decorate your foam pumpkin. Select stencils with various patterns or shapes that align with your desired theme. Position the stencil on the pumpkin’s surface and secure it in place with tape. Spray paint over the stencil, ensuring an even coverage. Allow the paint to dry before carefully removing the stencil.
Method 8: Create a Succulent Planter
Transform your foam pumpkin into a unique succulent planter. Carve a hole at the top of the pumpkin and scoop out the foam carefully. Line the inside of the pumpkin with plastic or a small container to hold soil and prevent water damage.
Fill it with potting soil and plant your favorite succulents. Decorate the outside of the pumpkin with paint, moss, or additional accents to enhance its natural appeal.

Method 9: Personalize with Vinyl Decals
Add a personal touch to your foam pumpkin by applying vinyl decals. Choose pre-made decals or create your own using a cutting machine and adhesive vinyl sheets. Carefully apply the decals to the pumpkin’s surface, smoothing out any bubbles or wrinkles. Use a scraper tool to ensure proper adhesion. You can create names, quotes, or intricate designs to make your foam pumpkin uniquely yours.
Method 10: Mod Podge and Natural Elements
Combine Mod Podge with natural elements to create an organic and rustic look for your foam pumpkin. Apply Mod Podge to the pumpkin’s surface using a foam brush. Press natural elements such as leaves, twigs, or dried flowers onto the Mod Podge, arranging them in desired patterns or designs. Apply an additional layer of Mod Podge on top to seal the elements. Allow it to dry completely before displaying.
Things to Consider When Decorating a Foam Pumpkin
- Choose the right colors for your foam pumpkin. Select colors that match the theme of the room or event where it will be placed.
- Consider the overall look you want to achieve when decorating your foam pumpkin. Do you want a more traditional, classic look or something creative and modern?
- Plan out how you’ll cover the surface of the pumpkin. There are many different options, depending on what look you want to achieve. You can use fabric, ribbon, lace, beads or even buttons and rhinestones.
- Think about adding accents such as glitter glue or paint detailing for extra sparkle and texture. If you’re using paint, make sure it is meant for foam surfaces so that your design won’t be ruined by the paint seeping in or smearing.
- For a 3D look, consider adhering items like faux gems or artificial flowers to give your pumpkin more depth and dimension.
- Make sure the decorations you choose have something to do with Halloween or fall themes if that’s what your pumpkin is for. Otherwise, you can use decorations that represent anything or give it a personalized look.

Conclusion
Decorating foam pumpkins is a great way to get creative and express yourself this fall season. While they are easy to make, they can be surprisingly versatile and great for all skill levels of craftsmanship. Beginners can use basic supplies with minimal effort like markers or paint, but experienced crafters may seize the opportunity and go wild with more complex techniques.
A classic white foam pumpkin can quickly turn into your own personal autumn masterpiece with just a few simple tools and supplies. So grab those materials, pick out your favorite colors, and start creating your own version of How to Decorate a Foam Pumpkin!