
Do you want to make a statement with your gift wrapping? Gift-giving season is here! Everyone loves receiving a present that has been thoughtfully wrapped, and a great way to make your gifts extra special is by adding a homemade tulle bow. A tulle bow can give it an eye-catching flair that is sure to wow the recipient. Whether you’re making a birthday or holiday present, look extra special, learning how to craft your own tulle bows is easy and fun!
Whether you’re an experienced crafter or a newbie starting out with handmade bows, this project only takes minutes, and the results are sure to wow. No matter what the occasion, follow along for simple instructions on how to make a tulle bow for a present that will make your gift stand out from all the rest. We’ll take you step by step through the process of making your own unique gifts using this versatile material. So get ready; in just a few easy steps, we’ll show you how to make stunning DIY tulle bows for all occasions.
What is a Tulle Bow?
A Tulle bow is a type of decorative bow made from the sheer cloth-like material called “tulle.” It has an airy, light feel and a slight shimmer that adds a festive touch to any present. The most common color for tulle bows is white, but you can easily find colored varieties at craft stores or online. Tulle is very inexpensive and versatile, making it a great material for gift wrapping.
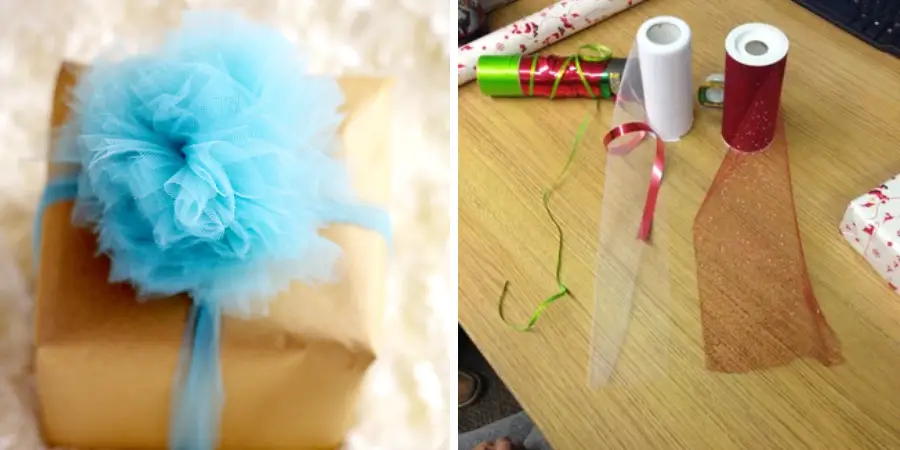
Materials Needed
- Two pieces of tulle (same or different colors)
- Scissors
- Ribbon
- Hot glue gun (optional)
10 Ways How to Make a Tulle Bow for a Present
1. Cutting
Cut two pieces of tulle into strips that are 6 inches wide and 12 inches long. Cut one of the strips into three equal parts. While cutting, keep in mind that the strips don’t have to be absolutely perfect.
2. Folding
Fold each piece of tulle in half lengthwise and make sure they stay together as one layer. Folding is the most important part of making a tulle bow, as it will determine how your bow looks. Also, keep in mind that the tulle will fray, so it’s better to make sure all the folds are even.

3. Twisting
Twist each of the pieces of tulle so that they form a tight twist in the center. Make sure to keep them together as one piece here; this is what will give your bow its shape and volume.
3. Stacking
Stack the three strips on top of each other and hold them together with your fingers. Make sure there is no overlap between the strips and that all edges are aligned. Keep a tight grip on the tulle while stacking.
4. Tying
Tie the three strips together with a piece of ribbon, making sure to tie it tightly so that it holds its shape. Make sure there is no slack in the knot and that all edges are aligned. Tying the ribbon is what will give your bow its unique shape.
5. Fluffing
Gently pull each piece of tulle away from the center and fluff up the bow to create volume. Gently tug at the edges of the tulle strips to make them look more full and fluffy. This step is what gives your bow that extra special touch.
6. Adjusting
Adjust the shape of your bow by tugging at the edges and adjusting the ribbon knot to make sure that everything looks even. This step will help you get a perfectly shaped bow every time.
7. Secure
Secure the bow in place with hot glue or a piece of tape if needed. Gently press on the bow until it holds its shape. This step is optional, but it will help keep your bow in place and prevent it from fraying or coming apart.

8. Finishing
Finish off the bow by wrapping a piece of ribbon around the center to hide any rough edges or loose threads. This will give your bow a nice finishing touch and make sure that everything looks neat and tidy.
9. Attaching
Attach the bow to your gift with a piece of ribbon or string. Make sure that you tie it tightly so that the bow doesn’t come off. Attaching the bow is what will make your gift look extra special.
10. Admire
Admire your work and admire how unique and beautiful your tulle bow looks! You’ve just created a one-of-a-kind gift that stands out from all the rest.
Making a tulle bow for a present doesn’t have to be difficult. With these 10 easy steps, you can make your own unique and beautiful bows for any occasion! Whether you’re wrapping a special birthday gift or making a festive holiday present, tulle bows are sure to impress. So what are you waiting for? Get crafting and show off your creative side!
8 Common Mistakes to Avoid
Making a tulle bow for a present can be tricky, but it doesn’t have to be! To make the perfect bow, there are several common mistakes that you should avoid.
1. Not using enough loops of tulle. When making a tulle bow, the finished result will look much fuller and more pleasing if you use at least four loops of tulle, but more is even better.
2. Not making the loops uniform in size and shape. This can make the bow look messy and unstructured, so take your time to ensure all of the loops are shaped similarly and stay consistent in size throughout.
3. Not ensuring that each loop falls at least partially over the one before it. This is important for ensuring that the finished bow looks full and well-structured, so be sure to pay attention to this detail.
4. Not using enough ribbon or not tying it tight enough. Both of these can make the bow look limp and unappealing, so make sure you use plenty of ribbon and tie it in a secure knot at the end. Keep in mind that you can also use two different colors of ribbon for a more dynamic look.

5. Not fluffing the loops before tying them off. It’s important to take your time and fluff each loop carefully so that it looks full and voluminous when it’s finished. If you don’t, the bow may not hold its shape as well over time.
6. Not cutting the tulle in an even line at the end. This can make the bow look very messy, so be sure to use a sharp pair of scissors and cut all of the loops evenly. It will make a huge difference in the finished bow.
7. Not using the right type of tulle. There are several types of tulle available on the market, so choose one that’s appropriate for your project—some may be too thin or lightweight for making bows, while others may be too stiff and unyielding.
8. Not taking time to double-check your work. This is a small but important step that can really make or break a tulle bow for a present, so be sure to take the time to double-check your work before you tie off the ribbon. This will ensure that it looks perfect and professional when it’s finished.
By following these tips and avoiding these common mistakes, you’ll be able to make a stunning tulle bow for your present in no time. So get started and show off your skills today!
Frequently Asked Question
Can You Make a Fluffy Tulle Bow?
Yes! Making a fluffy tulle bow for a present is easy. You’ll need the following materials: tulle fabric, scissors, and ribbon. Cut about four times as much fabric as you would normally use for a regular bow; this will give you plenty of material for it to be fluffy. Then tie the ends together into two loops and secure with ribbon or string.
To add even more fluffiness, you can tease the loops with your fingers to make them look bigger and fuller. Finally, tie a ribbon around the middle of the bow so it looks complete and secure in place. You now have a beautiful, fluffy tulle bow for your present!
Can I Add Embellishments to My Tulle Bow?
Yes! You can easily add embellishments to your tulle bow to make it look even more special. Try adding glitter, sequins, beads, or other decorations to the fabric for a unique and sparkly look. Alternatively, you could tie small charms, such as bells or butterflies, onto the ribbon at the center of the bow. With some creative thinking, you can make your tulle bow even more special and unique.

Conclusion
Now that you have finished this tutorial, you are ready to not only create a beautiful tulle bow to complete your present wrapping but impress your friends and family with your craftsmanship! Your gift’s recipient will certainly love the extra effort you made for their special day. Why not take it a step further and personalize each gift with a unique bow design?
From bold and vibrant colors to more subtle pastel hues, there is no shortage of options when designing a tulle bow. And who knows, maybe you can transform this creative skill into making money by selling custom bows online or at local craft markets. No matter what you decide to do with it, craftsmanship is always fun and can really pay off in the long run. Follow this guide to learn how to make a tulle bow for a present, and you will be ready to go!