
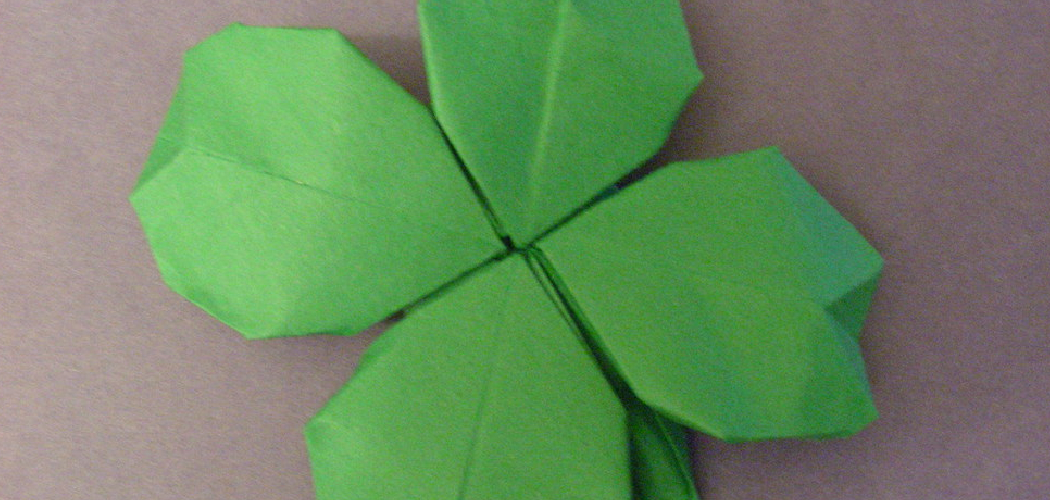
Do you want to make a unique St. Patrick’s Day decoration that’s sure to brighten up your home? It is important to know how to make a shamrock out of paper. It’s easy and fun to create a shamrock out of paper!
By carefully folding the right type of paper or crafting materials, you can display this traditional Celtic symbol in just minutes. Making a shamrock out of paper is not only simple but also cost-effective.

It won’t break the bank as other decorations might! Keep reading for step-by-step instructions on making an eye-catching shamrock from scrap paper.
Tools you Will Need
- Paper or cardstock
- Scissors
- Glue or tape
- Ruler (optional)
5 Easy Steps Guide on How to Make a Shamrock Out of Paper
Step 1: Cut the Paper
Cutting the perfect heart shape can seem like a daunting task, but with a little care and attention to detail, it will be easy! First, take your pair of scissors and cut three hearts out of the paper or card stock. When cutting, make sure to leave a one-inch margin on each side so that you can more easily fold them together to construct a shamrock.
Also, when deciding the size of each heart be aware that they will shrink slightly when folded due to their rounded edges. With these simple steps in mind, you are on your way to having the ingredients for a beautiful and creative shamrock craft!
Step 2: Fold the Hearts
Making a shamrock out of paper is a fun and simple way to get in the spirit of St. Patrick’s Day! All you need to do is begin with three heart-shaped pieces of paper. Take one of your hearts and fold it in half lengthwise; repeat this step with the other two hearts so that they are folded as well.
Once you have your folded hearts, take the base of each heart and overlap them slightly on top of each other, forming a shamrock shape. Gently press down on the overlapping edges to keep them held together.

You have now completed your very own paper shamrock! Place your shamrock near the window for all passersby outside to admire or hang it up for a festive addition to the home or office.
Step 3: Glue or Tape the Hearts Together
Making a shamrock with paper can be a fun and creative project. To begin, fold each paper heart in half. Once all of them are folded, use either glue or tape to attach the hearts. For a neat final product, make sure the edges are aligned as well as you can manage so that your shamrock looks clean and even.
If desired, take it one step further by adding paint or colored pencils for added visual interest! No matter how you choose to customize it, once your shamrock is complete you have yourself an adorable decoration or even a unique gift for someone special.
Step 4: Cut a Stem
To begin making your shamrock, you’ll need to cut a stem. Grab your scissors, and focus on cutting out a thin strip of paper that’s about two inches long. Make sure your line is straight and even, as this will be the stalk of your shamrock. Your paper should be folded over in thirds.
So having a firm grasp on the length and shape of the stem is key. Once this is done, all you have left to do is trim off each end, leaving a small green triangle with an even longer green stem! Now you have created a festive three-leaved clover just in time for the holiday season!
Step 5: Glue the Stem in Place
Adding a stem to your shamrock is a great way to make it look more powerful and real. For the best result, you should apply some glue to the bottom edge of your shamrock before securing the stem in place.
To ensure that the stem won’t come off anytime soon, press firmly until the glue dries and you can be sure that your shamrock is ready for a proud display. Gluing on a stem also helps further protect your shamrock from wear and tear over time.

Making a shamrock out of paper is an easy and inexpensive way to bring some Irish cheer into your home this St. Patrick’s Day. With just a few simple steps, you can create an eye-catching decoration that’s sure to delight your family and friends! So get creative and have fun making a shamrock out of paper – it may become a beloved holiday tradition that you’ll look forward to each year.
Tips for Making a Shamrock Out of Paper
- Gather your materials. You will need a piece of green construction paper, scissors, and a black marker.
- Fold the piece of green construction paper in half lengthwise.
- Cut a shamrock shape out of the paper. Unfold the paper to see your shamrock shape.
- Use the black marker to draw a stem on the shamrock.
- Cut out the shamrock shape again, this time cutting around the outside of the stem.
- Fold the shamrock in half lengthwise again.
- Cut slits along the folded edge of the shamrock, being careful not to cut through to the other side.
- Unfold the shamrock and press it flat.
- Fold each side of the shamrock towards the center, overlapping the edges slightly.
- Your paper shamrock is now complete!
How to Put Together the Most Beautiful Paper Shamrocks In No Time?
Making your decorative paper shamrocks is a wonderfully rewarding craft project, especially during St. Patrick’s Day – and it doesn’t take long to do! It just requires some simple things like paper, scissors, glue, and a few other odds and ends. Firstly, start by tracing the shape of a shamrock onto the colored paper of your choice – green makes for an ideal hue.

Cut out the shapes, then fold each piece lengthwise slightly in the center with the curve facing outwards. Then, start gluing them together at their curved end – two at a time should be plenty as you can form them into smaller petals of six that makeup one complete shamrock. Your beautiful paper shamrock is ready just in time for your celebrations to begin.
An Easy Way To Tell Everyone You’re Irish: Making a Shamrock Out Of Paper!
One of the best and most creative ways to show off your Irish heritage is by making a shamrock out of paper. This easy yet festive craft is great for St. Patrick’s Day, school projects, or just as a way to share some of your cultures with friends and family!
All you need are scissors, glue, four pieces of green construction paper, and a pen or marker – but feel free to get creative with other materials like glitter, feathers, sequins, and more (just remember to keep it kid-friendly).
Once you have all your supplies gathered, cut them into four equal parts and fold each piece into a triangle. You can then decorate the triangles with any color you like before arranging them into one large shamrock shape. All that’s left is for you to showcase it proudly!
Frequently Asked Questions
How to Make a Festive Shamrock Out of Paper for St. Patrick’s Day?
Making a festive shamrock out of paper is an easy and fun craft to prepare for St. Patrick’s Day! Begin by drawing a large shamrock outline on green construction paper. Cut out the shape carefully using scissors and set it aside.
Fold two additional sheets of green construction paper in half and cut out two symmetrical shapes from each sheet that resemble the leaves of the shamrock. Attach each leaf to the larger piece with thin strips of tape and fan out slightly for a realistic look.
Lastly, use markers or crayons to add detail and embellishment such as polka dots, stars, stripes, spirals, or even words or phrases like “Luck of the Irish”. You now have a unique and charming decoration sure to bring some luck your way – enjoy!
How To Craft the Perfect DIY Shamrock Out of Paper For Your Home Decor?
With St Patrick’s Day around the corner, you may be looking for a fun craft project to spruce up your home! Why not create the perfect DIY Shamrock out of paper? All you need is green craft paper or construction paper, scissors, and a glue stick.
First, draw three circles with varying sizes on your craft paper using a marker for your shamrock leaves. Next, cut out the three circles, place each leaf on top of another and glue them together. You can add more colors by gluing pieces of sparkly silver or gold foam to outline the edges of each leaf.
You Can Check It Out to Fix Crochet Mistakes

Don’t forget to make sure your leaves are pointed at the bottom like a traditional shamrock shape. Lastly, attach a string to the back with some tape so it can be hung up in your window or on any wall for an added bit of Irish-inspired decor this season.
Conclusion
You can make a shamrock out of paper with just a few simple steps. You should carefully determine how to make a shamrock out of paper. You will need to gather your materials.
You will need to cut out three heart shapes from the green paper. Once you have done this, you will need to glue the hearts together. You will need to add some finishing touches to your shamrock. With some easy instructions, you will be able to make a shamrock out of paper in no time!
You Can Check It Out to Make Paper Pine Cones