
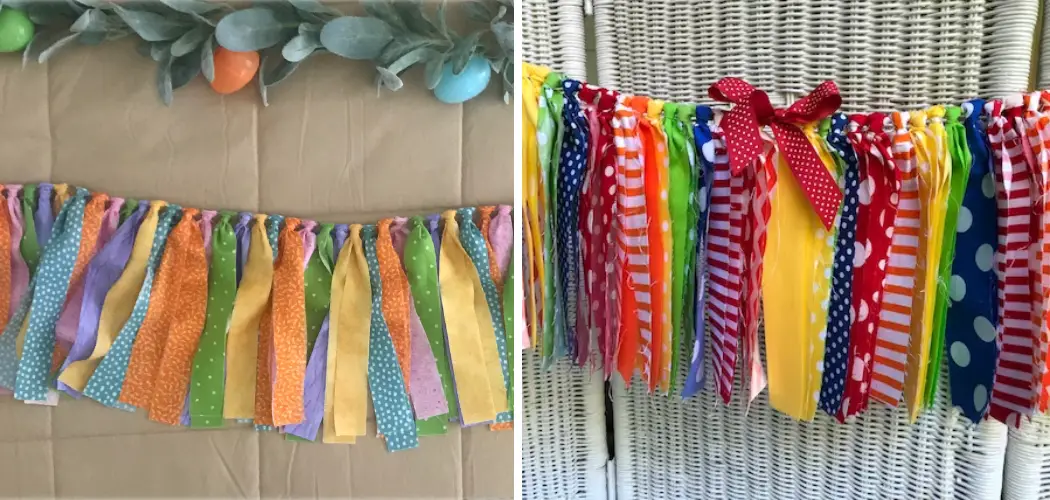
Are you looking for ways to add a touch of rustic charm and cozy warmth to your home? Look no further than rag garlands! Rag garlands are a perfect balance of beauty and practicality and create a welcoming atmosphere in any space.
Best of all, making them is incredibly easy – with just some basic materials, skillful knotting technique, and lots of creative flair, you can customize one tailored specifically to your unique style.

Whether you hang it on the wall, use it to dress up a table setting, or even adorn your Christmas tree with a colorful garland of scraps, the possibilities are endless! Here’s how to make a rag garland.
So, keep reading to learn how easy it is to make a rag garland!
What Will You Need?
- Scraps of fabric – 8+ in different colors and textures, but all cut to roughly the same length and width (around 12” x 5”)
- Ribbon or twine
- Scissors
Once you’ve got your materials, you’re ready to start knotting!
10 Easy Steps on How to Make a Rag Garland
Step 1. Prepare Your Workspace:
Clear a flat surface such as a tabletop or the floor. Lay out your twine, ensuring it’s the desired length for your garland. Have your fabric scraps and scissors within arm’s reach. Use a ruler to measure and mark the twine at intervals if needed.
Step 2. Knotting:
Starting with one fabric scrap, fold the ends over each other so that they overlap in the middle and look like two sides of a bow. Take your twine and tie it around the center of this knot, ensuring both ends are even. Ensure the knot is pulled tight.

Step 3. Continue Knotting:
Proceed with the same method for the rest of the fabric scraps. Place each subsequent knot next to the previous one on the twine. It’s okay if the knots aren’t perfect or the fabrics don’t align perfectly – this adds to the rustic charm of the rag garland! Continue until you’ve used up all your fabric scraps or until you’re satisfied with the length of your garland.
Step 4. Adjust the Rags:
Once all the fabric scraps are tied onto the twine, take a moment to adjust the rags. You can slide the knots along the twine to space them out evenly, or bunch them closer together for a fuller look. Remember, your garland is a reflection of your style, so there’s no right or wrong way to arrange the rags.
Step 5. Trim the Rags:
If you find some fabric scraps are longer than others or want a more uniform look, grab your scissors and trim the rags. You can cut them all to the same length or vary the length for a more whimsical, rustic appearance. Be sure to keep the cut-offs, as they can be used for future rag garlands or other craft projects.
Always follow safety precautions when using scissors or other sharp tools.
Step 6. Final Touches:
Now that your rag garland is assembled, it’s time for the finishing touches. Adjust your knots one last time, making sure you’re pleased with the look. Then, trim the ends of the twine if necessary, leaving enough to hang the garland. Lastly, if you wish, add embellishments like small wooden beads or charms onto the twine between the fabric scraps for an extra pop of interest.

Step 7. Hang the Garland:
Select the perfect spot for your handmade rag garland. This could be a mantle, bookshelf, bedpost, or even a door frame. Use the excess twine on the ends of the garland to tie loops, which can be hooked onto nails or hooks. Alternatively, if you plan to wrap it around a tree or drape it across a table, simply arrange the garland as you wish. Stand back and admire your beautiful, rustic rag garland!
Remember, the beauty of a handmade item like a rag garland lies in its imperfections and personal touches, so don’t stress if it doesn’t look “perfect” – it’s perfect in its way.
Step 8. Care and Maintenance:
To keep your rag garland looking fresh and vibrant, proper care and maintenance are key. Avoid placing your garland in direct sunlight for extended periods to prevent the fabric colors from fading. If your garland becomes dusty, lightly shake it outdoors or use a low-setting vacuum to gently clean it.
Should your garland require a more thorough cleaning, hand wash it gently with cold water and a mild detergent, then allow it to air dry completely before rehanging. Always follow washing instructions specific to the fabric types used in your garland.
Step 9. Recreate and Experiment:
Once you’ve successfully made your first rag garland, don’t stop there! Feel encouraged to experiment with different types of fabric, colors, textures, and lengths. Try adding in other materials like lace, burlap, or satin ribbons.
Each combination will provide a different aesthetic, allowing you to create a collection of unique, handmade rag garlands. You can make seasonal garlands for special occasions or create themed garlands for different rooms in your home.
Step 10. Share and Inspire:
After creating your rag garland, don’t keep your creativity to yourself. Share your garland with family friends, and on social media platforms. Post photos of your creations and share the process. Inspire others by demonstrating how simple and fun it is to make a rag garland.

You never know who you might inspire to start their DIY project! And remember, making rag garlands is not only a fun activity but also a sustainable one, as it uses leftover fabric scraps.
By following this guide, you can now make your rag garland. Enjoy the creative process of combining fabric scraps, twine, and other embellishments to create something beautiful and unique. Get creative with colors, textures, and shapes for a truly one-of-a-kind look!
5 Additional Tips and Tricks
- Mix different fabric types, such as cotton, linen, and other materials to make your garland even more colorful and exciting.
- You can also add ribbons between the rag strips to add a flare.
- For a subtle hint of sparkle, you can place small pieces of sequin on the fabric strips before sewing them in place.
- If you’re feeling adventurous, decorate the rag strips with colorful buttons.
- Glue some pom-poms at the end of each strip and along the garland for a fun finishing touch!
With these tips and tricks, you can create a vibrant rag garland that will make any room special. Let your imagination run wild, and have fun crafting!
5 Things You Should Avoid
- Avoid using material that is too thin or fragile, as it may tear easily when you are folding and sewing the strips together.
- Don’t make your garland too long to avoid having difficulty hanging the garland up at home.
- Make sure not to sew the rag strips tightly, as this will make them difficult to hang.
- Use only a few pieces of fabric in one strip, as this could make it too heavy for the garland to hold up.
- Ensure not to overstuff the rag strips with decorations such as buttons, pom-poms, and sequins; this will put extra strain on the garland when you hang it up.
With these few tips and tricks in mind, you can create the most beautiful rag garland!

What Kind of Fabric Do You Use for Rag Garland?
Using a wide variety of fabrics is key when making a rag garland. Choose from lightweight cotton and linen to heavier materials such as wool or fleece. Feel free to mix different textures and colors for an eye-catching display! Avoid using fabric with too much stretch in it, making the rag pieces difficult to sew together.
The fabric pieces you choose should also be easy to cut into strips. To make each strip consistent, measure the width of the fabric before cutting it up. Aim for a uniform width so all your rag pieces look even and balanced once sewn together.
With an array of colorful fabrics and textures, you can create a unique and beautiful rag garland that is sure to be the centerpiece of any room.
How Do You Hang a Rag Garland?
After all your hard work crafting your rag garland, you’ll need to find the perfect way to hang it up at home. The best method for hanging your rag garland is using an adhesive hook or 3M Command Strips. You can find them easily at any home goods store or online.
If you want to hang your garland from the ceiling, measure it beforehand and use a strong adhesive hook rated for heavier weights. Once everything is in place, you can fluff and arrange the rag strips however you’d like!
With these tips in mind, you can easily hang your one-of-a-kind rag garland and enjoy its beauty for many years.
Conclusion
Crafting something unique and personal for our homes can bring us joy and make our spaces more inviting. A rag garland is perfect for filling any area with color, charm, and coziness. From picking the fabric colors to make your good spirits soar to tying up the ends of your rag garland with ribbon triumphantly, you’ll be sure to take pride in creating yours.
So grab some fabric scraps, watch one of my tutorial videos, or create your steps and get crafty! Have fun making memories and feel accomplished when you hang up your handmade rag garland.
Hopefully, the article on how to make a rag garland was helpful. Thank you!