
Finishing a latch hook rug is the final, satisfying step in a creative journey that transforms individual strands of yarn into a beautifully textured piece of home decor or a cozy keepsake. Whether you’ve meticulously crafted a rug depicting a colorful landscape or opted for a simple, comforting pattern, the process of completing your latch hook project deserves just as much attention as the crafting itself.
In this guide, we will walk you through the essential steps on how to finish a latch hook rug, ensuring that your creation is durable, visually appealing, and ready to adorn your home or make a thoughtful gift.

Whether you’re a seasoned latch hook artist or embarking on your first rug-making adventure, these instructions will help you master the art of finishing with confidence and flair.
The Satisfaction of Completing a Latch Hook Rug
Once the latch hook rug is completely hooked, it is time to finish the project and stand back and admire your work. This is a very satisfying feeling but can be tricky if you have never done this before. The first step is to trim off any excess fabric around the edges of the rug.
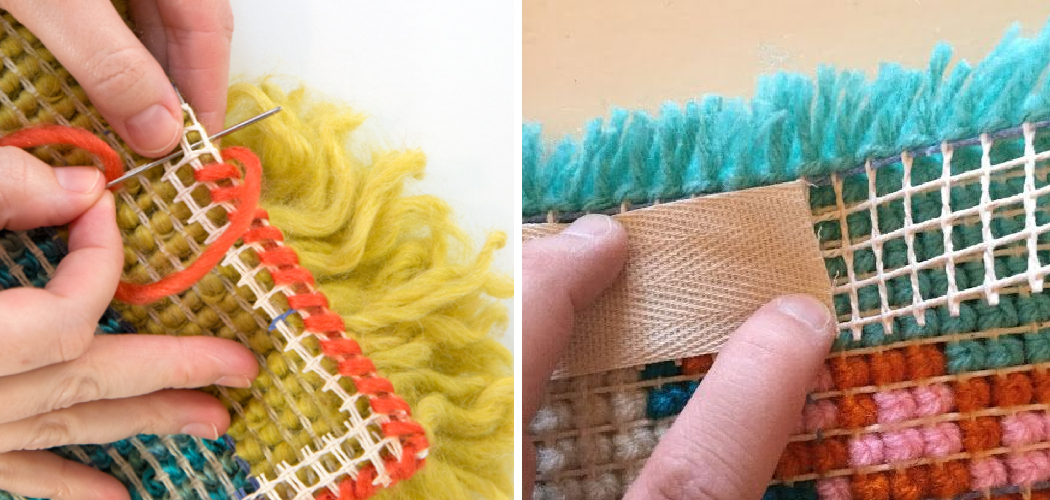
It’s best to use sharp scissors that will cut through several strands at once. You will then need to secure the edges of the rug, using a good quality yarn. Do this in a simple whip stitch around the entire perimeter of the rug, making sure each stitch is tight enough that it won’t become undone over time.
Once the edges are secure, you may want to give your latch hook rug a final steam pressing before use or display, as this will help to set the yarns and make the rug look even more finished. Again, it is important to use a good quality fabric steamer or iron for this step – never use any heat settings that are too hot for the type of yarn used in your project.
Identifying Areas where Excess Yarn Protrudes
Once your latch hook rug is complete, you will need to check for any areas where excess yarn has been pulled through the canvas. You can do this by running your fingers over the surface of the rug and feeling for bumps or knots that shouldn’t be there. If any are found, carefully use scissors to cut away these excess pieces of yarn. The edges of the rug will remain neat and secure if you do this.

Once all excess yarn has been trimmed, it’s time to create a border for the rug. This can be done by stitching together a flat braid or crochet trim using worsted weight yarn. The border should be about one inch wide and should be worked in single crochet stitches.
Finally, the rug should be blocked. This is done by laying the rug out on a clean surface and then using steam to even out any lumps or bumps in the wool. After steaming, the rug should be left to dry flat overnight before being rolled up for storage or hung on a wall.
10 Steps How to Finish a Latch Hook Rug
Gather the Supplies You Need
Before you start working on your latch hook rug, it is important to make sure that you have all of the supplies that you need. This includes a latch hook tool, a canvas backing, yarn, and scissors. If you don’t have a latch hook tool, you can purchase one at most craft stores or online retailers.
Select Your Yarn Colors
Once you have gathered all of your supplies, it’s time to choose the colors for your rug. You can use any combination of colors that you like, but it is important to select colors that will complement each other and create an attractive design. Once you have chosen your colors, cut the yarn into pieces that are about 12 inches long.
Prepare Your Canvas Backing
Now it’s time to prepare your canvas backing for the rug. Start by stretching out the canvas and securing it with tacks or staples so that it won’t move while you are working on it. Then use a ruler and pencil to draw horizontal lines across the canvas in order to create evenly spaced rows for your stitches.

Begin Latch Hooking
Now it’s time to begin latch hooking! Start by placing one end of a piece of yarn through the hole in the latch hook tool and then pull it through until there is an equal amount of yarn on both sides of the tool. Then place this loop over one of the horizontal lines on your canvas and pull tight so that it is secure. Repeat this process until all of your horizontal lines are filled with loops of yarn.
Create Vertical Rows
Once all of your horizontal lines are filled with loops, it’s time to start creating vertical rows by stitching each loop together with its neighbors in each row using small stitches made with a needle and thread or embroidery floss. Make sure that each stitch is tight enough so that they do not come undone when tugged on slightly but not so tight as to distort or damage your loops.
Secure Loops With Glue
Once all of your stitches are complete, use a fabric glue such as Aleene’s Fabric Fusion Glue to secure each loop in place so that they do not come undone during use or cleaning of the rug later on down the road. Apply a thin layer around each loop before pressing them firmly against their neighbors in order to ensure maximum adhesion between them once dried completely overnight.
Trim Excess Yarn
Once all of your loops are secured with glue, trim off any excess yarn from around them using sharp scissors or pinking shears in order to give them clean edges and prevent fraying over time. Be careful not to snip too close or else some loops may become detached from their neighbors when tugged on slightly.
Add Finishing Touches
If desired, add finishing touches such as tassels along two opposite edges or fringe along four edges for added texture and visual interest.. To make tassels, simply cut several lengths of coordinating yarn (about 6-8 inches long), fold them in half, then tie them securely together near their folded ends. For fringe, knot several strands (about 8-10 inches long) together at both ends before cutting off any excess length.

Clean Rug Regularly
In order to keep your rug looking its best, be sure to vacuum regularly using an upholstery attachment in order to remove dirt particles from deep within its fibers. Additionally, spot clean spills immediately using mild soap and warm water before blotting dry with a soft cloth.
Enjoy Your New Rug!
Finally, sit back and admire your beautiful new creation – after all those hours spent painstakingly crafting every detail – now’s finally time for you to enjoy! Place it proudly where everyone can see its beauty – whether indoors or outdoors – either way, be sure to take care when moving as even though securely attached, excessive tugging could cause some loops to detach from their neighbors.
Common Mistakes to Avoid WhenFinishing a Latch Hook Rug
When it comes to completing a latch hook rug, there are some common mistakes that you should be aware of. Here are some tips to help you finish your project without any issues:
- Don’t cut the canvas too small when stretching the rug or else it won’t fit your frame. You need to make sure there is enough extra fabric so that the edges will fit.
- Be careful not to pull the threads too tightly when tying off the ends or else your rug could end up looking lumpy and uneven.
- Avoid using too much glue when attaching the canvas to the frame because it can lead to an inferior finish product that is difficult to remove later on.
- Taking shortcuts during the binding process can be tempting, but don’t do it. Make sure you follow all of the steps correctly or else your rug won’t have a clean and neat look when finished.
- Don’t forget to add an extra layer of canvas backing in order to protect your artistic masterpiece from wear and tear over time. This step is often overlooked but is essential for making your rug last.
- If you’re using a frame to hang your latch hook rug, make sure it is not too big or else the weight of the rug may cause it to sag over time.

Conclusion
In conclusion, latch hook rug making is a simple yet involving craft with multiple benefits. You can have the satisfaction of creating a beautiful custom piece of art for your home from raw materials. Not only does it help in stress relief but this hobby also encourages creative thought processes, problem-solving skills, and fine motor skills as well.
The process of completing a latch hook rug can be mentally soothing to someone who enjoys crafts and appreciates beautiful things. Now that you know how to finish a latch hook rug you can begin your own marvelous masterpieces! So grab some yarn, get your latch hook set, and start creating! Who knows what spectacular rugs you could come up with?