
Do you want to make a delightful surprise for someone special? In just a few simple steps, you can make an eye-catching pop-up box! There’s nothing quite like the joy of watching someone open your unique craft creation and have their eyes light up with delight.

Plus, making a pop-up box is easy and fun – anyone can do it. So grab some supplies, roll up your sleeves, and let’s get started on how to make a pop up box!
What is a Pop-up Box?
A pop-up box is a type of papercraft that uses folding and cutting to create an intricate 3D box with the surprise element of having something “pop up” when opened. It’s often used for special occasions such as anniversaries, birthdays, or holidays. It can also be used to make unique and creative packaging for gifts.
What Supplies Do You Need?
Given below is a list of supplies you will need to make your pop-up box:
• Paper
You’ll need two pieces of paper, one for the outside of your box and one for the inside. Choose whichever type and size of paper you like best – cardstock is great as it holds its shape better than regular printer paper.
• Ruler
A ruler or straight edge will help ensure straight cuts and folds when making your box.
• Pencil
You’ll need a pencil to make marks on your paper that can later be erased.
• Craft Knife
For more intricate cuts, use a craft knife instead of scissors. Make sure to always use caution when using sharp blades!
• Glue
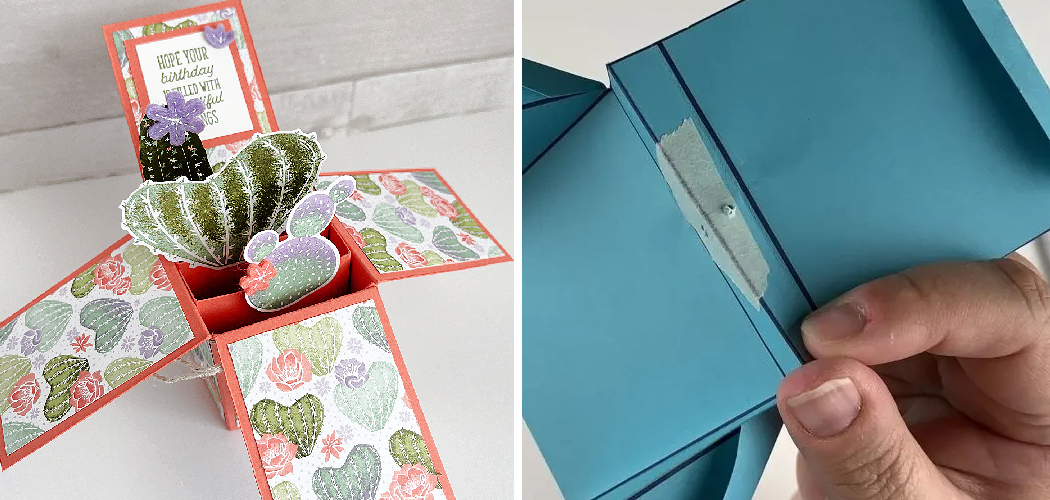
Glue or adhesive tape will help secure the edges of your box together so it doesn’t come undone easily.
10 Step-by-step Instructions on How to Make a Pop Up Box
Step 1: Measure and Cut Your Paper
Using a ruler, measure and mark your paper to the desired size of the box. A good starting point is 8×8 inch (20×20 cm) squares. If you want to make the box bigger, add 1 inch (2.5 cm) to each side. Cut your paper with scissors or a craft knife. After you’ve cut out both pieces of paper, fold them in half. This will help you visualize how the box will look.

Step 2: Fold Your Paper in Half
Fold your paper in half along the long side of the square, making sure the edges are lined up and there are no gaps. It’s important to make sure the paper is folded evenly so all sides of the box will be the same size.
But don’t worry too much if it’s not perfect – you can always trim off any excess paper later. It’s also a good idea to press your paper with an iron before folding it, as this will help make the creases sharper.
Step 3: Mark Bottom Corners
Unfold the paper and take one corner at a time, fold it into a triangle, with the fold at the top. When you open it back up, mark where the two sides meet in each corner. This will be important for folding later. This step is also a good time to draw any other design elements you want to incorporate into your box, such as stars or hearts.
Step 4: Cut Down Centre Line
Using scissors or a craft knife, cut down each side of the center line to create four equal-sized squares. Make sure not to cut all the way past the corners! It’s best to make small cuts and go back over them until you reach the corners. This will create the base of your box. If your cuts have gone past the corners, you can trim off any excess paper.
Step 5: Fold Flaps Inward
Fold each of the four flaps inward so that they meet with the corner markings. Secure with glue or adhesive tape if needed. It’s best to start with one flap, and then do the other three. This will give you a better chance of getting all four flaps lined up evenly. It’s important to make sure the folds are tight and that you don’t leave any gaps.
Step 6: Create a Pop-up Lid
Take one of the squares and fold it in half again, creasing the paper firmly. Unfold it and make a mark at one end, about two fingers away from the bottom edge. Now fold that same square in thirds by folding up both sides to meet at your marked point. Make sure to crease well. This will be the pop-up lid of your box.

Step 7: Cut Out the Pop-up Lid
Cut out along the top folded line on each side of the square. Be careful not to cut the sides that will be secured together later! If you want, you can also add a curve to the top of your lid at this point. It’s a nice detail that makes your box look more elegant. It’s best to use a craft knife for this step.
Step 8: Fold Pop-up Lid Sides
Turn the lid over and fold in each side to create a box shape. Secure with glue or adhesive tape if needed. It’s important to make sure the sides are folded in evenly, and that you don’t leave any gaps. But don’t worry if it’s not perfect – you can always trim off any excess paper later. It’s also a good idea to press your paper with an iron before folding it, as this will help make the creases sharper.
Step 9: Fit Inside Piece Into First Piece
Lay down your first piece of paper, then fit the inside pop-up lid into it so that it is centered. You should have two pieces overlapping on each side. Secure with glue or adhesive tape if needed. This will create a box shape that can be opened and closed. If you want, you can also add a closure tab at the top.
Step 10: Close Up Box
Fold up the sides of both pieces of paper and secure them together with glue or adhesive tape. Make sure all edges are lined up correctly and press firmly to finish your pop-up box! Always use caution when using glue and sharp blades. Otherwise, all that’s left to do is enjoy your creation and use it for whatever special occasion or gift you have in mind.
Following these instructions on how to make a pop up box, you can easily make a pop-up box. It’s a fun and creative way to give someone a special gift or surprise

Do You Need to Use Professionals?
No, you don’t need to use professionals for making a pop-up box. With just a few simple supplies and some time, anyone can make an eye-catching pop-up box! However, if you need help or don’t have the materials at hand, there are professional services that offer custom designs and will help you create your own Pop Up Box tailored to your needs.
So if you want something extra special or require assistance in the design process, consider seeking out such services instead!
Now that you know how to make a pop-up box, why not go ahead and give it a try? Get creative with decorating it as well – there’s no limit when it comes to what kind of surprises you can put inside! So have fun and make something special for someone today.
Frequently Asked Questions
Q: How Long Does It Take to Make a Pop-up Box?
A: It depends on the size and complexity of your box, as well as how much time and effort you put into making it. A simple pop-up box should take no longer than an hour to make, while a more intricate design may require several hours.
Q: What Kind of Paper Should I Use?
A: Any kind of paper is suitable for making a pop-up box, but cardstock tends to hold its shape better than regular printing paper. You can also use patterned or textured papers for added uniqueness!
Q: Can I Decorate My Pop-Up Box?
A: Absolutely! There are plenty of ways you can customize your pop-up box with decorations or embellishments such as ribbons, stickers, glitter, and more. It’s totally up to you – have fun and get creative!

Q: How Can I Make My Pop-Up Box More Durable?
A: If you want to make sure your pop-up box is as sturdy and durable as possible, you can use hot glue instead of regular adhesive tape or glue, and add additional layers of paper or cardstock if necessary. This will ensure that the box lasts much longer!
Conclusion
The success of your pop-up box depends on personal preference, materials used, and level of detail. With the information given, we hope you felt empowered to design and create a pop-up box of your own! From selecting the right paper color to gluing on those critical flaps, we have provided an outline for a basic pop-up box.
If you have ever wanted to take your projects to the next level or impress someone with a custom-made gift then look no further than this tutorial on how to make a pop up box. You can proudly stand behind your finished product knowing that you designed it yourself.
After seeing the “magic” of rising walls after lightly pushing against them, be sure not to overlook the awe that comes with creating such objects. It’s easy and fun! We want you to think outside the box when making yours – get creative and let us know what kind of designs you come up with!