
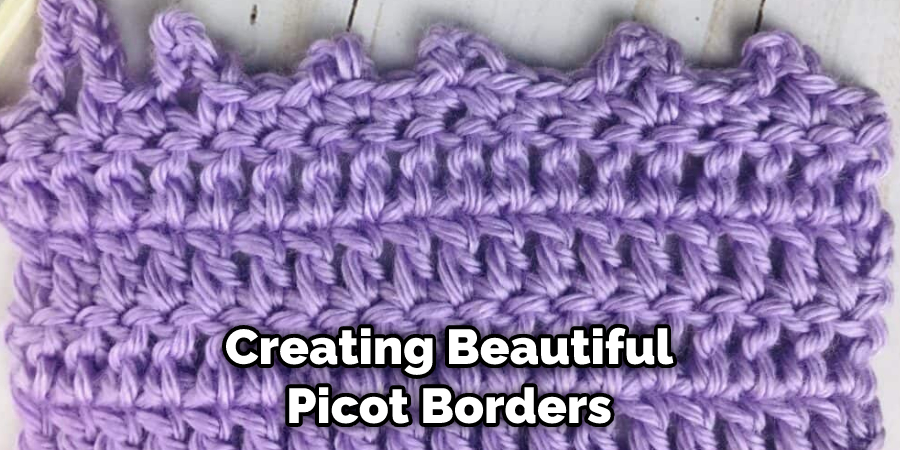
Are you looking for an easy way to add a bit of pizzazz to your next crocheting project? Created from creating basic crochet stitches, the picot stitch is a great decorative technique that can be used in many creative ways.

Adding a picot to your crochet project is an easy way to elevate any garment or accessory’s look instantly. Whether you’re a beginner crocheter looking for ideas on decorating clothing and accessories or an experienced crafter wanting to learn some new techniques — this post has got you covered!
With straightforward step-by-step instructions, we will walk through everything you need to know about how to make a picot in crochet that can be used as a stand-alone piece or for embellishing other items. So grab your hooks, yarn, and crafting supplies – let’s get started!
What Will You Need?
Before you begin crafting, there are a few tools and supplies that you will need to make a picot in crochet:
1. Crochet Hooks: You will need a crochet hook that is the correct size for your yarn.
2. Yarn: Select any type of yarn in whatever color you desire.
3. Scissors: Snip off excess yarn when finished with your project.
4. Tapestry Needle: This tool will be used to weave in any loose ends after the picot stitch is complete.
Instructions

Once you have gathered all your supplies, it’s time to start making the picot stitch. Here are the steps that you need to follow.
10 Easy Steps on How to Make a Picot in Crochet
Step 1. Make a Chain:
Begin by making a foundation chain of 4 or more stitches. You can make it as long as you like, depending on the size of your project. If you are unsure of the right length, start with a chain of 4-5 stitches.
Step 2. Skip the First Chain:
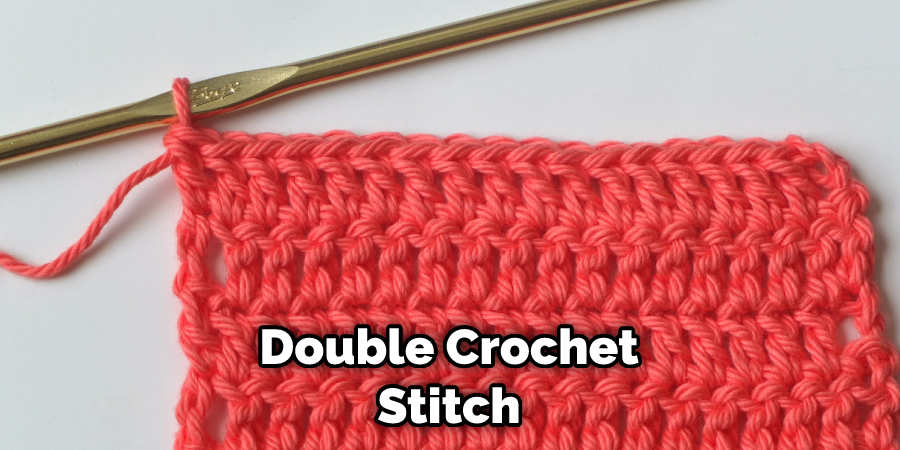
Skip the first chain and insert your hook into the second chain from the crochet hook. Don’t forget to yarn over. Because this will be a double crochet stitch, you will need to yarn over twice.
Step 3. Make the Double Crochet Stitch:
Make the double crochet stitch in the second chain. Yarn over again and pull the yarn through the loop on your hook – you should now have three loops on your hook. If you have made the stitch correctly, you should have two loops left on your hook.
Step 4. Make the Picot:
Yarn over and pull the yarn through both of the remaining loops on your hook. This will create a picot (or small loop) at the end of the stitch. Be careful not to pull the yarn too tight, as this can cause the picot to become distorted.
Step 5. Tighten and Secure:
Once you have made the picot, you can tighten it by gently pulling on the yarn with your fingers. Secure it by pulling the yarn through the loop and tying a knot at the back of the stitch. Repeat steps 2-5 until you have reached the desired length for your project. For added texture, you can alternate between making single crochet stitches and double crochet stitches in each chain before creating a picot stitch.
Step 6. Fasten Off:
When you are finished making your picot, fasten off to secure all of your hard work. Additionally, you can use a tapestry needle to weave in any excess yarn at the back of your project. It will help keep the stitches in place and make them look more neat and tidy.
Step 7. Weave In Any Loose Ends:
Use a tapestry needle to weave in any loose ends that may be visible at the back of the project. Make sure to weave in both ends so that the picot is securely fastened and won’t unravel. It can also help make the stitches look more neat and tidy.
Step 8. Block:
Once you have completed your project and woven in all of the loose ends, it’s time to block it. This will help ensure that all of your stitches remain even and uniform in size and shape. To do this, simply lay out your work on a flat surface, such as an ironing board or blocking mat. Use pins to keep your fabric secure, and leave it to dry for several hours before removing them.
Step 9: Enjoy!
Finally, take a step back and admire your hard work! You should now have created a beautiful picot stitch that will add texture and style to any project. Remember, practice makes perfect – so don’t be afraid to experiment with different types of stitches and patterns.
Step 10: Share the Photos of Your Finished Project!
Don’t forget to show off your hard work online. Take a few photos of the finished product and share them with friends, family, and other makers! Who knows, you may even inspire someone else to try out this technique.
By following these simple steps, you can easily learn how to make a picot in crochet. With some practice and patience, you’ll be creating gorgeous textures for all of your future projects in no time! So grab those hooks, and let’s get started!
5 Additional Tips and Tricks
- Picot stitches add extra texture and dimension to a crochet project.
- To make a picot stitch, yarn over twice when you would normally yarn over only once, then slip stitch into the first loop of the last double crochet (or single crochet) stitch.
- When measuring a picot, in order to ensure consistency, use a ruler for standard measurements or gauge your eye for non-standard sizes.
- Use taller stitches, such as half double or triple crochet if you desire larger picots; use shorter stitches, such as single crochets, if you desire smaller picots.
- With practice, you can also create a decorative effect on your fabric by creating multiple scalloped edges with picots!
Whether you’re a beginner or an experienced crocheter, picot stitches are easy and fun to learn, allowing you to create beautiful projects easily. Experimenting with different stitch sizes and combinations can help you find the perfect look for your projects!
5 Different Style Ideas
- Create a lacy edge on shawls, blankets, or cowls by alternating picot stitches with regular single or double crochet stitches.
- Make a ruffle effect by using only picot stitches and varying the size of each one.
- Make a chevron pattern by creating two stitches in between each picot stitch for an asymmetrical zigzag look.
- For a bolder look, use two yarn colors at the same time to create different sized picots with contrasting hues!
- Use repeat patterns to make intricate baskets or other three-dimensional items – just use your imagination!
By following these steps and ideas, you’ll create beautiful picot stitches in no time! So, don’t be afraid to experiment and find the perfect look for your projects. Have fun and happy crocheting!
5 Things You Should Avoid
- 1. Avoid using the wrong yarn weight. The heavier the yarn, the larger your picot stitches will be.
- Don’t pull too tightly on picots – this can cause them to become distorted and can affect their overall appearance.
- Avoid using thick and thin strands of yarn together to create a picot stitch. This can make it harder to keep track of the stitch count and could compromise the look of your project.
- Don’t forget to block when you have completed your project – not doing so may mean all your hard work goes to waste!
- Lastly, don’t get discouraged if you find it difficult at first – practice makes perfect! Take it slow and steady until you get the hang of it.
By following these tips and avoiding these common mistakes, you’ll soon be a master of picot stitches! So grab your crochet hooks, and let’s get started!
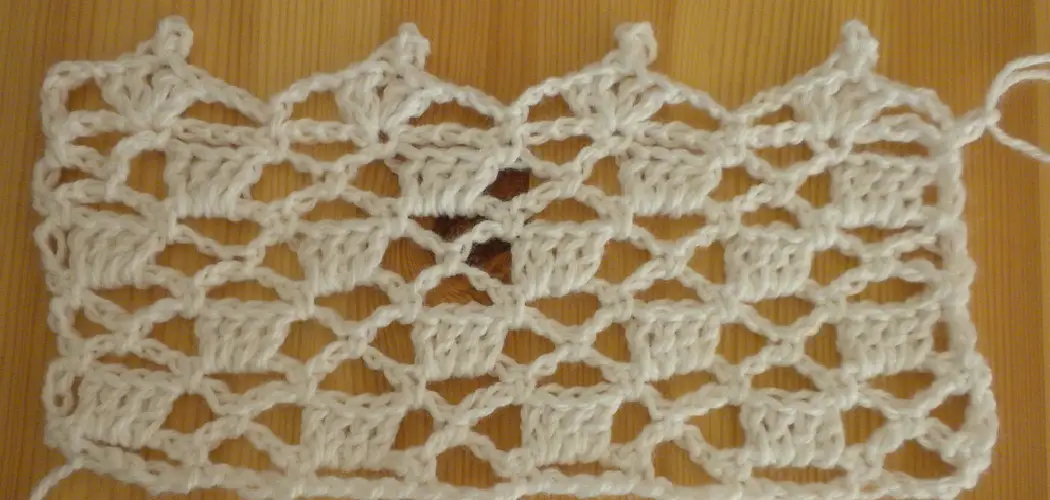
How Do You Make a Picot Border?
A picot border is a great way to add an elegant touch to your crochet projects. To make a picot border, begin by chaining three stitches at the end of your row. Then, insert your hook into the second chain from the hook and make two single crochets. Now insert your hook into the middle stitch of your 3-chain set and make two more single crochets. This will form one picot stitch.
Continue this pattern across the row for as many stitches or chains as desired. Once you’ve completed the row, turn your work and repeat the pattern back in the opposite direction; this will create a scalloped edge along both sides of your project! With some practice, you’ll soon be an expert at creating beautiful picot borders.
Conclusion
Now that you know how to make a picot in crochet, you can direct your attention to its endless possibilities. Create colorful and unique pieces or apply a traditional twist to classic patterns. You may even take things up a notch by crocheting outfits such as sweaters, shawls, and scarves from top to bottom. And don’t forget about fixing up other garments using the picot stitch, be it lacy bras, colorful pillowcases, or dainty ribbons for headgear. The possibilities are virtually endless! All you need is a bit of creativity, determination, and patience – plus of course, some fine quality yarn – and you’ll be well on your way to making stunning pieces!
Have fun experimenting with different patterns and techniques until you find whatever combination works best for you. Who knows what kind of wonderful things will eventually emerge from all your hard work?
Hopefully, this guide has given you the confidence to start making some incredible picot crochet projects! Enjoy your journey, and happy crocheting!