
If you’re a fan of quirky and eye-catching headwear, creating a mushroom hat out of cardboard is a delightful and rewarding DIY project. This whimsical accessory is perfect for costume parties, festivals, or simply adding a touch of playful charm to your everyday outfits. Crafting your mushroom hat is not only a fun activity but also an opportunity to showcase your creativity and craftsmanship.

Whether you’re a seasoned crafter or a novice looking to explore a new project, this guide will walk you through the step-by-step process of how to make a mushroom hat out of cardboard. So, gather your materials, unleash your imagination, and let’s embark on this magical journey of hat-making!
Benefits of Crafting with Cardboard
When it comes to crafting, cardboard is a great material to work with. It’s lightweight, easily accessible and versatile. With these simple materials, you can create all sorts of projects like hats, costumes or even furniture. Cardboard is also eco-friendly – it’s recyclable and sustainable! Not only that but it’s also a great way to get creative and have a little bit of fun. So why not try out your skills with this simple DIY mushroom hat project!
Materials You’ll Need
Before you begin, collect the following materials to ensure a smooth crafting process:
- Sturdy cardboard or corrugated cardboard sheets: The quality of your cardboard will affect the durability and stability of your mushroom hat.
- Scissors or utility knife: These tools will be essential for cutting out your cardboard pieces with precision.
- Pencil or marker: Use these to sketch your mushroom hat design on the cardboard before cutting.
- Ruler or measuring tape: Accurate measurements are crucial for achieving a well-proportioned hat.
- Hot glue gun and glue sticks: Hot glue is a reliable adhesive for securing cardboard pieces together.
- Acrylic paint or spray paint in desired colors: Choose paint that adheres well to cardboard and suits your mushroom hat design.
- Paintbrushes or sponges: These will allow you to apply paint with different textures and effects.
- Elastic or ribbon (for hat strap): A comfortable strap will ensure your mushroom hat stays securely in place.
Inspiring Ideas for Mushroom Hat Designs
Mushroom hats can make a great addition to any costume or cosplay. They are relatively affordable and easy to craft with cardboard. But the possibilities for design are nearly limitless! To help get your imagination going, here are some inspiring ideas for mushroom hat designs that you can make out of cardboard:

- Go classic with the traditional white and red spotted design, or switch it up with a rainbow of colors.
- For a unique take on the classic style, add an extra layer of cardboard to your hat for an extra large look.
- Create your own spin on Alice in Wonderland and craft a giant top hat with tiny mushroom accents around the base.
- Upcycle cereal boxes to create small, intricate designs with captivating textures and colors.
- Create a steampunk inspired design with copper wire accents and other metallic details.
- Make a cute forest scene by attaching small moss or fake leaf accessories to the top of the hat.
- Give your mushroom hat an extra special touch with glitter, gems, sequins or any other type of sparkly embellishment.
- For a really bold look, you can paint the cardboard with metallic or neon paints.
- Add extra dimension to your mushroom hat by layering several shapes and sizes of cardboard pieces together.
Whatever design you choose, have fun and be creative! With just a little bit of effort and imagination, your mushroom hat will transform into an eye-catching masterpiece. Happy crafting!
10 Steps How to Make a Mushroom Hat Out of Cardboard
Step 1: Design Your Mushroom Hat:
Start by envisioning your mushroom hat’s design. Consider the size, shape, and color scheme you want for both the cap and the stem. With a pencil or marker, sketch the outline of the mushroom cap on a piece of cardboard. Ensure it is large enough to comfortably fit on your head and cover the top of it. Next, draw a stem shape that will serve as the support for the cap. Be creative with your design and let your imagination run wild!
Step 2: Cut Out the Pieces:
Once your design is finalized, carefully cut out the cardboard pieces following the outlines you sketched. For a smoother cut, use scissors for simpler shapes and a utility knife for more intricate details. Take your time to ensure clean and precise edges.

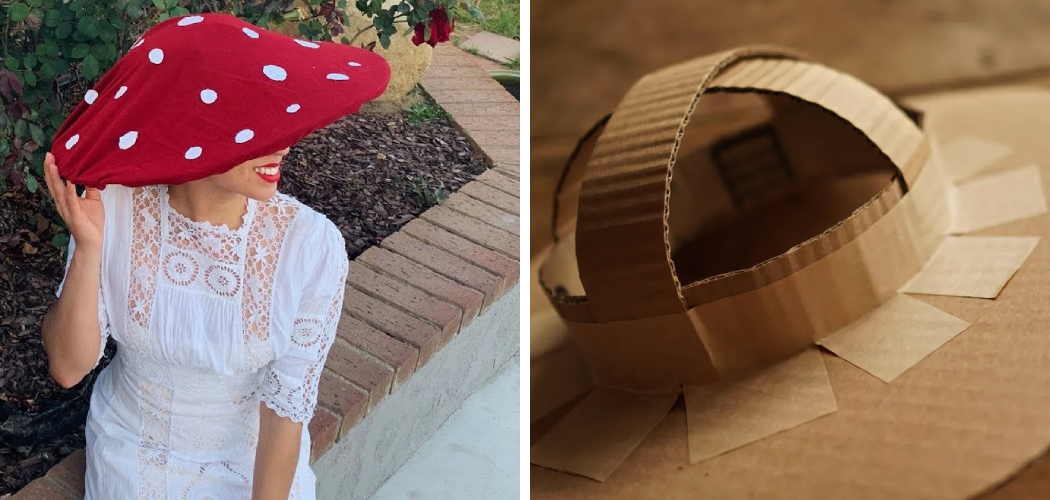
Step 3: Assemble the Mushroom Cap:
With all the pieces cut out, it’s time to bring your mushroom hat to life. Begin by gently shaping the cardboard piece representing the mushroom cap into a dome shape. This will give it the iconic mushroom cap appearance. If necessary, make small cuts along the edges to allow for easier bending and shaping.
Step 4: Construct the Mushroom Stem:
Next, take the cardboard piece representing the stem and roll it into a cylinder shape. Use hot glue to secure the edges of the cylinder together, creating a stable stem for your mushroom hat. Adjust the size of the cylinder as needed, depending on how tall you want the stem to be.
Step 5: Attach Cap to the Stem:
Now comes the exciting part—attaching the mushroom cap to the stem. Apply hot glue to the top of the stem and carefully place the dome-shaped cap on top. Hold it in place until the glue dries and the cap is firmly attached to the stem. This connection is crucial for the stability of your hat, so ensure it is securely bonded.
Step 6: Reinforce the Structure:
To add extra durability to your mushroom hat, reinforce the seams with additional hot glue as needed. Pay special attention to the connection between the cap and the stem, as this area will support the weight of the hat.
Step 7: Paint Your Mushroom Hat:
With the basic structure complete, it’s time to add color and character to your mushroom hat. Choose acrylic paint or spray paint in the colors that suit your mushroom design. Paint the cap with the characteristic cap color, such as a vibrant red or pure white, and the stem with a complementary color like brown or beige. Use paintbrushes or sponges to experiment with different textures and effects.

Step 8: Add Decorative Touches:
To enhance the whimsical appeal of your mushroom hat, consider adding decorative touches. Faux flowers, leaves, or glitter can be glued to the cap or stem to create a magical and enchanting look. These additions will make your mushroom hat stand out and showcase your creativity.
Step 9: Create a Hat Strap:
To ensure your mushroom hat stays securely on your head, create a hat strap. Cut a piece of elastic or ribbon and attach it to the inside of the mushroom cap using hot glue. The strap should be long enough to comfortably fit around your head without being too tight.
Step 10: Try on Your Mushroom Hat and Make Adjustments:
With all the steps complete, it’s time for the moment of truth—try on your newly crafted mushroom hat! Assess its fit and comfort level. If necessary, make any adjustments or additional reinforcements to ensure the hat stays securely in place while you wear it. Once you’re satisfied with the fit, you’re ready to proudly showcase your unique and whimsical mushroom hat to the world!
Things to Consider When Making Mushroom Hat Out of Cardboard
Now that you know how to make a mushroom hat out of cardboard, there are some things to keep in mind when crafting your own special headgear.
First and foremost, it’s important to select the right kind of cardboard for the job. Picking up cardstock from your local craft store is ideal because it is sturdier than regular cardboard. This makes it easier to work with, and the finished product will be more durable.
Also, when cutting the cardboard into the desired shape for your mushroom hat, use a pair of scissors or an x-acto knife instead of a regular craft knife. The extra precision will give you better results when constructing your hat. Regular knives tend to rip through the cardboard and leave jagged edges.

Once you have cut your cardboard into the mushroom shape, it’s time to assemble it. Start by folding a few of the flaps inward so that they make a cone shape with an opening at the top. This will form the basic structure for your hat. If necessary, use staples to secure the flaps together.
Conclusion
Well, now you know how to make a mushroom hat out of cardboard step-by-step. After you’ve competed the hat, you can wear it for fun or even create a costume with it, since you can paint or decorate the mushroom shapings and turn them into something unique and interesting. Who would have thought that out of simple cardboard, we could create such cute hats?
Now that you have all the steps for making your own mushroom hat – have some fun experimenting with different materials and decorations until you come up with one that pleases your imagination! You can do this in a way as unique and creative as possible, making sure to add details that show something exciting about who you are.