
If you’re looking for a fun and easy DIY project, glitter cups may be just what you need. These sparkly cups are perfect for special occasions or add glam to your everyday life. Plus, they are surprisingly simple to make! In this blog post, we will guide you through the steps on how to make glitter cups that will surely impress your family and friends.

Can You Make Glitter Cups?
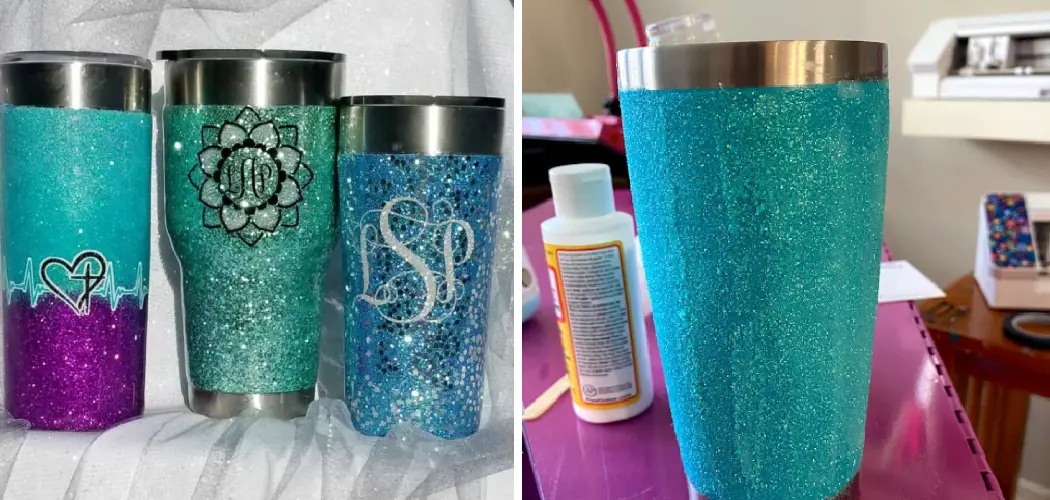
Do you love all things glittery? Well, have you ever considered making your glitter cups? It’s a fun and easy craft that can add sparkle to any drink. You only need clear plastic cups, Mod Podge, glitter, and a paintbrush. First, brush Mod Podge onto the outside of the cup, leaving enough space at the top for drinking.
Then, sprinkle glitter onto the Mod Podge and let it dry. Once it’s dry, shake off any excess glitter and add another layer of Mod Podge to seal it. And voila! You now have a dazzling and personalized cup that will make any drink feel special. Try it and see how you can add glam to your everyday routine.
Why Should You Make Glitter Cups?
If you’re looking for a way to add some sparkle to your drinkware collection, glitter cups may be just what you need! Not only are they visually stunning, but they’re also a great DIY project that you can customize to fit your style and preferences.
Glitter cups can be made using various materials and techniques, from spray paint and Mod Podge to vinyl decals and stencils. Plus, they make great gifts for friends and family members who love shiny and glam things. So why not try glitter cups and see how they can elevate your drinking experience?
7 Steps to Follow on How to Make Glitter Cups
1. Gather Your Supplies
Before starting any DIY project, it’s important to gather all the necessary supplies. For this project, you will need clear plastic cups, a mod podge, foam brushes, glitter, and a paper plate or bowl. You can find these items at any local craft store or online. Make sure to choose the glitter colors of your preference and enough to cover the number of cups you want to make.

2. Create Your Glue Mixture
In a paper plate or bowl, mix Mod Podge and glitter. The Mod Podge will act as a sealant and glue for the glitter. How much glitter you need will depend on personal preference, but you want enough to cover the entire cup. Make sure to stir the mixture well so glitter is dispersed evenly.
3. Apply Your Glue Mixture
Using a foam brush, generously apply the glue mixture onto the outside of the cup. Try not to overdo it and avoid drip marks. Once you’ve covered the entire cup, use a second foam brush to smooth out any bumps or lumps.
You can also roll the cup on the glitter plate to make sure the glitter completely covers the cup. Allow it to dry for 30 minutes, then repeat the process until you achieve the desired glitter effect.
4. Add Your Finishing Touches
Once the cup is completely dry and has the desired glitter, you may want to add some finishing touches. Tie a ribbon or small tag around the cup’s rim or embellish the cup with some rhinestones or glitter markers. Let your imagination go wild, and customize your glitter cup to reflect your unique style.
5. Sealing the Cup
For a more durable cup, you can apply a coat of Mod Podge to seal in the glitter. It’s unnecessary, but it will help keep your cups sparkly for longer periods. To do so, use a foam brush to spread an even layer of Mod Podge over each cup’s exterior. Allow the Mod Podge to dry for 24 hours, and your glitter cups are ready to be enjoyed!

6. Baking Your Glitter Cups (optional)
You can bake your glitter cups in the oven if you want a more permanent result. Place them on a cookie sheet lined with parchment paper and set the oven to 350°F. Bake for 30 minutes and then turn off the oven. Allow the cups to cool inside the oven before handling them. This step is optional but will make your glitter cups more durable and long-lasting.
7. Enjoy Your Glitter Cups!
Now that you know how to make glitter cups, it’s time to enjoy them! Add drinks or snacks to your homemade glitter cups and show them to your friends and family. They are sure to be impressed with your crafty creations! Don’t forget to take lots of pictures for Instagram! You can also make different variations of glitter cups, like half-glitter or ombre designs. Have fun and get creative!
With these simple steps, you can quickly make sparkly and stylish glitter cups. Whether you’re looking for a creative project with friends or an easy way to glam up your home, this DIY will have you covered. So grab some supplies and get crafting!
5 Considerations Things When You Need to Make Glitter Cups
1. Type of Glitter
When making glitter cups, the first consideration is the type of glitter to use. There are many different types of glitter available, each with unique properties. For example, some glitters are more sparkly than others, while some may be more opaque or have a longer shelf life. Choosing the right type of glitter for your project is important to achieve the desired effect.

2. Color Scheme
Another consideration when making glitter cups is the color scheme you want to use. The colors you choose will depend on what type of design you want to create and what kind of atmosphere you’re trying to create.
If you’re looking bright and cheerful, bold colors like pink and yellow can be great choices. On the other hand, if you’re looking for something more subtle and elegant, softer shades such as pastels or neutrals can be just as effective.
3. Adhesive
The adhesive used to attach the glitter to the cup is also an important consideration when making glitter cups. Different adhesives have different levels of strength and flexibility, so it’s important to choose one that is strong enough to hold up against wear and tear yet still flexible enough not to crack or chip away from the cup over time.
4. Sealant
Once all of the glitter has been applied, it’s important to seal it with a sealant to protect it from moisture and dirt build-up over time. This will help ensure that your glitter cups remain looking their best for years to come!
5. Care Instructions
Finally, make sure you provide care instructions with your finished product so that customers know how best to care for their new glitter cups to keep them looking their best! Providing these instructions is a great way to show your customers that you value their business and want them to enjoy their purchases for years to come!
Benefits of Making Glitter Cups
Adding some sparkle to your life has never been easier. Making glitter cups not only adds a touch of glam to your drinkware collection, but it’s also a fun and easy DIY activity. You can save money by personalizing your cups instead of buying expensive ones from a store. Glitter cups are perfect for parties, events or even to add some pizzazz to your daily routine.

The colorful glitter adds a touch of whimsy and can turn an ordinary drink into a dazzling creation. Plus, you can customize your glitter cups to match your style and taste. Whether it’s adding some metallic hues or choosing a rainbow selection, the possibilities are endless. So, why not add a little shimmer and shine to your life with glitter cups?
Some Common Mistakes People Make When Trying to Make Glitter Cups
Creating glitter cups has recently become a trend amongst those looking for a sparkling touch to their drinkware. However, many individuals have stumbled into pitfalls while trying to perfect this craft. One common mistake is not preparing the cups properly before applying the glitter. This can lead to the glitter not sticking and flaking off easily.
Another mistake is using the wrong type of adhesive, which can cause the glitter to clump together or fall off. Finally, improper drying time can also lead to a less-than-sparkling final product. Though these mistakes may be disheartening, they can easily be avoided with a bit of research and patience. With the right steps, anyone can create a shiny, glittery masterpiece to sip from.
Conclusion
Overall, making glitter cups is a fun and easy DIY project that anyone can do. Whether you want to add a bit of sparkle to your next party or just your daily routine, these cups will surely brighten up your day. With just a few supplies and some creativity, you can create your own unique glitter cups that are both beautiful and functional. Thanks for reading our post about how to make glitter cups.
You Can Check It Out to Crochet a Cup for a Top