
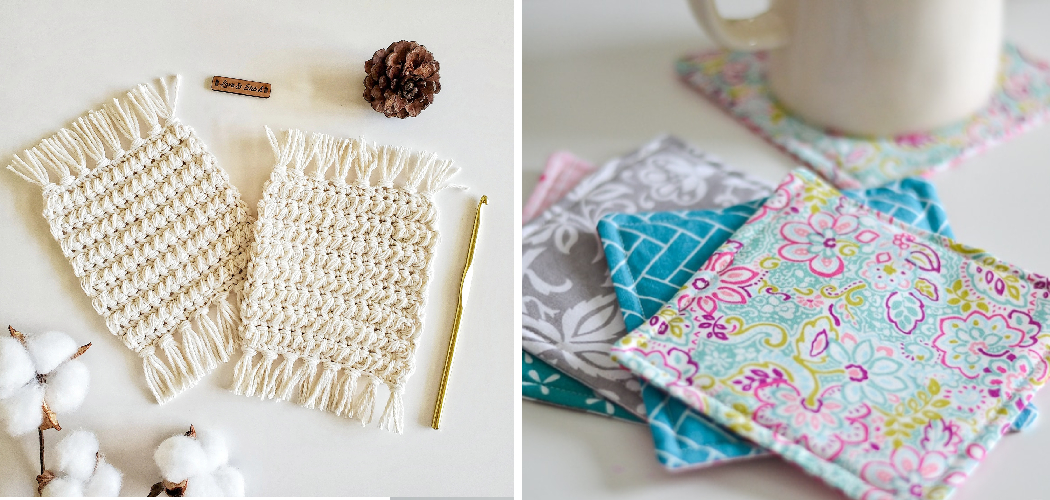
In the world of crafting, few things can match the joy of creating something both functional and aesthetically pleasing. If you’re a coffee or tea enthusiast looking to add a touch of charm to your daily ritual, then crafting a mug rug might just be the perfect project for you.

A mug rug is a small fabric coaster that not only protects your surfaces from heat and spills but also adds a delightful touch of personality to your mug collection.
In this step-by-step guide on how to make a mug rug, we will explore the art of making a beautiful mug rug, allowing you to unleash your creativity and showcase your crafting skills. So grab your favorite fabric, thread, and a cup of your preferred beverage, and let’s embark on this delightful journey together!
What is Mug Rug?
A mug rug is a small fabric coaster that is specifically designed to accommodate a mug or cup. It is larger than a traditional coaster and provides a cozy resting place for your hot or cold beverage. Mug rugs are typically rectangular or square in shape and offer a variety of benefits.
They serve as a protective barrier, shielding your surfaces from heat, moisture, and spills. Additionally, mug rugs can add a touch of style and personality to your coffee or tea area, as they come in a wide range of designs, patterns, and fabrics. They are versatile and can be customized to suit your preferences, making them a popular choice for crafting enthusiasts.
Needed Materials
Before we begin, gather the following materials:
Fabric:
Choose a sturdy fabric for the base and a complementary fabric for the top layer. Cotton is an excellent choice due to its durability and wide range of patterns.
Batting or Fusible Fleece:
This material provides insulation and thickness to your mug rug.
Rotary Cutter and Cutting Mat:
Essential tools for precise cutting.
Quilting Ruler:
A ruler with clear measurements helps create accurate shapes.
Fabric Scissors:
Used for trimming excess fabric.
Sewing Machine:
While hand-sewing is an option, a sewing machine will save time and provide a neater finish.
Thread:
Choose a thread color that complements your fabric.
Pins and Needles:
Used for securing fabric layers and hand-sewing details.
Iron and Ironing Board:
Essential for pressing fabric and creating crisp edges.
Embellishments (optional):
Buttons, ribbons, or embroidery floss for decorative elements.
11 Step-by-step Guidelines on How to Make a Mug Rug
Step 1: Design and Pattern Selection

The first step in making a mug rug is to decide on the design and select a pattern. You can either choose a pre-existing pattern or create your own. If you’re feeling creative, designing a mug rug that matches your personal style or complements your kitchen decor can be a wonderful choice.
Sketch your design on paper or use digital tools to visualize the final product. Consider the shape, size, and any decorative elements you’d like to incorporate.
Once you have your design, transfer it onto pattern paper or cardboard. Cut out the pattern carefully, ensuring it matches your desired mug rug dimensions. Remember to include an additional 1/4 inch seam allowance around the edges for sewing.
Step 2: Fabric Preparation
Prepare your fabric by washing, drying, and ironing it to remove any wrinkles or sizing. This step is crucial to prevent shrinkage or distortion after sewing.
Place the base fabric (the one that will be visible on the back of the mug rug) on a flat surface, the wrong side up. Position the batting or fusible fleece on top, aligning the edges. If you’re using fusible fleece, follow the manufacturer’s instructions to adhere it to the base fabric.
Now, place the top fabric (the one that will be visible on the front of the mug rug) right side up on the layered base and batting. Ensure that all the edges are aligned.Pin the layers together to prevent shifting during sewing. Place pins near the edges and in the middle to secure the layers.

Step 3: Cutting and Pinning
Using a rotary cutter, cutting mat, and quilting ruler, trim the layered fabrics to match the shape of your pattern, following the marked lines. Take your time to achieve precise cuts.
Once you have your fabric pieces ready, it’s time to pin them together. Remove the pattern and reposition the top fabric layer, right side up. Align the edges of the fabrics and insert pins along the outer edges to hold them in place.
Step 4: Sewing the Layers
Set up your sewing machine with a thread color that complements your fabric selection. Start sewing at one end, using a 1/4 inch seam allowance, and backstitch at the beginning and end to secure the stitches. Sew around the entire mug rug, removing the pins as you go. Take your time to maintain a consistent seam allowance and sew as close to the edge as possible for a neat finish.
When sewing around corners or curves, pivot the fabric by stopping with the needle down, lifting the presser foot, and turning the fabric. Leave a small opening of about 2-3 inches for turning the mug rug right side out. Backstitch at the beginning and end of the opening to reinforce it.
Step 5: Trimming and Turning
Trim the excess fabric and batting around the mug rug, leaving a small seam allowance. This step helps reduce bulkiness and creates cleaner edges when turning the mug rug right side out.
Carefully turn the mug rug right side out through the small opening. Use a blunt object, such as a chopstick or knitting needle, to push out the corners and achieve crisp edges.

Step 6: Pressing and Topstitching
Use an iron set to the appropriate temperature for your fabric to press the edges and flatten the mug rug. Pay special attention to the opening, folding the seam allowance inside and pressing it.
If desired, you can topstitch around the entire mug rug to add a decorative touch and close the opening. Set your sewing machine to a straight stitch and sew close to the edge, backstitching at the beginning and end to secure the stitches.
Step 7: Embellishments
Now is the perfect time to add embellishments to your mug rug. Get creative with buttons, ribbons, or embroidery floss to personalize your creation and make it truly unique. Sew buttons onto the mug rug by hand or using your sewing machine. You can create a pattern or randomly scatter them across the surface.
Alternatively, sew a ribbon along the edge of the mug rug, either by hand or with your sewing machine. For a touch of embroidery, choose a design or monogram and stitch it onto the fabric using embroidery floss. Be sure to secure the loose ends of the floss on the back of the mug rug.
Step 8: Final Pressing
Give your mug rug a final press with the iron to ensure all the edges are crisp and any embellishments are securely attached. This step will provide a polished look to your finished creation.
Step 9: Enjoying Your Mug Rug
Your charming mug rug is now ready to add joy to your coffee or tea routine. Place it on your table or desk, and rest your favorite mug on top. Enjoy the comfort and protection it provides while savoring your beverage.
Step 10: Cleaning and Care
To keep your mug rug in excellent condition, spot-clean it as needed. Use a damp cloth or gentle detergent to remove any stains or spills. Avoid placing hot items directly from the oven or stove onto the mug rug, as this may cause damage. Allow them to cool slightly or use a trivet underneath.

Step 11: Share and Inspire
Share your creation with friends and family or on social media to inspire others to embark on their own mug rug crafting journey. Encourage them to unleash their creativity and enjoy the process of making something both beautiful and practical.
Following these steps on how to make a mug rug you will be able to make a mug rug in no time.
Frequently Asked Questions
Q1: What is a Mug Rug?
A mug rug is a small fabric coaster that is designed to hold a mug or cup, providing protection to your surfaces from heat, moisture, and spills. It is larger than a traditional coaster, typically measuring around 4×6 to 6×9 inches, and can also serve as a decorative element for your coffee or tea area.
Q2: Can I Make a Mug Rug Without a Sewing Machine?
Yes, you can make a mug rug without a sewing machine. While a sewing machine can save time and provide a neater finish, you can still create a mug rug using hand-sewing techniques. Simply stitch the layers together with a needle and thread, using a running stitch or a blanket stitch for the edges. It may take a bit more time and effort, but the result can be just as lovely.
Q3: What Fabrics Are Best for Making a Mug Rug?
Cotton fabric is an excellent choice for making a mug rug due to its durability, versatility, and wide range of patterns and designs. It is also easy to work with and readily available. Look for fabrics that are thick enough to provide some insulation and protection for your surfaces. You can also use other materials such as linen or felt, depending on your preference and desired aesthetic.

Q4: How Do I Choose a Design or Pattern for My Mug Rug?
Choosing a design or pattern for your mug rug depends on your personal style and preferences. You can opt for pre-existing patterns available online or in craft books, or you can design your own. Consider factors such as shape, size, and any decorative elements you would like to incorporate. You can draw inspiration from your kitchen decor, nature, or even personal hobbies and interests.
Conclusion
Crafting a mug rug is a delightful and rewarding project that allows you to showcase your creativity while enhancing your coffee or tea experience. With a few materials, some basic sewing skills, and a touch of imagination, you can create a charming and practical accessory for your favorite beverages.
So, gather your supplies, let your creative spirit soar, and enjoy the process of making a mug rug that reflects your personal style. Happy crafting! Thanks for reading this article on how to make a mug rug.