
Creating a hanging sleeve for a quilt is an essential step in preparing your masterpiece for display. Whether you’re showcasing your quilt at a local exhibition or simply want to hang it on a wall at home, a hanging sleeve provides a practical and visually appealing solution. A hanging sleeve is a fabric tube attached to the back of the quilt, allowing you to insert a dowel or rod for hanging purposes.
It ensures that your quilt hangs evenly and securely without causing any damage. Making a hanging sleeve may seem daunting to some, but with a few simple steps and basic sewing skills, you can easily create one yourself.

In this article, we will guide you through the process of how to make a hanging sleeve for a quilt, providing you with clear instructions and tips to ensure a professional and polished result. Get ready to showcase your quilt with pride!
Why a Hanging Sleeve Is Essential for Displaying Quilts
A hanging sleeve is a necessary addition to any quilt if you want to properly display it. It helps provide stability and protection from the elements while the quilt is hung in a public space.
Hanging sleeves also ensure that your quilt hangs smoothly without bunching or sagging. This makes for an attractive and professional presentation, allowing viewers to admire the quilt in its entirety without distractions.
Additionally, hanging sleeves are a great way to preserve the life of your quilt. Many fabrics can be damaged by direct sunlight or exposure to moisture. Having a sleeve will help protect against these elements and ensure that your quilt retains its original brilliance and beauty for years to come.
Finally, having a hanging sleeve adds an extra layer of professionalism to any quilt display and tells viewers that you take pride in your work. It also allows quilts to be easily transported for use in different venues, without losing their shape or appearance.
A hanging sleeve is an essential addition if you want to properly display your beautiful creations with confidence and pride! By taking the necessary steps to make one, you can ensure that your quilts are properly protected and presented for everyone to enjoy.
The Benefits of Using a Hanging Sleeve for a Quilt
Using a hanging sleeve to hang your quilt is the perfect way to display this beloved handmade piece of art. With a hanging sleeve, your quilt can be hung securely on a wall or door, and you don’t have to worry about it slipping off the hanger.

A hanging sleeve also helps protect your quilt from damage and wear and tear. Having a protective sleeve in place can help extend the life of your quilt for years to come. Even if you plan on folding up your quilt instead of hanging it, having a hanging sleeve will keep it protected when not in use.
The versatility of having a hanging sleeve also makes it more enjoyable to hang up your finished quilt in multiple places without worrying about re-stitching or re-hanging each time. Hanging sleeves are easily adjustable so that you can change the length of the sleeve to fit the space you’re putting it in.
Finally, using a hanging sleeve adds another layer of beauty to your quilt display. It can be used as an opportunity to add another beautiful detail such as fabric trim or ribbon that will serve as the perfect complement to your quilt and its surroundings.
Definition and Purpose of a Hanging Sleeve
A hanging sleeve is a special fabric pocket attached to the back of a quilt that helps display it properly and securely when hung. It ensures that the weight of the quilt isn’t on individual stitches or binded edges, preserving its quality and extending its lifespan.
The purpose of a hanging sleeve is two-fold firstly, it supports the weight of the quilt so it can be safely displayed without damaging any seams or stitching. Secondly, it keeps its shape while being displayed horizontally as well as vertically, creating an aesthetically pleasing look.

Hanging sleeves are also useful for storage, preventing dust and dirt from settling into fibers or creases in the material.
When making a hanging sleeve, choose fabrics that match the quilt for a cohesive look. While many choices are available, sturdy cotton fabrics like muslin and twill typically work best. To ensure a proper fit, measure the width of the quilt before starting. A hanging sleeve should be twice as wide as the quilt when finished to provide adequate support.
Overall, hanging sleeves are important components of a handmade quilt that help protect it from wear and tear while also making it easier to display or store safely. They can be made quickly with minimal materials, using either machine or hand stitching techniques. With careful planning and precise measurements, anyone can add an attractive finishing touch to their project.
10 Ways How to Make a Hanging Sleeve for a Quilt
Measure and Cut the Sleeve Fabric:
Begin by measuring the width of your quilt’s top edge using a measuring tape. Add an extra inch to this measurement to account for seam allowances. Then, cut a piece of fabric with the calculated width and a length that is at least 8 inches longer than the width of your quilt. This additional length will provide room for the hanging rod.
Fold and Press the Fabric:
Take the fabric piece and fold it lengthwise in half, ensuring that the right sides are together. Press the fold firmly with an iron to create a visible crease. This crease will serve as a guide for sewing the side seam and ensuring a straight hanging sleeve.
Sew the Side Seam:
Keeping the fabric folded, take it to your sewing machine and sew a straight seam along the open side of the fabric using a ¼-inch seam allowance. This stitching will create a long fabric tube with one open end. Backstitch at the beginning and end of the seam to reinforce the stitches and prevent unraveling.
Turn the Tube Right Side Out:
With the side seam sewn, it’s time to turn the fabric tube right side out. Reach inside the tube and grab hold of one end. Carefully pull the fabric through the tube, turning it right side out. Once completely turned, use your fingers or a blunt tool to push out the corners and ensure a neat and even shape. Lay the tube flat and press it with an iron to remove any wrinkles.

Align the Sleeve with the Quilt:
Lay your quilt on a clean, flat surface with the quilt top facing up. Take the fabric tube (hanging sleeve) you’ve just created and place it on the quilt’s back, aligning the top raw edge of the sleeve with the top edge of the quilt. Ensure that the sleeve is centered and straight along the width of the quilt. Smooth out any wrinkles or folds in the fabric as you go.
Pin the Sleeve to the Quilt:
To secure the sleeve in place, carefully insert pins through the fabric layers, starting at the center and working towards the edges. Make sure to pin through both layers of the sleeve and the quilt. This will prevent any shifting or misalignment during the sewing process. Smooth out the fabric as you go to ensure a flat and even appearance.
Sew the Sleeve to the Quilt:
Using a sewing machine, select a straight stitch and set it to a length of approximately 2.5 mm. Stitch along the top edge of the sleeve, about ⅛ inch from the raw edge, through both layers of the sleeve and the quilt.
This stitching will securely attach the sleeve to the quilt, providing stability when hanging. Remember to backstitch at the beginning and end of the seam for added strength.
Secure the Bottom Edge of the Sleeve:
To finish the bottom edge of the sleeve, fold the raw edge under by ¼ inch and press it with an iron. Then, fold it under once more by another ¼ inch, encasing the raw edge within the fabric. Pin the folded edge in place to hold it securely. Lastly, stitch close to the folded edge, ensuring that you catch both layers of the sleeve and the quilt. This stitching will create a clean and finished look.
Quilt the Sleeve (Optional):
If you desire an extra decorative touch or added stability, you can choose to quilt the hanging sleeve. To do this, select a quilting design of your choice and thread your sewing machine with a coordinating thread. Stitch along the length of the fabric tube, following the chosen quilting pattern. This quilting not only adds visual interest but also distributes the weight of the quilt evenly when hung.
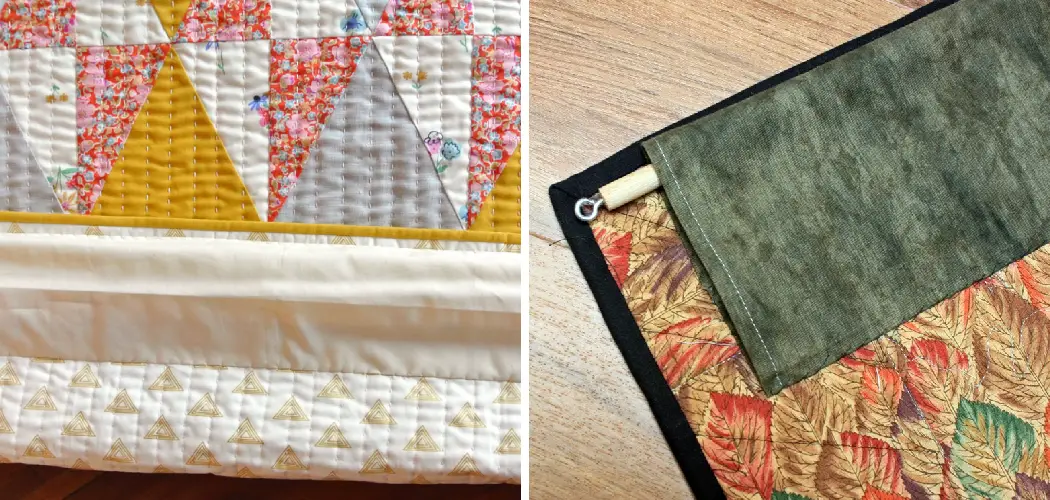
Insert the Hanging Rod:
With the sleeve securely attached to the quilt, it’s time to insert the hanging rod. Choose a wooden dowel or a sturdy rod that is slightly longer than the width of the quilt. Slide the rod carefully through the fabric tube, ensuring that it extends beyond the edges of the sleeve.

This will provide enough room for hanging. Once the rod is inserted, you can use hooks, nails, or other hanging mechanisms to display your quilt proudly.
Conclusion
Congratulations! Now you have the skills and know-how to make a hanging sleeve for a quilt that is professional quality. It is easy to put together and can be done in an afternoon or less of dedicated work. With these simple steps, any quilter can make a beautiful hanging sleeve for their next quilt.
Not only will it show off their hard work, but it will protect the underside of the quilt from dust and dirt accumulation over time. So go ahead, give it a try – after all, why not (try to) keep your masterpiece looking its best? And when your friends ask you how you did it, just share this article and spread the knowledge of making a hanging sleeve for a quilt!