
Crafting a handprint stepping stone is a beautiful way to immortalize a moment in time and create a lasting memory that can adorn your garden or outdoor space.
These personalized stones serve as a touching tribute to loved ones, both young and old, by capturing their unique handprints in a durable and decorative form. Making a handprint stepping stone is not only a fun and creative DIY project but also a heartfelt endeavor that can be enjoyed for years to come.

In this article, we will guide you through the step-by-step process of creating your very own handprint stepping stone, from gathering the necessary materials and preparing the mold to imprinting the handprints and adding the finishing touches.
Whether you’re looking to add a personal touch to your garden path, commemorate a special occasion, or create a meaningful gift, learning how to make a handprint stepping stone is a wonderful way to express your love and creativity. So, let’s begin this artistic journey and turn a simple stone into a cherished keepsake.
The Sentimental and Decorative Value of Handprint Stepping Stones
Handprint stepping stones are more than just a fun craft project or an outdoor decoration. They hold a special sentimental value that makes them so treasured by both children and adults alike.
For parents, creating handprint stepping stones with their children allows them to capture a moment in time. As children grow up so quickly, these stepping stones serve as a reminder of just how small their hands were at that moment. They become a way to preserve memories and create a tangible keepsake that can be cherished for years to come.
But handprint stepping stones are not just for children and parents. They hold a special place in the hearts of grandparents, aunts, uncles, and other family members as well. It is a wonderful way to involve extended family in a project, creating not just a stepping stone but also bonding experiences and memories.
Moreover, handprint stepping stones can also serve as a way to remember loved ones who have passed away. They can be created with the handprints of family members or friends who are no longer with us, serving as a beautiful and meaningful tribute to their memory.
Aside from the sentimental value, handprint stepping stones also have a decorative purpose. They can add a personal touch to any garden or outdoor space, making it truly unique and special. They can also be used as a gift for special occasions such as Mother’s Day, Father’s Day, or even as a housewarming present.

In addition to their sentimental and decorative value, handprint stepping stones are also a great way to encourage creativity and self-expression. Children can choose their own colors, designs, and even add their names or special messages. This allows them to take ownership of the project and feel a sense of pride in creating something beautiful.
10 Methods How to Make a Handprint Stepping Stone
1. Gather Materials
To make a handprint stepping stone, you will need a few supplies. First, you will need a bag of concrete mix and some water to mix it with. You will also need a container for the mixture, such as an old bucket or plastic storage bin. Additionally, you will need some tools to shape the stone, such as a trowel and/or rubber spatula. Finally, you will need something to use as a mold for the stone, such as an old cake pan or pie plate.
2. Mix the Concrete
Once you have all of your materials gathered, it’s time to mix the concrete. Follow the instructions on your bag of concrete mix to determine how much water you should add to the mixture. Once it is mixed together well, pour it into your chosen container and let it sit for about 10 minutes before continuing on to the next step.

3. Prepare Your Mold
Next, prepare your mold by greasing it with cooking oil or shortening so that the finished product will come out easily when dry. Place your mold on top of a flat surface that can withstand being wet and heavy, such as a sturdy table or countertop covered with newspaper or plastic sheeting.
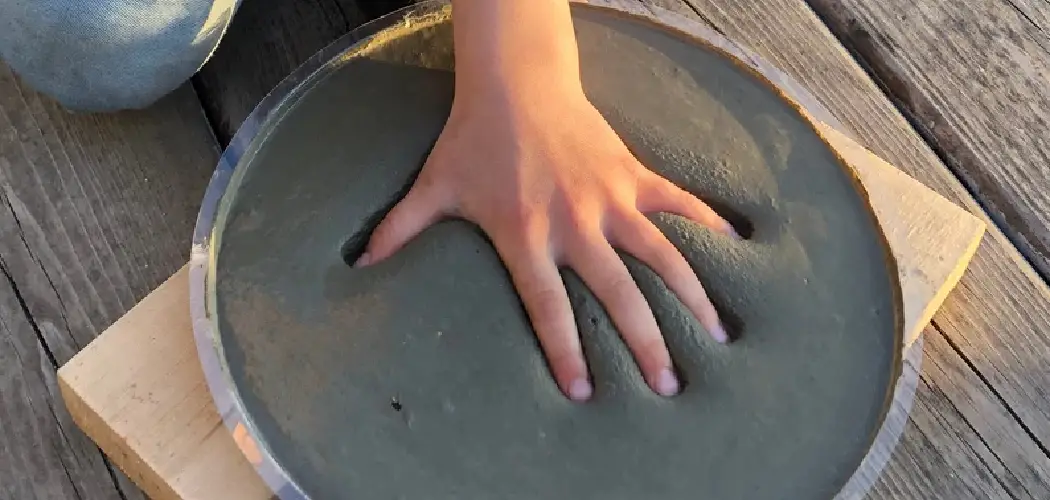
4. Add Handprints
Once your mold is prepared and your concrete is ready, begin adding handprints! Have each person press their hands into the wet concrete mixture until their hands are completely submerged in it – be sure not to move them around too much once they’re in there! For best results, press each hand down firmly but gently so that all of their fingerprints are clearly visible in the finished stone.
5. Smooth Out Edges
After everyone has added their handprints to the wet concrete mixture, use a trowel or rubber spatula to smooth out any rough edges around them so that they look neat and uniform when dry. Be careful not to disturb any of the handprints while smoothing out any edges! This step is especially important if using small children’s hands – their little fingers can easily get damaged if handled too roughly!
6. Let Dry
Once all of the edges are smoothed out nicely around each person’s handprints in the wet concrete mixture, let it sit undisturbed overnight (or longer) until fully dry and hardened before attempting to remove it from its mold! Depending on temperature and humidity levels in your area this could take anywhere from 24-48 hours (or longer).
7. Remove From Mold
Once your stepping stone is completely dry and hardened (you should be able to tell by tapping on its surface), carefully remove it from its mold by gently prying up one side at a time with something thin like an old butter knife or metal spatula until it pops free from its container! If necessary, use some gentle force – but be careful not to damage any of those precious handprints!

8. Sand Edges & Surface
Once removed from its mold successfully without damaging any of those precious handprints inside!, use sandpaper or an electric sander (if available) to lightly sand down any rough edges around its perimeter and on its surface – this will help give it a more polished look once painted later on!
9. Paint & Decorate
Once all of its edges have been sanded down nicely for a polished look, use acrylic paints (available at most craft stores) along with paint brushes and other decorative items such as glitter glue or rhinestones (also available at most craft stores) to decorate your stepping stone however you desire!
10. Seal With Polyurethane
To protect your newly decorated stepping stone from outdoor elements such as rain & snow (and keep those precious handprints safe!), seal both sides evenly with polyurethane spray sealant available at most hardware stores – just follow the directions provided on the product packaging carefully for best results!
Things to Consider When Making Handprint Stepping Stones
When it comes to crafting handprint stepping stones, there are a few things you should consider. These will help ensure that your finished product is not only beautiful, but also durable and long-lasting.
Choosing the Right Materials
The materials you choose for your handprint stepping stone project play a crucial role in its overall outcome. While you can use a variety of materials, such as concrete, plaster or even clay, it’s important to choose ones that are strong and weather-resistant. This will help ensure that your handprint stepping stone can withstand the elements when placed outdoors.
Preparing the Molds
Before you begin pouring your chosen material into the molds, make sure they are clean and dry. Any debris or moisture can affect the final result. If you are using a plastic mold, it’s recommended to apply a thin layer of petroleum jelly to prevent sticking.

Mix Your Materials
Follow the instructions provided with your chosen material for mixing. It’s important to mix thoroughly and ensure there are no lumps in the mixture. This will help create a smooth surface for your handprint.
Making the Handprint
When pressing your hand into the mixture, make sure to do so firmly and evenly. You want to create a clear and defined handprint that will last for years to come. It may be helpful to have someone assist you in this step, especially if making multiple stepping stones.
Conclusion
Crafting a handprint stepping stone is the perfect project for anyone looking to add some homemade charm to their garden or backyard. After gathering all of your materials, simply combine them together and create your own unique masterpiece!
Whether you’re creating it with your own family or as a gift for another, this craft will always be an inviting addition. To finish off your handprint stepping stone, display it proudly in the sun.
It won’t be long until you start seeing its beauty in bloom. You are now confident about how to make a handprint stepping stone with ease and confidence! So don’t hesitate – gather your materials, grab some friends, and start crafting – just remember the placement tips we discussed in this post. Now get out there and show off your creative side by making one of these beautiful stepping stones!