
Do you want to make a beaded daisy chain that will add a beautiful color and elegance to your wardrobe? Daisy chains are classic and timeless decorations made from interlinking individual beads or tiny blossoms.

This jewelry can take many forms, from chokers to headpieces, adding an elegant finishing touch for special occasions. In this blog post, we’ll show just how easy it is for any skill level crafter to make their own beaded daisy chain in no time!
We’ve laid out all the materials you need, step-by-step instructions on how to create the perfect piece of unique jewelry, plus helpful tips for making sure your daisy chain turns out perfectly every time.
So get ready – you’re about to learn everything you need to know about how to make a beaded daisy chain!
What Will You Need?
Before you dive into creating your beaded daisy chain, make sure you have all the necessary materials. Here’s a list of what you’ll need:
- Beading wire or string
- A variety of beads (glass, plastic, seed, etc.)
- Clasp or toggle closure
- Scissors
Once you have all the materials, you can get started on your very own beaded daisy chain!
10 Easy Steps on How to Make a Beaded Daisy Chain
Step 1: Choose Your Beads
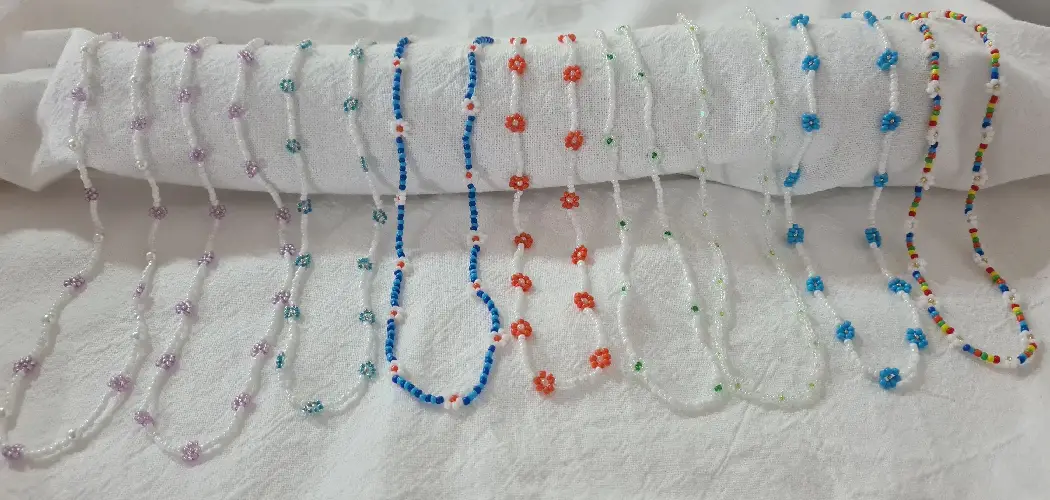
First, decide on the colors and sizes of the beads that you want to use for your daisy chain. This can be as simple or as complex as you’d like. A traditional daisy chain usually includes white beads for the petals, yellow for the center, and green for the stems. But feel free to get creative – use any colors that inspire you!

Step 2: Cut Your String
Second, cut a length of beading string or wire longer than your desired finished product (taking into account any clasps or closures you plan to add). As a rule of thumb, it is always better to have excess string than to run short. Remember, you can always trim the excess string once you are finished.
Step 3: String Your Beads
Next, start stringing your beads according to the pattern you have chosen for your daisy chain. For a classic pattern, start with your petal beads, followed by your center bead, and then the stem beads. Repeat this pattern throughout the length of your string. Leave enough space at the end of the string for your clasp or closure.
Step 4: Attach the Clasp
After stringing all your beads, it’s time to attach the clasp or closure to your beaded daisy chain. Thread the end of your string through the loop of your clasp or closure. Then, loop it back through the last few beads on your string. This will secure the clasp in place and also hide the end of the string within the beads.
Repeat this step on the other end of your string with the other part of your clasp or closure. If you’re using a toggle and bar closure, remember that the bar side needs to be long enough to fit through the toggle but not so long that it slips out easily.
Step 5: Check Your Work
Once you’ve attached the clasp, take some time to check your beaded daisy chain. Ensure all the beads are correctly strung and the pattern is consistent. Also, confirm that the clasp or closure is securely fastened and that the ends of the string are well hidden.

If you find any issues, it’s easier to fix them now before you move on to the next step. Once you’re happy with your work, you’re halfway through making your beaded daisy chain!
Step 6: Create Your Second Layer
To give your daisy chain some depth, you can create a second layer of beads. Start by threading a separate string through the first “stem” bead on your previous layer.
Then follow the same pattern as before – petal beads, center bead, stem bead – but this time, thread through the existing “stem” beads from your original layer. This will align your two layers and give your daisy chain a more complex, attractive look. Remember to leave enough string at both ends for attaching your clasp or closure!
Step 7: Attach the Clasp to the Second Layer
After strung your second layer of beads, it’s time to attach the clasp or closure. Like step 4, thread the end of your string through the loop on your clasp or closure, then loop it back through the last few beads on your string. This hides the end of the string and secures the clasp.

Do the same on the other end of your string with the other part of your clasp or closure. Double-check that your clasp is secure and that your beads are correctly aligned.
Step 8: Check the Second Layer
Your next step is to review your second layer meticulously. Ensure that the daisy chain pattern is consistent and visually appealing. Examine the placement of the beads, the tightness of the string, and the security of the clasp. If you notice any inconsistencies, make the necessary adjustments.
This proactive step will save you time and prevent potential disappointments. After all, creating a beaded daisy chain is as much about the process as it is about the final product. Your attention to detail will surely pay off in the end!
Step 9: Finishing Touches
The final step involves making any last-minute adjustments to your beaded daisy chain. Look over your creation one last time – is there anything that doesn’t seem right? If you notice any loose beads, you should tighten your strings. If a bead is out of place, adjust it to maintain the pattern. Finally, trim any remaining excess string. After these final adjustments, your beaded daisy chain should be ready!
Step 10: Enjoy Your Beaded Daisy Chain
Congratulations – the last step is to enjoy your beaded daisy chain! Whether you choose to wear it, give it as a gift, or even sell it, the joy comes from having created a unique piece of jewelry with your own hands.
Remember, each bead you thread contributes to a larger pattern, much like every moment in our lives adds to a greater whole. So, each time you look at your daisy chain, let it remind you of your creativity, patience, and attention to detail.
By following these ten easy steps, you can make your very own beaded daisy chain in no time. But don’t stop there – use this tutorial as a guide to create other beautiful beaded jewelry pieces and let your creativity run wild.
5 Additional Tips and Tricks
- Start With High-quality Beads: When creating a beaded daisy chain, the quality of your beads will significantly affect the result. Opt for beads that are uniform in size and shape, making your chain look more professional and neat.
- Use a Beading Needle: A beading needle can make threading the beads onto your string much easier. These needles are thin and flexible, and they can fit through even the smallest of bead holes.
- Practice Patience: Making a beaded daisy chain can be a time-consuming process, especially for beginners. But with patience and perseverance, your skills will improve over time.
- Experiment With Colors: Be bold and play with different color combinations in your chain. Mixing and matching colors can lead to beautiful and unique designs.
- Take Care of Your Chain: Once your beaded daisy chain is complete, store it properly to maintain its beauty. Avoid exposing it to harsh elements like direct sunlight or water, as they can damage the beads.

With these additional tips and tricks, you can take your beaded daisy chain making skills to the next level.
5 Things You Should Avoid
- Avoid Cheap Materials: The longevity and aesthetics of your beaded daisy chain heavily depend on the quality of the materials used. Avoid cheap, easily breakable beads and stringing materials.
- Do Not Rush: Rushing through the process can lead to mistakes and inconsistencies in your design. Take your time to place each bead correctly.
- Avoid Using a Thick Thread: Using a thread that’s too thick for your beads could end up damaging them or making it difficult to thread them. Make sure to choose a thread that fits your beads nicely.
- Do Not Ignore the Knots: Knots are essential in beadwork to prevent the beads from sliding off. Avoid missing the knots or not tying them tightly enough.
- Avoid Inappropriate Storage: Do not store your beaded daisy chain in places with high heat or humidity, as this can cause the colors to fade or the materials to degrade. Always keep your creations in a cool, dry place.
By avoiding these common mistakes, you can ensure that your beaded daisy chain turns out beautifully and lasts for a long time. Remember to have fun and let your creativity shine through in your designs!
Conclusion
The possibilities and uses for a beaded daisy chain are endless! If you feel overwhelmed by the task of creating your own, remember that practice makes perfect – and the result will be worth it. When learning how to make a beaded daisy chain, it is essential to equip yourself with the right materials and follow the easy steps outlined in this blog post.
Making your own daisy chain is an advantageous experience and can provide both visual beauty as well as a sense of personal accomplishment.
We hope these instructions on making a beaded daisy chain help you in creating a colorful array of flowers. With some patience and creative flair, you can make one out of any type or color of beads that you choose. So give it a try today and show off your beautiful creations!