
Are you ready to have some spooky fun? Creating a balloon spider is a great way to add an element of surprise for your family and friends this Halloween. It’s easy, quick, and costs very little money – so why not give it a try?
With just a few simple supplies: balloons, googly eyes, pipe cleaners, and imagination – you can create your own one-of-a-kind balloon spider in no time! Read on to learn how to make a balloon spider and surprise your friends!

Supplies You Will Need to Make a Balloon Spider
- Three balloons (black, white, and green)
- Googly eyes
- Pipe cleaners
- Markers or colored pencils
- Hot glue gun
- Scissors
Step-by-Step Guidelines on How to Make a Balloon Spider
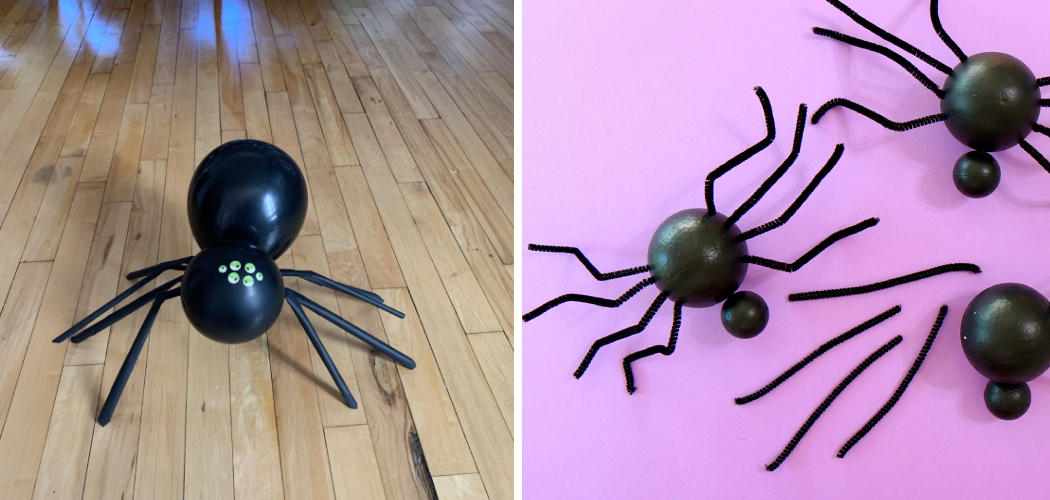
Step 1: Start by Blowing Up The Black Balloon
Inflate the black balloon and tie a knot to keep it closed. This will be the spider’s body. This will help it have a shape that is easily manipulated. So it’s important to make sure the black balloon is well inflated and make sure to tie a tight knot at the end.
Step 2: Create the Spider’s Legs
Take eight pieces of pipe cleaner and divide them into four pairs. Each pair should be a different color (red, blue, green, or yellow). Fold each pair in half and twist them around each other about three-fourths of an inch from one end. Attach the twisted end to the black balloon by wrapping it around the sides of the full balloon. Repeat this process with all four pairs.
Step 3: Make the Spider’s Head and Eyes
Inflate the white balloon and tie a knot at the end. Cut off a small piece of the neck, about one inch from where you tied the knot. This will be the spider’s head. Attach it to the black balloon, near the front of the body. Glue two googly eyes onto the white balloon head and draw a mouth with a marker or colored pencil.

Step 4: Add Green Accents
Inflate the green balloon and tie a knot at the end. Cut off four small pieces from the neck, about one inch from where you tied the knot. Attach each piece to the black balloon in a curved line so that it looks like spider legs. Adding these green accents will give the spider a unique look.
Step 5: Make the Spider’s Web
Cut four pieces of pipe cleaner in half, and twist them together. Attach each twisted end to the black balloon by wrapping it around the sides of the full balloon. This will create a web-like pattern that wraps around your spider’s body. You can also draw a web pattern with a marker or colored pencil if you prefer.
And that’s it! You’ve now created your very own balloon spider! This spooky creation is sure to make your friends scream in delight. Have fun and show off your unique work of art this Halloween season!
Additional Tips and Tricks to Make a Balloon Spider
- 1Before you start, practice making a basic balloon sculpture. This will help you understand the basics and build your confidence in handling balloons so that you don’t make any mistakes with the spider shape.
- When stretching and twisting the balloons, be careful not to over-stretch them or twist them too tightly as this can cause them to burst or break.
- Use the right tools for the job. Investing in a good quality balloon pump will make it easier to create larger sculptures and save you time in the long run.
- Consider using markers or paint pens to give your spider an interesting design or color scheme.
- Lastly, practice makes perfect! With each attempt, you’ll become more adept at making balloon spiders so that you can create bigger and better ones.
By following these tips and tricks, you’ll be able to make a great-looking balloon spider in no time! Have fun and get creative. Good luck!
Things You Should Consider to Make a Balloon Spider
1. Select the Right Size Balloons for Your Spider:
The size of the balloon you select will depend on its intended purpose. For a small spider, use a 10-inch round latex balloon. For a larger one, choose a 16-inch round or 12-inch twisting balloon. Selecting the right size balloon will ensure that your spider looks proportional.

2. Choose Your Color Scheme:
Select colors for your spider based on its intended purpose. If you plan to use it as a Halloween decoration, choose black and orange balloons. For a birthday party, pick balloons in bright pastels or jewel tones. You should also consider the size of the room where the spider will be placed. The bigger the room, the brighter and more outrageous your color scheme can be.
3. Select a Suitable Base for Your Spider:
An appropriate base is essential for your balloon spider to have form and stability. You can use a basket or foam board as a base, depending on its size and weight requirements. If you want to make it sturdier, you can use a wooden base. Selecting the right base will ensure that your spider looks great and lasts for a long time.
4. Assemble the Spider’s Legs:
Attach a balloon to each corner of the base with duct tape or glue. You can also use a plastic cable ties for added stability. Once the legs are in place, tie them together at the center using more ties or string. This will form the body of your spider. Assembling the legs correctly will provide your spider with a balanced and secure structure.
5. Decorate Your Spider:
Once you have assembled the body of your spider, it’s time to get creative. You can add eyes, teeth, fangs, or any other decorations you like to make it look more realistic. To give your spider an extra spooky look, you can add glow-in-the-dark paint to its eyes and fangs. Decorating your spider will make it unique and give it personality. This will make it stand out among all the other spiders.
Creating a balloon spider is easy and fun. With the right tools and materials, you can create unique decorations for any special occasion. Plus, this craft project is great for kids of all ages to practice their balloon-twisting skills. Have fun!

Precautions Need to Follow for Making a Balloon Spider
- Make sure you have the right materials before beginning. All you will need is long balloons, a pump, scissors, and tape.
- Exercise caution when using scissors to cut the balloons as they can be sharp and may cause injury if not handled properly.
- When inflating the balloons, use a pump instead of your mouth to avoid breathing in any of the latex contained within the balloon.
- Securely tape any loose ends such as legs, eyes, or antennae to create a sturdy structure for your spider to prevent it from breaking or falling apart.
- As with most projects that involve balloons, it is advised to avoid over-inflating them, as this can result in a balloon bursting.
- Lastly, keep the spider away from any sharp objects or surfaces that could puncture it.
- Enjoy your newly created spider! With the proper precautions in place, you can now show off your own unique homemade Balloon Spider to friends and family.
- You can also incorporate some decorations by adding googly eyes or another type of embellishment to make it look even more realistic and fun.
By following these precautions, you will have the knowledge and confidence necessary to make a great Balloon Spider that you can proudly show off. So get creative and whip up a unique and amazing Balloon Spider of your own!

Frequently Asked Questions
What Materials Do I Need to Make a Balloon Spider?
You will need some balloons, preferably small in size and of various colors, along with string or thread to secure the pieces together. You may also want to use scissors and glue for additional details.
How Long Does It Take to Make a Balloon Spider?
Depending on how much detail you would like to add, it usually takes between 15-30 minutes. Keep in mind that the more complex your spider design is, the more time it will take.
Are There Any Safety Precautions I Should Follow When Making a Balloon Spider?
When blowing up the balloons, make sure not to overinflate them as they may pop. Additionally, if you are using scissors or glue be careful and keep away from any small children who might be around.
Can I Make a Bigger Balloon Spider?
Yes! If you want it to be bigger, just use larger balloons and adjust your design accordingly. You can also use multiple pieces of thread to connect the parts and make them more secure.
What Are Some Creative Ways To Decorate My Balloon Spider?
You can use different colors, sizes, and shapes of balloons to create a unique design that suits your style. You can use additional materials such as markers, glitter, pom-poms, etc to add extra details. You can also make the spider’s legs bendable by using wire or string instead of balloons.
Are There Any Other Projects I Can Make With Balloons?
Yes! You can make a variety of shapes and objects with balloons such as animals, flowers, stars, hearts, or anything else you can think of. Have fun and get creative!

Conclusion
Crafting a balloon spider is an excellent way to entertain guests and celebrate special occasions. Using balloons, a bit of creativity, and a few items from the local craft store you can create this festive decoration in no time. Even complete beginners can make their own fun take on this classic idea with minimal effort.
For any construction challenges, there are always ways to adjust the size or shape of the spider for the desired effect. With some patience, your very own balloon spider will be ready to haunt your home with color and joy!
Take a moment today to try out this project for yourself and share the delight with others. Who knows; maybe you’ll discover your new favorite Halloween decoration How to Make a Balloon Spider!