

Are you looking for a fun and creative way to make your unique shirt? Have you ever thought of adorning it with colorful pom poms? Yes, you can! How to glue pom poms to a shirt is an easy and inexpensive craft that anyone can do. With just a few supplies, such as fabric glue, scissors, and some colorful yarn or pieces of felt, you, too, could have the perfect custom-made piece of clothing.

Creating a fun and unique craft has never been easier than with pom poms! Whether you plan to make it the centerpiece of your outfit or just want to add a little extra flair, gluing these colorful balls of fuzz onto your shirt is an entertaining activity that can help bring out your creative side.
So get ready for some fun – let’s explore how to glue pom poms to a shirt!
What Will You Need?
Before you get started, there are a few supplies you will need to gather up.
- Fabric Glue: The fabric glue you use is important when it comes to making sure your pom poms stay stuck on your shirt for as long as possible. We recommend using a fabric glue designed specifically for clothing and textiles for best results.
- Scissors: You will need a pair of scissors to cut the pom pieces from yarn or felt.
- Yarn or Felt: Find some colorful yarn/felt you want to use for your pom poms! This is where you can get creative and have fun with the design of your shirt.
Now, let’s get into gluing them on!
10 Easy Steps on How to Glue Pom Poms to a Shirt
Once you have gathered all your supplies, it’s time to start gluing! Follow these steps for success:
Step 1. Cut Out Pieces of Yarn:
Cut out the pieces of yarn you will use for your pom poms. Make sure they are long enough to wrap around two or three fingers. As you cut the pieces, keep them as even and consistent as possible.
Step 2. Wrap Around Fingers:
Wrap each piece around two or three of your fingers, and tie a knot at the top. This will give you a nice round shape for your pom poms. You can make the pom poms as big or as small as you like.
Step 3. Cut Along Knot:
Once you have tied all of the knots, take a pair of scissors and cut along the knots so that the excess length is removed from each piece. Now you should have several round pieces ready to use! Additionally, if you are using felt, skip steps 1 and 2 and cut out your desired shapes with the scissors.
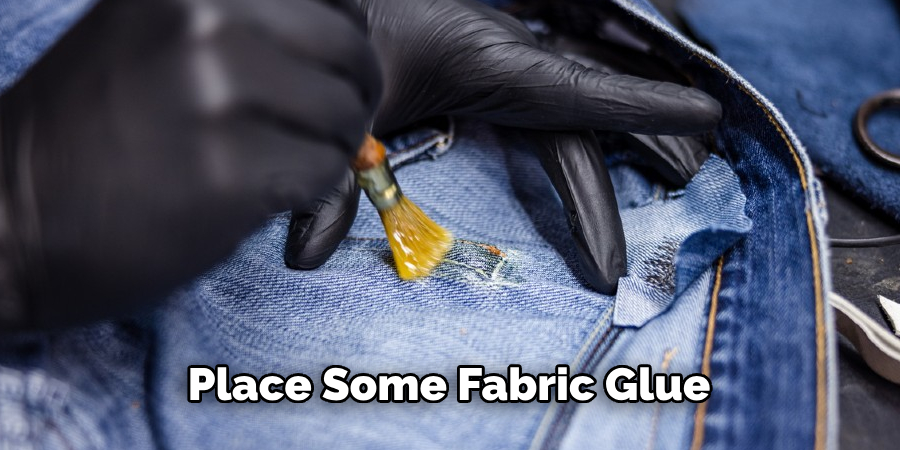
Step 4. Glue Pom Poms onto Shirt:
Place some fabric glue onto the back of each pom pom piece and then press it firmly onto your shirt. Make sure to spread out the pieces evenly so that the design has a good overall balance. Otherwise, you may end up with one side of your shirt looking fuller than the other. Allow the glue to set for a few minutes before moving to step 5.
Step 5. Add More Pom Poms:
Continue gluing your pom poms onto your shirt until you are happy with the design. Feel free to mix up different colors or patterns; don’t be afraid to get creative! This is your shirt, after all.
Step 6. Let Dry Completely:
Give the shirt time to dry completely before wearing or washing it. You want to ensure the pom poms are securely attached and won’t come off in the washing machine. Ensure this by waiting at least 24 hours before you put it in the wash.
Step 7. Wear Your Shirt with Pride:
Now it’s time to show off your fabulously designed shirt! You can wear it out on a night out with friends or just around town – wherever you go, be sure to enjoy the compliments you get for your one-of-a-kind creation. Always remember: when it comes to crafting, there are no rules – just have fun and let your imagination run wild!
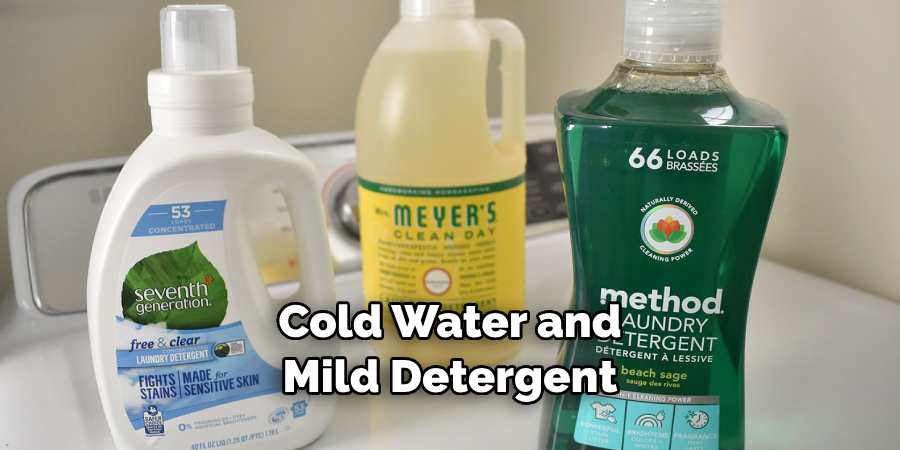
Step 8. Washing Instructions:
When your shirt needs to be washed, use cold water and mild detergent by hand. Gently press any excess water out of the fabric before laying it flat to dry. Do not put it in a clothes dryer or machine wash it.
Step 9. Caring for Your Shirt:
Your shirt should last for many years with proper care and maintenance. Be sure to store it away from any heat sources or direct sunlight, as this can cause fading of the colors over time. Additionally, be sure to fold or roll the shirt gently when storing it to preserve the craftsmanship of your pom poms.
Step 10. Enjoy!
Most importantly — enjoy your beautiful custom-made piece of clothing! Show off your creativity and proudly wear your unique design everywhere you go! It’s a great conversation starter and will get many compliments from friends and family.
You can make a unique and fashionable shirt in no time by following these simple steps. So prepare your supplies and have fun creating something special – good luck!
5 Additional Tips and Tricks
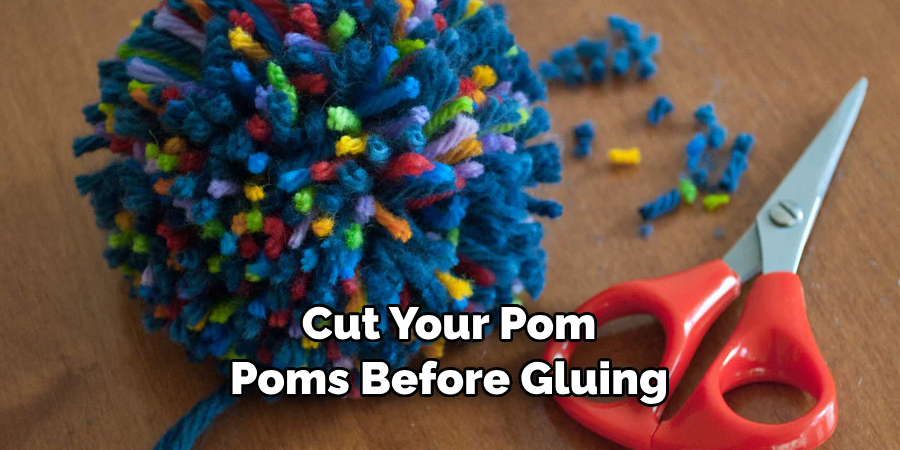
- Pre-cut your pom poms before gluing them onto the shirt. Not only will this help keep your project neat and organized, but it will also ensure that all of the pom poms are glued on evenly.
- Use fabric glue for best results when gluing pom poms to a shirt. Fabric glue is designed to bond fabrics together, making it ideal for adding decorations like pom poms to clothing projects.
- Lay out your design ahead of time so that you can better visualize where each piece should go and plan accordingly. This will make it easier to achieve a professional-looking outcome with your final product.
- If you’re using multiple colors of pom poms, try to group them in sections or stripes for a more cohesive look.
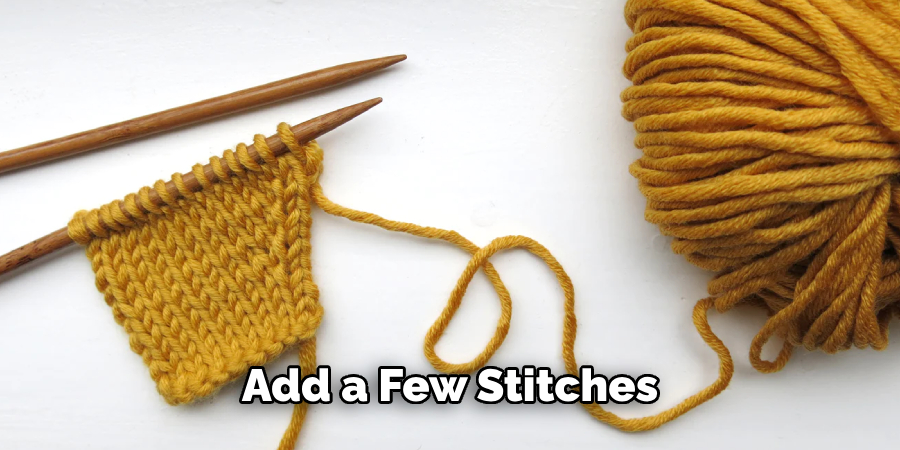
- If the shirt is made from light material, attach each pom pom with an additional stitch for extra security. This will also help keep your projects looking neat even after repeated washings.
These tips and tricks ensure beautiful results when gluing pom poms to a shirt!
5 Things You Should Avoid
- Don’t use regular glue, as it can be too harsh on fabric and may cause damage.
- Avoid using pins or other sharp objects to attach the pom poms, as these can easily snag or tear the shirt material.
- Avoid overfilling the area with too many decorations – a few colors of pom poms should do the trick!
- Avoid leaving gaps between your glued-on decorations, as this can make them look uneven and sloppy.
- Finally, don’t forget to finish your project by pressing down firmly on each decoration after you have applied them – this will ensure they stay in place for many wears to come!
Avoiding these few pitfalls will help keep your projects looking professional and beautiful. Have fun crafting with pom poms!
What Glue Will Stick to Pom Poms?
Fabric glue is the best type of glue to attach pom poms to clothing. Fabric glue is designed to bond fabrics together and won’t damage the material like traditional glue. Additionally, it will ensure that your decorations stay in place even after multiple washes.
For extra security, you may add a few stitches to each decoration after you have glued them on. This will help keep everything in place and ensure your projects look great for years!
With these tips in mind, you should be able to easily create stunning projects by gluing pom poms onto shirts or other garments! Have fun crafting with fabric decorations!
Does Elmer’s Glue Work on Pom Poms?
Elmer’s glue is not the best choice for gluing pom poms onto clothing. While Elmer’s glue can work in some instances, it tends to be too harsh on fabric and may cause damage or discoloration. Also, Elmer’s glue does not provide as much adhesion as fabric glue, meaning your projects won’t stay in place for as long.
For best results when gluing pom poms onto shirts or other garments, we recommend using fabric glue to bond fabrics. This will ensure that your decorations stay put even after multiple washing items – giving you beautiful results every time!
Conclusion
With the help of a few household items, you can take your favorite shirt and turn it into a cute and unique accessory with some pom poms!
Whether you plan to glue on one or many, this simple activity is easy enough for anyone to do. Spend time exploring different earring shapes, such as stars, teardrops, and moons – the endless possibilities. Plus, you can choose various colors depending on your style preference.
After all, this project on how to glue pom poms to a shirt is completely customizable to your taste. Giving an old garment a new life has never been simpler or more fun! Get creative with patterns and color combinations, and enjoy creating amazing new designs with these little puffs of colorful yarn – let’s get crafting!