
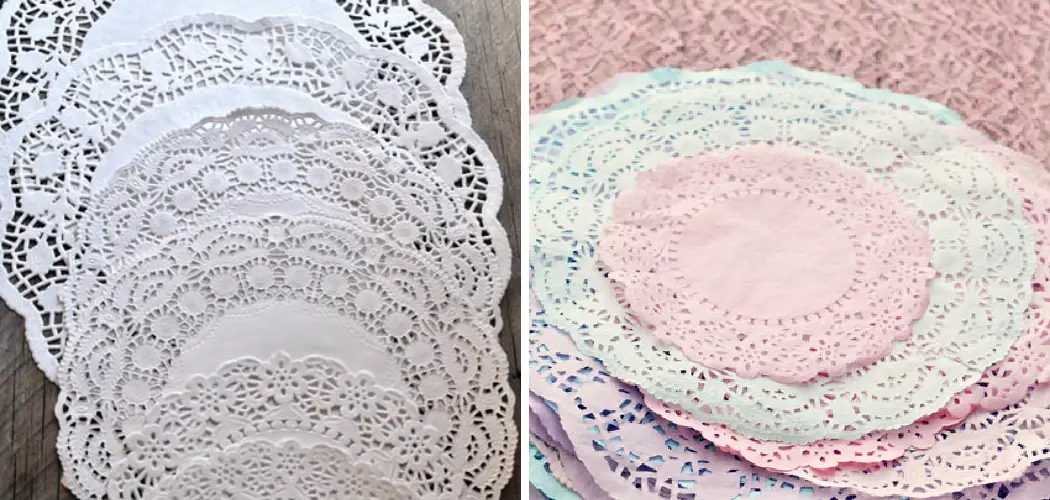
Do you love crafting but can never seem to find the perfect materials? If this is your plight, then paper doilies are just what you need. Not only are they incredibly versatile – ranging from a delicate background for scrapbooking compositions to something that can be folded or cut into shapes and patterns for special cards – but they also open up a world of decorative possibilities when it comes to dying.

When you dye paper doilies yourself, you can create the exact hue that works best for your project – from bright and cheerful primary colors to soft pastel shades. Plus, learning how to dye paper doilies is an easy and inexpensive way to take a craft project up a notch! So roll up your sleeves, grab some colored dyes, and create stunningly customized handmade doily projects with these step-by-step Instructions.
What Will You Need?
To dye paper doilies, you will need the following materials:
Colored Dyes or Fabric Dyes (Depending on Your Desired Color)
First things first, you need to gather the right dyes for your desired color. You can either opt for colored dyes specifically designed for paper or fabric dyes that work well on both paper and cloth materials.
Water
Next, you will need water to dissolve your chosen dye and create a dye bath.
Mixing Bowl or Container
You will also need a mixing bowl or container to create your dye bath in. Make sure it is large enough to submerge the paper doilies.
Paper Doilies
Of course, you will need paper doilies for this project! You can purchase pre-made doilies from a craft store or make your own using a die-cutting machine.
Rubber Gloves
To avoid staining your hands with the dye, it is best to wear rubber gloves while handling the dye and doilies.
Towels or Paper Towels
To dry off your paper doilies after dying them, have some towels or paper towels on hand. You can also use these to absorb any excess dye from the doilies.
Optional: Vinegar or Salt
Depending on your chosen dye, you may need to add vinegar or salt to help the dye set on the paper doilies. Check the instructions on your dye package to see if these ingredients are needed.
10 Easy Steps on How to Dye Paper Doilies:
Step 1: Preparing the Doilies
Before you begin dyeing your paper doilies, it’s important to prepare them properly. First, lay out a large piece of newspaper or an old towel on a flat surface, such as a table or workspace. Next, separate your paper doilies into individual pieces and place them on the newspaper or towel surface, ensuring they don’t overlap.
You can also lightly mist the doilies with water before dyeing them to help the dye spread more evenly. It’s important not to soak the doilies, as they are delicate and can easily tear.
Step 2: Submerging the Doilies in Dye
Next, pour a small amount of dye into one of your bowls. Be careful not to use too much, as you’ll need some leftover space to add more water later if needed. Then, carefully dip your paper doily into the bowl so that it is completely submerged in the dye.

But don’t leave the doily in for too long – just a few seconds will do. Keep in mind that the longer you leave it in, the darker and more intense the color will be.
Step 3: Soaking and Rinsing the Doilies
Let your doily soak in the dye for about 5 minutes, then remove it from the bowl and rinse it with warm water until all of the dye has rinsed away. Once your doily is clean, gently squeeze out any excess liquid and set it aside to dry on a piece of paper towel or an absorbent cloth. Don’t worry if your doily looks a little discolored at this point – the dyeing process has just begun, and it will take some time for the final results to come through.
This step is crucial for setting the dye on your paper doilies and ensuring that the color stays vibrant even after drying. If you want a more intense color, repeat this step with your doily until you achieve the desired shade.
Step 4: Drying the Doilies
Repeat steps 2 and 3 for each different color of dye you want to create until all of your paper doilies have been dyed. Depending on how vibrant you want your colors to be, you may need to repeat these steps more than once by adding water to the dye mixture and soaking the doilies for 5-10 minutes before rinsing. Be careful not to let your doilies dry completely in between soaking and rinsing sessions, as this may cause the colors to set.
Otherwise, you can let your doilies air dry completely after going through the dyeing process once. This will result in a more subtle and faded color, but it’s perfect for achieving a vintage or pastel look.
Step 5: Letting Your Doilies Dry Completely
Once all of your paper doilies have been dyed and are fully dry, you can begin using them in various crafting projects – from beautiful handmade cards to lovely decorative accents for scrapbooks or other DIY projects. You can use your dyed paper doilies as-is for a simple and elegant effect, or you can transform them into fun shapes and patterns by folding, cutting, and shaping them as desired.
It’s important to note that some dyes may fade over time, so it’s best to use your dyed paper doilies within a few months of creating them for optimal color vibrancy.
Step 6. Experiment with Different Colors
While the traditional white paper doily is beautiful in its own right, you can also experiment with dyeing your doilies in various colors – from jewel tones and vibrant pastels to muted shades and even metallic hues. Another fun way to use your paper doilies is to create a collage of different colors and designs for a vibrant, eye-catching accent. Ensure that your finished project is completely dry before you display it so that the colors do not smudge or run.

You can also try using different techniques to create unique effects, such as ombre, tie-dye, or marbling. Feel free to mix and match colors and designs to see what works best for your project.
Step 7: Try Different Shaping Techniques
Aside from folding and cutting your paper doilies into different shapes and patterns, there are also a number of fun and artistic ways to shape them. For example, you can lay out several dyed doilies in different sizes and arrange them in concentric circles for a pretty sunburst effect. Or, try using your dyed doilies as stencils to create interesting designs on other surfaces, such as wood or paper.
If you’re feeling particularly creative, you can even use your dyed paper doilies to create origami or other 3D shapes. The possibilities are endless when it comes to crafting with paper doilies!
Step 8: Incorporate Your Doily Crafts into Other Projects
Once you’ve created beautiful dyed paper doilies by following these easy steps, choosing how to use them is completely up to you. Whether you want to create one-of-a-kind greeting cards for friends and loved ones, add a decorative touch to your planner or home decor, or give your DIY craft projects a unique and personal touch, these pretty little accessories are a perfect choice.
You can also use your dyed paper doilies as a base for other crafts, such as creating handmade flowers or adding them to scrapbook layouts.
Step 9: Share Your Creations
Finally, once you’ve learned, be sure to share your unique creations with friends and family! Whether you decide to create simple single-color designs or intricate patterns using different colored doilies, the possibilities are endless for how you can use these versatile homemade decorations in your own crafting projects. And who knows – maybe your next handmade card will become an heirloom that generations will cherish forever.
You can also inspire others by sharing your creations on social media or joining crafting communities online, where you can exchange ideas and techniques with fellow crafter.
Step 10: Have Fun and Be Creative!
Whether you’re using dyed paper doilies for card-making, scrapbooking, or another DIY project, the most important thing is to have fun and be creative. After all, crafting is all about exploring your own personal style and putting your own unique stamp on whatever you create – so don’t be afraid to experiment and explore different ideas as you make these lovely little accessories your own.

By following these simple steps for how to dye paper doilies, you can create beautiful handmade accessories that are perfect for various crafting projects. So what are you waiting for? Give it a try today, and let your creativity shine!
Do You Need to Use Professionals?
No, you don’t necessarily need to use professionals to dye paper doilies. This is a simple and fun DIY project that can easily be done at home with minimal supplies and equipment. However, if you are planning on using the dyed doilies for special occasions or professional projects, it may be beneficial to consult with professionals or take some time to perfect your technique. Ultimately, it’s up to personal preference and the level of skill and expertise desired for your finished product. So go ahead, have fun and get creative with your dyed paper doilies! Remember, the possibilities are endless!

How Much Could It Cost?
The cost of dyeing paper doilies can vary depending on the type and brand of dye you choose to use. However, most dyes are relatively inexpensive and can be found at your local craft store or online for a few dollars per bottle. Additionally, many basic household items such as bowls, newspapers, and towels can be used in place of specialized equipment to keep costs down. Overall, dyeing paper doilies is a budget-friendly way to add a personal touch to your crafting projects. So don’t be afraid to experiment with different colors and techniques without breaking the bank!
5 Additional Tips and Tricks:
1. Before dying your doilies, make sure that you prepare them accordingly. This means thoroughly washing and drying them first, that the doilies are bleached and starched, and that they have been ironed.
2. Once your doilies are ready to go, choose your dyes according to what color you want your doilies to be. Some great options include water soluble dyes, food coloring, and fabric dye.
3. To dye your doilies, you can either submerge them in a bowl of water and dyes or use a brush to apply them directly to your doilies. Either method should work well, though if you’re using a brush, it can help to dilute your dye with water first.
4. Depending on how saturated you want your doilies to be, you may need to let them sit in the dye for several hours or overnight. Try repeating this process multiple times to add even more depth and color until you get the desired effect.
5. Once your doilies are dyed how you like them, simply wash off any excess dye with water and let them dry completely before using or storing them.
Follow these simple tips and tricks and start adding gorgeous color and style to your papercraft projects today!
5 Precautions You Can Take:
1. Always use high-quality paper doilies for dyeing, as cheaper varieties may not be able to withstand the process.
2. Always start with a clean, dry surface when dyeing your paper doilies. This will allow for even application of the dye and prevent unwanted staining or damage to other surfaces in your work area.
3. When working with water-based dyes, use gloves and protective eyewear to avoid exposure to harmful chemicals or irritants that could damage your skin or eyes.
4. Keep the dyed doilies out of direct sunlight while they are drying, as this can cause them to fade or discolor over time. Instead, find a cool, dark space where they can sit undisturbed until they are completely dry.
5. Finally, store your dyed paper doilies in an airtight plastic container when you’re not using them to keep them looking bright and vibrant for as long as possible.
With these simple precautions in mind, you can enjoy beautifully dyed paper doilies for years to come!
Frequently Asked Questions:
Q: Can I Use Paper Doilies for Other Types of Crafting, Such as Sewing or Embroidery?
A: Absolutely! Paper doilies can be a versatile and unique addition to a variety of different crafting projects, including sewing, embroidery, and more. Just make sure to take the necessary precautions when using them in these types of projects, such as avoiding exposure to water or direct sunlight.
Q: Can I Use Other Types of Dyes, Such as Natural Plant-based Dyes or Spray Paints, to Color My Paper Doilies?
A: Yes! While water-soluble dyes and food coloring are commonly used for dyeing paper doilies, you can certainly experiment with other types of dyes and paints to achieve different effects. Just make sure to follow the appropriate safety precautions and test a small area first before applying it to all of your doilies.
Q: Can I Use Dyed Paper Doilies for Food Decoration?
A: No, it is not recommended to use dyed paper doilies for food decoration or as part of any dish or drink presentation. These doilies are meant for decorative purposes only and should not come into direct contact with food or drinks. Instead, use them as a beautiful accent to your table setting or as part of a serving tray display.
Q: Can I Use the Same Dyeing Techniques on Other Types of Paper Products?
A: Yes, you can certainly experiment with dyeing other types of paper products using the same techniques described in this guide. However, keep in mind that different papers may react differently to certain dyes, so it’s always a good idea to test a small area first before applying it to your entire project. Also, be sure to use paper products that are suitable for dyeing and can withstand the process.
Q: Can I Use Dyeing Techniques on Fabric-Based Doilies?
A: Yes, you can use dyeing techniques on fabric-based doilies such as lace or crochet. However, keep in mind that fabrics may require different dyes and techniques compared to paper doilies. It’s always best to consult with a professional or test a small area before attempting to dye your fabric-based doilies.
Conclusion:
Homemade paper doilies are fun, easy, and inexpensive to make. With just a few simple supplies, you can add a touch of elegance to any décor. Whether you choose to dye them or keep them natural, paper doilies are sure to impress your guests.
If you want to add some extra flair to your doilies, consider dying them! It’s a simple process that can be done with items you likely already have in your home. Give it a try today and see what amazing designs you come up with!
Hopefully, the article on how to dye paper doilies has helped you learn how to add a beautiful touch of color and elegance to your home décor. Best of luck as you explore this fun, creative process for yourself!
You Can Check It Out To Make a Bee with Paper