

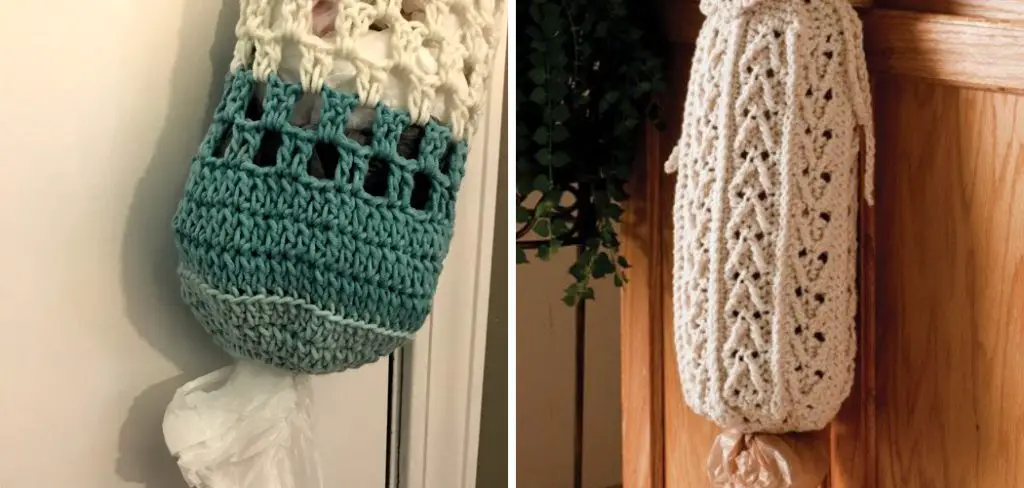
Are you looking for a practical and creative way to repurpose those plastic shopping bags that have been cluttering up your house? By following this step-by-step tutorial on how to crochet a plastic bag holder, you will learn how to easily crochet a convenient and attractive plastic bag holder that can help bring some order and style into your home.
Whether you are an experienced crocheter or just starting out, this project is sure to be fun and rewarding! Plus, it’s the perfect way to show off your skills while also doing something positive for the environment. So grab some yarn, and let’s get started on creating this stylish bag holder now.
Can You Add a Zipper to a Crochet Bag?
Yes, you can add a zipper to a crochet bag. Adding a zipper to your crochet bag will help keep your items secure and make it easier to store their items in the bag. There are multiple techniques for adding zippers to crochet bags.
One method involves using an invisible zipper that is sewn into the top edge of the bag. This method is often quicker and easier, though it can be more challenging to get the zipper to line up properly with the edges of the bag. If you are new to sewing zippers, this may not be the best option for you.
Another option is to use a regular zipper, which will give a cleaner look and allow for more customization. To add a regular zipper, start by crocheting a flap that will cover the zipper. Measure the length of the zipper and then crochet the flap to match this measurement. Sew your zipper into place and then attach it to your bag by sewing it onto the opening edge of your bag.
Whichever method you choose, adding a zipper to your crochet bag is an easy way to transform it into a more secure and stylish accessory. With the right materials and a bit of patience, you’ll have a unique and useful handmade item in no time!
10 Methods How to Crochet a Plastic Bag Holder
1. Supplies You Will Need
In order to crochet a plastic bag holder, you will need the following supplies: a crochet hook, a skein of worsted-weight yarn, and a tapestry needle. You will also need a pair of scissors to snip the yarn when you are finished. If you don’t have a crochet hook, you can use an old-fashioned knitting needle.
2. Starting the Holder
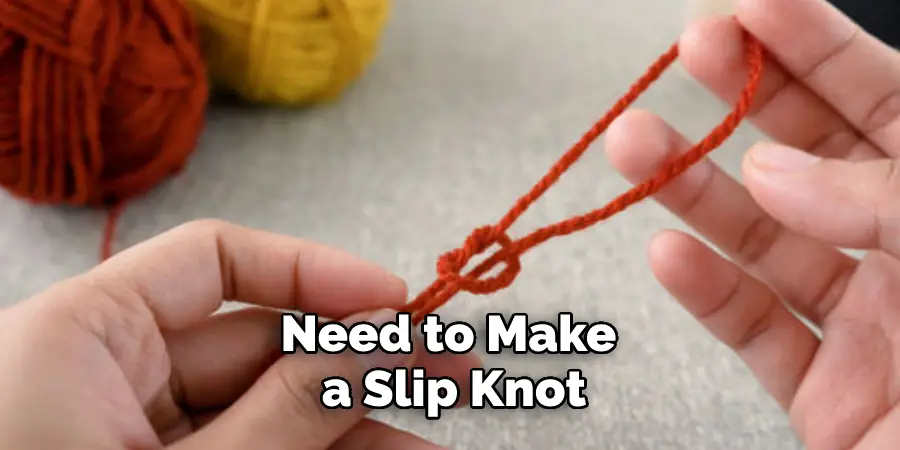
To start the holder, you will need to make a slip knot and then chain 30 stitches. Then, you will single crochet in the second chain from the hook and in each stitch across. When you reach the end of the row, you will turn in your work. At the beginning of the next row, you will chain 1 and single crochet in each stitch across.
When you have 10 rows, it is time to start the decreases. Although the pattern indicates that you should begin the decreases after 10 rows, it is not necessary to do so. You can continue crocheting until you reach the desired length of the holder before beginning to decrease.
3. Crocheting the Body of the Holder
For the next row, you will again single crochet in each stitch across. You will continue to do this until your work measures approximately 6 inches wide. You can adjust the size if you need to; just remember that it should be around 6 inches wide, and the length of your chain will determine how tall it is.
4. Adding the Bottom of the Holder
Once your work measures 6 inches wide, you will need to add the bottom of the holder. To do this, you will crochet 2 stitches together in each stitch across. When you reach the end of the row, you will turn in your work.
For the next two rows, you will be crocheting in a pattern of single crochet and skip one stitch. Continue this pattern until your work measures 12 inches wide. When you reach the end of the row, you will turn in your work.
5. Crocheting the Side of the Holder
For the next row, you will single crochet in each stitch across. You will continue to do this until your work measures approximately 8 inches tall. Once you reach the desired height, fasten off and weave in all your ends. When you are ready, you can embellish your holder with a button, ribbon, or other decorative items. Your plastic bag holder is now complete and ready to use!
When you use your bag holder, be sure to store it in a dry place. The plastic bags that you put inside of it will eventually accumulate moisture, and this can cause the holder to mildew if it is stored in a damp environment. Have fun with your new creation, and enjoy the convenience of having your plastic bags always at hand.
6. Adding the Handle of the Holder

Once your work measures 8 inches tall, you will need to add the handle of the holder. To do this, you will chain 30 stitches and then join them to the other side of your work with a slip stitch.
Make sure that you insert your hook into the back side of the beginning chain stitch. You will now be crocheting around the handle and continuing to work in single crochets. Make sure that your work does not twist and turn as you go, or it will be difficult for the holder to hang correctly when you are finished.
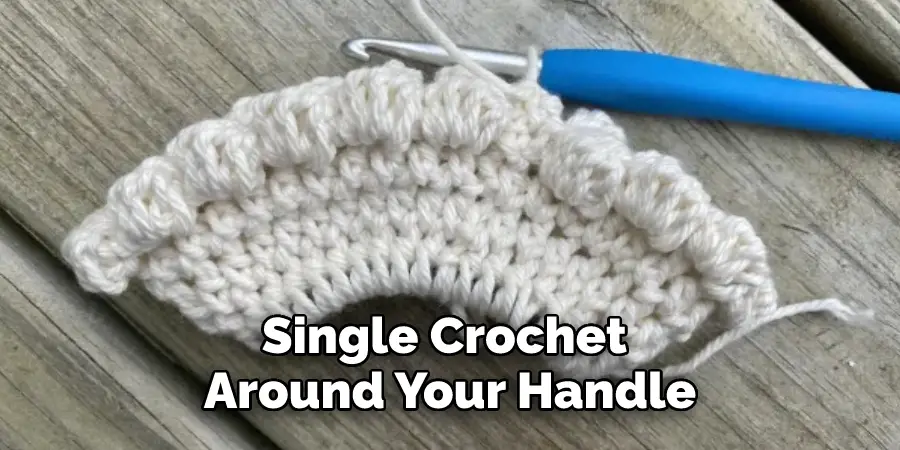
7. Crocheting Around the Handle
After joining your handle, you will need to single crochet around it in order to secure it in place. When you reach the end of your round, you will join it with a slip stitch and then turn your work. Continue crocheting until you reach the top of the bag, making sure to keep your stitches tight.
When you reach the top, fasten off and weave in your ends. If your handle is still loose after crocheting around it, you can use a darning needle to add some additional stitches for extra security. Now your plastic bag holder is complete!
8. Single Crocheting around Handle
For the next round, you will again single crochet around your handle. When you reach the end of your round, you will join it with a slip stitch and then turn your work. You will continue to do this until your handle is approximately 4 inches long.
Make sure to count your stitches so that you keep an even number. While crocheting, it may be helpful to use a stitch marker. This will help you keep track of your rounds and let you know when to join with a slip stitch. Once your handle is 4 inches long, you will fasten it off and weave in the ends.
9. Finishing Up
After crocheting around your handle for 4 inches, you will need to cut your yarn and then weave in all of your loose ends with a tapestry needle. Once you have done this, you can try your Plastic Bag Holder out with its first load of plastic grocery bags.
If you would like to add a zipper closure to your bag holder, there are two different methods you can use. One option is to use an invisible zipper, which will give the bag a sleek look and help keep everything contained and li0. Another option is to create a flap that will cover the zipper from the outside.
To do this, start by crocheting a flap that is 2 inches wide and 6 inches long. Measure the length of your zipper and then add 1 inch to the length of your flap.
Sew the zipper onto the flap, making sure to match up the edges evenly.
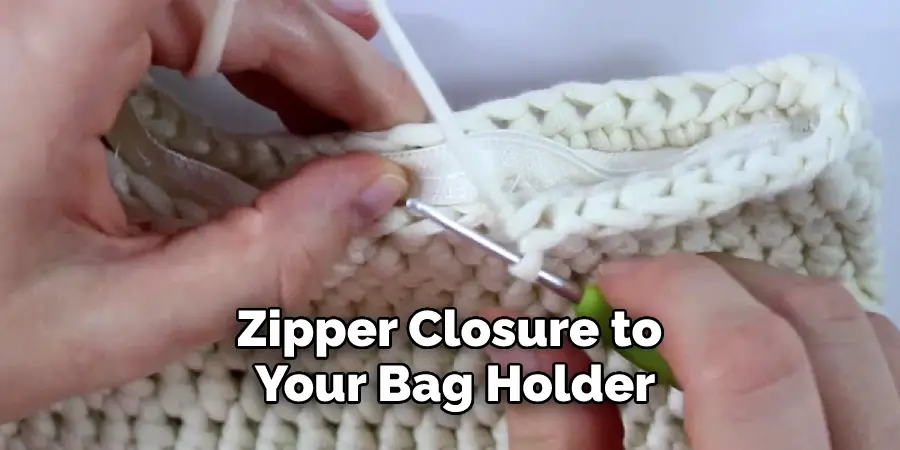
Attach the completed flap and zipper to the top of the bag. Secure it by stitching around the edges and making sure to catch the zipper in your stitches. Once complete, you should have a stylish bag holder with a secure zipper for storing your items.
Conclusion
Now that you know how to crochet a plastic bag holder, put your new skills to use and make one (or two) for yourself. Once you get the hang of it, they only take about 10 minutes each to make.
Not only are they useful, but they also make great gifts for friends and family members who are trying to reduce their own reliance on single-use plastics. So grab some yarn and a crochet hook, and get started today!
You Can Check It Out to Join Crochet Side Seams