
Have you been wanting to explore the creative possibilities of using your Cricut machine with multi-color iron-on? With a few simple materials and some knowledge of how to do multi color iron on cricut, you can have your projects sparkling in no time. The techniques used when creating multi-color designs are sophisticated and perfect for making totally unique items that stand out from others.

Imagine having matching tees customized for an evening hangout or backpacks embellished with attractive designs – now is the time to unlock all this potential by learning how to apply multi-color iron-ons quickly and easily!
Why Do Multi Color Iron On Cricut?
Multi-color iron-ons can be a great addition to any craft project. Whether you want to make a personalized gift or add some pizzazz to your wardrobe, multi-color iron-ons offer endless possibilities. Plus, with the use of a Cricut machine, you can easily create intricate and detailed designs that would be difficult to achieve by hand. If you’re new to multi-color iron-ons, don’t worry – with a few tips and tricks, you’ll be mastering this technique in no time.
Needed Materials
Below is a list of the materials you will need to complete this project:
- Cricut Cutting Machine
- Iron-on Vinyl in Various Colors (Depending on Design)
- Weeding Tool
- Heat Transfer Tape
- Protective Sheet or Parchment Paper
- Scissors
- Iron or Heat Press
- Fabric Surface to Apply the Iron-on Vinyl Onto
10 Step-by-step Guidelines on How to Do Multi Color Iron on Cricut
Step 1: Prepare Your Design
To start, you’ll need to create your design or find one in Cricut Design Space. Make sure it is a multi-color design that will work well with iron-on vinyl. It’s also essential to check that your design is the right size for the item you will be applying. But don’t worry, you can always resize your design in Design Space if needed. It’s also a good idea to mirror your design before cutting it out.

Step 2: Mirror Your Design
Once the design is ready, make sure it is mirrored, especially when using iron-on vinyl. This step will ensure that the final design appears correctly when transferred onto your item. You can find a mirror option in Cricut Design Space by clicking on “Edit” and then “Flip Canvas Horizontal.” It’s crucial to remember this step, or else you’ll end up with a backward design.
Step 3: Load Your Materials
Select the iron-on vinyl material in Design Space and make sure your machine is set to cut iron-on. Follow the prompts on your screen to load the mat with the vinyl into your Cricut machine. You should make sure that the shiny side of the iron-on is facing down on the mat. It is also essential to set the dial on your machine to “Iron-on” or custom. It is recommended to do a test cut before cutting your final design.
Step 4: Cut Your Design
Once everything is set up, click on “Make It” and let your machine do its magic. Once it’s done cutting, unload both the mat and iron-on vinyl from your Cricut machine. This part is super crucial, so make sure to handle the iron-on carefully without touching the adhesive side. It might be helpful to use the weeding tool to help remove any small pieces of vinyl from your design if needed.
Step 5: Prepare Your Surface
Before applying the iron-on, it’s essential to prepare your surface. If you’re working with a fabric item, make sure to prewash and dry it without using any fabric softener. Also, ensure that there are no wrinkles on your surface as they can interfere with the transfer process. You can also use a heat press to preheat the surface for better results.
Step 6: Heat Your Iron or Heat Press
If you’re using an iron, set it to a cotton setting without steam. If you have a heat press, refer to the manufacturer’s instructions for the appropriate temperature and time needed for iron-on vinyl. It’s essential to let your iron or heat press heat up fully before starting the transfer process. But remember not to overheat your surface as it can melt the adhesive on the iron-on.

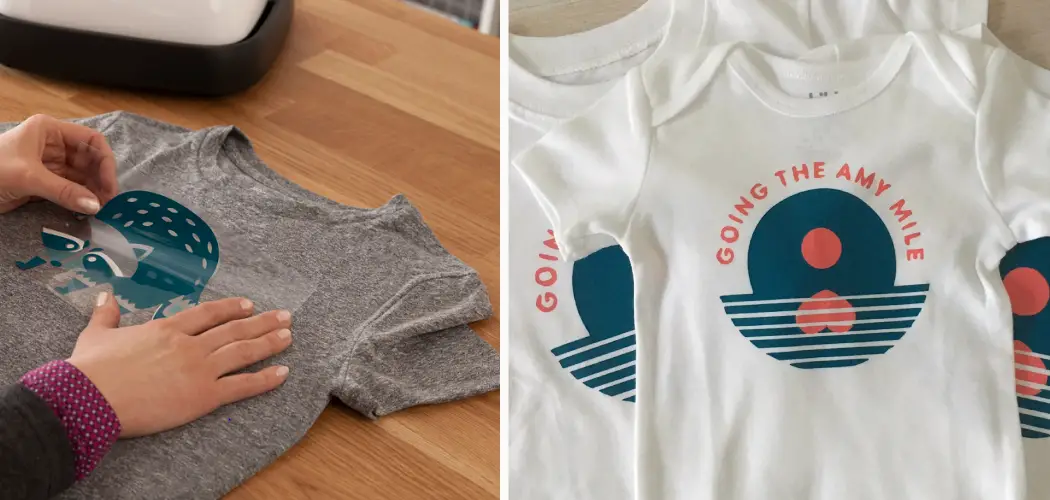
Step 7: Arrange Your Design on the Surface
Use scissors to cut around your design and remove any excess material. Then, place your design on the surface and arrange it according to your liking. You can use a ruler or measuring tape for precise placement. It’s also helpful to use small pieces of heat transfer tape to keep your design in place.
Step 8: Transfer the First Layer
Place a protective sheet of parchment paper on top of your design and apply heat to the first layer according to the instructions for your iron or heat press. Typically, this involves pressing down firmly with consistent pressure for about 15-20 seconds. Afterward, let the vinyl cool for a few seconds before removing the protective sheet or parchment paper.
Step 9: Repeat for Each Layer
Remove the first layer of heat transfer tape and apply the second layer using the same technique as before. Continue this process until all layers have been transferred onto your surface. Although time-consuming, this step is crucial to ensure a clean and professional-looking design.

Step 10: Remove the Heat Transfer Tape and Enjoy!
Once all layers have been transferred, you can remove the heat transfer tape and admire your multi-color iron-on design. If any parts of the design aren’t fully adhered, place the protective sheet or parchment paper back on top and apply more heat for a few seconds.
Following these ten steps will have you creating stunning and unique multi-color iron-on designs in no time. With a little practice, you’ll be able to apply your designs to various items with ease and confidence. So go ahead and unleash your creativity by learning how to do multi color iron on Cricut! Happy crafting!
Additional Tips
- Experiment With Different Colors and Designs to Create One-of-a-kind Items.
- Use a Thin Towel or Cloth Between the Iron/heat Press and the Design to Prevent Any Direct Contact and Protect Your Surface.
- Pre-cutting Your Layers Can Save Time During the Transfer Process.
- Have Fun and Don’t Be Afraid to Make Mistakes, It’s All Part of the Learning Process! Overall, Enjoy the Process and Let Your Creativity Shine Through. With This Skill, You Can Create Personalized and Unique Items for Yourself or to Give as Gifts to Others. So, What Are You Waiting for? Start Creating Multi-color Iron-on Designs With Your Cricut Today!

Frequently Asked Questions
Q1. Can I Use Different Types of Iron-on Vinyl for a Multi-color Design?
A1. Absolutely! You can mix and match different types of iron-on vinyl, such as glitter or holographic, to create an even more dynamic and eye-catching design. You can also layer different types of vinyl for a unique effect. Just make sure to follow the instructions for each type of vinyl when applying.
Q2. How Do I Care for Items with Multi-color Iron-on Designs?
A2. To ensure your design lasts, it’s best to wash your item inside out in cold water and tumble dry on low or hang dry. Avoid using fabric softener or ironing directly on the design. With proper care, your design can last for many washes and still look vibrant.
Q3. Can I Use Multi-color Iron-on Designs on Non-Fabric Items?
A3. Yes, you can! While fabric items are the most common surface to apply iron-on vinyl, you can also use it on other materials such as wood, canvas, or even metal. Just make sure to use the appropriate settings on your iron or heat press.
Q4. Can I Layer Iron-on Vinyl on Top of Each Other?
A4. Yes, you can layer iron-on vinyl as long as the bottom layer has cooled completely before applying the next one. It’s essential to pay attention to which color is on top, so your design stays in the correct order.
Conclusion
By the end of this post, you should be able to confidently tackle any multi-colored iron-on project with your Cricut. If you’re still feeling a bit overwhelmed, don’t worry – the material and design setting guides we provided here will serve as an indispensable reference throughout your journey.
And if ever in doubt, just remember that practice makes perfect! Using a combination of focus and patience, you can artfully craft detailed multi-colored designs for your projects, no matter what the occasion – so go ahead and start creating something truly special today! Thanks for reading this article on how to do multi color iron on cricut.