
Do you ever need more support with how tight and tricky it can be working with iron-on materials? Cricut Iron On makes that job much easier, but what do you do if you lack the right equipment or resources?
Don’t worry – in this blog post, we’ll review how to use regular household iron items to achieve the same result as a Cricut Iron On device. Following these simple steps, anyone can craft their amazing creations using any fabric!
Here’s what you need to do if you’d like to use regular household iron items with your Cricut Iron On material.

Whether t-shirts, bags, aprons, or whatever else tickles your fancy, understanding how to work with iron properly is essential for achieving professional results. So read on and learn more about how to use cricut iron on with regular iron!
What are the Uses of Regular Iron on Cricut Projects?
Cricut projects are great for customizing and decorating clothing, bags, hats, aprons, and other fabric items. The Cricut iron-on process works by pressing the design onto the material using a special machine that evenly applies heat across the entirety of the material. This process allows for the precise placement of your design with a professional-looking finish.
However, you may need access to the special Cricut Iron On machine. In this case, using a regular household iron can be just as effective – if done correctly.
What Will You Need?
To use a regular household iron with your Cricut Iron On material, you’ll need the following:
- A safe work surface or table to place the fabric on (ideally an ironing board)
- The Cricut Iron On design and instructions
- An iron
- A piece of cotton fabric for layering over the project as protection from heat damage
Once you have all the necessary items, it’s time to get crafting! Luckily, there aren’t many steps at all.
10 Easy Steps on How to Use Cricut Iron on With Regular Iron
Step 1. Preheat Your Iron:
The first step is to preheat your iron. This will help the heat distribute evenly so your design sticks in place after being pressed. If your iron does not have a setting specifically for Cricut Iron On, use the highest heat available.

Step 2. Place Your Fabric on the Work Surface:
Next, place your fabric on a safe work surface. This can be an ironing board or any other flat surface. The fabric should be free of wrinkles and creases for best results.
Step 3. Place Your Design According to Instructions:
Now it’s time to place your Cricut Iron On design according to the instructions given by the manufacturer. Follow all guidelines carefully for the best results – this will ensure your project looks great!
Step 4. Cover Design with Cotton Fabric:
Once you have placed your design correctly, cover it with cotton fabric to protect it from heat damage. This is especially important if using an old iron whose temperature may need correctly calibrating. Be careful not to move the design during this step, as it may affect the final result.
Step 5. Place Iron on Design:
Now it’s time to start ironing the design onto your fabric. Place your iron over the cotton fabric and press down firmly, moving back and forth consistently until you have covered the entire design area with heat. As you move the iron, keep it at a consistent height and pressure to apply the heat evenly.
Step 6. Allow to Cool:
Once you’ve finished pressing your design with an iron, set it aside and allow it to cool completely before attempting to move or peel off any part of the transfer material. Don’t worry if it looks a bit patchy – the design will be obvious once it cools down completely. As a precaution, it’s always best to go over the entire area again after cooling if needed.

Step 7. Peel Off Transfer Material:
Once cooled, carefully peel away the Cricut Iron On transfer material from your fabric item. You should now have a professional-looking design that is securely stuck in place! Another way to ensure your design stays in place is to turn it inside out and press the back side with the iron. This will help set the design firmly in place and prevent it from peeling off.
Step 8. Pre-Wash Item With Like Colors:
To ensure your design lasts for as long as possible, it’s important to pre-wash the item with like colors before wearing it. This will help keep your design looking great even after multiple washes. Use cold water and mild detergent, and follow the instructions on the label of the fabric.
Step 9. Iron Inside Out:
When washing and drying items with Cricut Iron On designs, turn them inside out before placing them in the dryer or ironing. This will prevent any damage from occurring due to excessive heat exposure. Keep the iron on a low setting, and always remember to use a piece of cotton fabric between the iron and your design for extra protection.
Step 10. Enjoy Your Creation:
All that’s left now is to enjoy your creation! Admire your workmanship and proudly wear or show off your new item. You’ll surely get many compliments with your custom-designed Cricut Iron On projects!

By following these steps on how to use cricut iron on with regular iron, you can easily create beautiful customized items without the need for a special machine. So don’t wait – get crafting today and unleash your inner DIY artist!
5 Additional Tips and Tricks
1. Before applying your Cricut Iron On to the fabric, ensure the fabric is pre-washed and thoroughly dried. Doing this will ensure that the adhesive will stick to the fabric properly.
2. If you are using a regular iron, you want to make sure that your iron is set to the highest setting. If you don’t have temperature control on your iron, use a pressing cloth between the fabric and the iron.
3. Make sure that when you are applying Cricut Iron On with a regular iron, you always keep the iron moving in one direction only. This will help ensure an even and smooth application of the adhesive to the fabric and prevent burning or damaging it in any way.
4. When removing Cricut Iron On from the fabric, make sure not to pull at it too hard, as this can cause damage to both the adhesive and the fabric itself. Instead, slowly peel away from the edges until it has been completely removed.
5. Finally, when storing your Cricut Iron On, ensure it is in a cool and dry area to ensure long term usability. Additionally, if you plan on using the same design multiple times, consider investing in additional sheets of the same material so that you can use them repeatedly.
By following these tips and tricks for using Cricut Iron On with regular iron, you will be able to apply your adhesive successfully and easily! Have fun creating beautiful projects with your iron!
5 Things You Should Avoid
1. Avoid ironing directly on the Cricut Iron On material itself. This can cause damage to the adhesive, as well as leave burn marks on the design.

2. Avoid using steam or water when applying your Cricut Iron On with a regular iron – the hot temperatures of a regular iron are sufficient to adhere it to the fabric.
3. Do not apply too much pressure when pressing down on the fabric with your iron; this could create creases in the material or distort your design.
4. Avoid using an iron set too hot – this risks burning and melting both the adhesive and fabric, resulting in damage and ruin of your project.
5. Finally, avoid stretching out fabric when applying your Cricut Iron On, as this could cause the adhesive to become unevenly adhered or not adhere.
Following these tips will help you get the most out of using Cricut Iron On with a regular iron and create beautiful projects without issues!
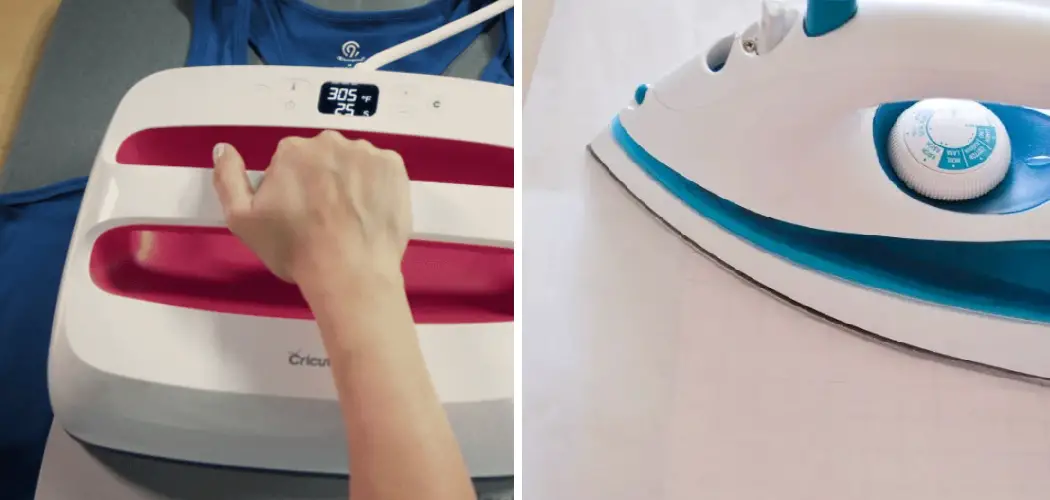
What Iron Setting Do You Use for Cricut Iron?
The ideal iron setting for Cricut Iron On is the highest temperature setting. If your iron does not have temperature control, it is best to use a pressing cloth between the fabric and the iron so you don’t risk melting or burning the design.
Additionally, make sure to keep the iron moving in one direction only in order to ensure an even application of heat and prevent any damage to your project. Finally, always check your user manual for specific instructions regarding which settings are best for your particular machine.
By following these tips when using Cricut Iron On with a regular iron, you can ensure that your projects turn out perfect every time!
Can You Use Heat-Resistant Tape?
Yes, you can use heat resistant tape when using Cricut Iron On with a regular iron. This type of tape helps to ensure that the adhesive adheres properly and evenly to the fabric and prevents any damage from occurring due to excess heat or pressure.
For best results, check your user manual for specific instructions regarding which type of heat resistant tape is best suited for your particular machine and how much should be used.
Additionally, make sure that all edges are securely sealed before applying your iron, and keep an eye on the temperature setting – if it’s set too high, you risk burning or melting the adhesive and fabric!

Overall, using heat resistant tape when using Cricut Iron On with a regular iron is a great way to ensure that the adhesive and fabric remain unharmed during the application process.
Why is Cricut Iron-on Not Sticking?
If your Cricut Iron-on is not sticking, there are a few possible explanations. First, make sure that the fabric has been pre-washed and thoroughly dried before applying the adhesive. This will ensure that the adhesive sticks to the fabric properly.
Additionally, if you are using a regular iron, use the highest temperature setting and keep it moving in one direction only – this will help prevent the burning or melting of both the adhesive and fabric. Finally, ensure that you are pressing firmly but evenly on all sides of the material for the best results.

With these tips, your Cricut Iron-on should stick quickly and easily. If you’re still having trouble, double check the adhesive instructions to ensure you follow the correct procedure.
Conclusion
With just a regular iron, you can use Cricut Iron on to create amazing project designs. Whether you’re a hobbyist or an expert crafter, Cricut Iron on can be used to make personalized masterpieces from home.
From t-shirts to jewelry and so much more, the possibilities are endless regarding the things you can do with Cricut Iron and a regular iron. Plus, that means that even if you don’t have access to/can’t afford a Cricut Heat Press Machine, you can still make the same creations with just your regular iron.
How to use cricut iron on with regular iron is an enjoyable way to express your creativity and show off your unique personality! So this summer, don’t forget that with just a few supplies and some simple instructions, you can create beautiful projects with your old clothes.
Using the Cricut Iron-on products combined with your at-home iron (and investing in a steam generator will make it all even easier!). And remember – the journey of creating art is often more rewarding than the finished product!
You Can Check It Out to Make Sticker With Cricut Joy