
Couching stitch is a versatile and creative hand embroidery technique that allows you to add texture, dimension, and a touch of elegance to your projects. This technique involves securing a decorative thread or yarn onto the fabric’s surface with small stitches, creating intricate patterns, and designs.

Whether you want to embellish clothing, home decor, or craft projects, learning how to do a couching stitch can greatly enhance your embroidery skills.This article will serve as your comprehensive guide to mastering the art of couching stitch, covering essential steps, materials, and techniques.
From selecting the right thread and fabric to understanding the stitch variations and applying them effectively, you’ll gain the knowledge and skills needed to incorporate couching into your embroidery repertoire. Whether you’re a seasoned embroiderer or a novice eager to explore new techniques, the couching stitch offers a creative and visually appealing way to elevate your projects.
Importance of the Couching Stitch in Embroidery
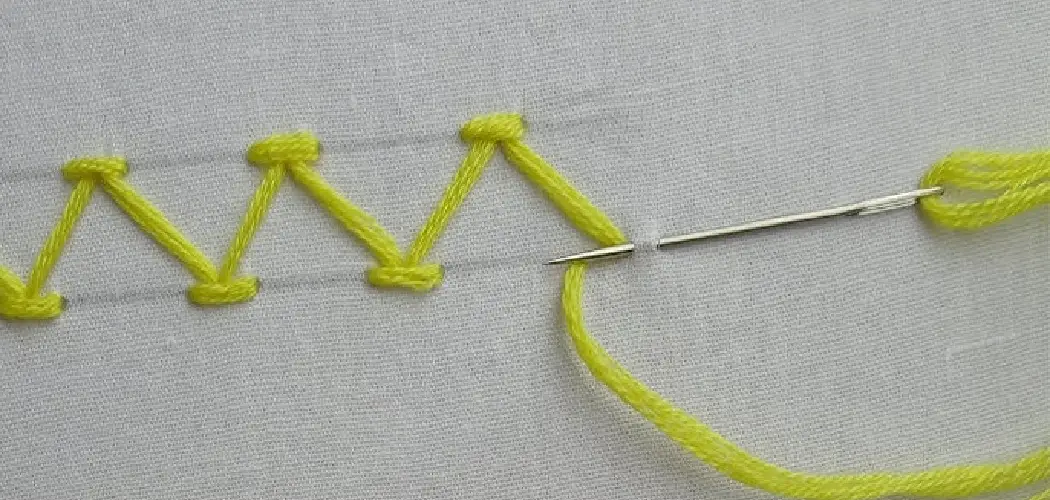
The couching stitch, also known as the laid work or couched work, is a popular technique used in embroidery. It involves laying down threads on top of a fabric and securing them in place with small stitches. This stitching method has been around for centuries and is still widely used today.
One of the reasons why the couching stitch has stood the test of time is its versatility and practicality. It can be used to create a variety of designs, from intricate patterns to simple outlines. The stitch can also be done using a range of threads, including metallic and thicker wool threads, making it ideal for adding texture and dimension to embroidery projects.
Moreover, the couching stitch is an excellent technique for beginners as it does not require complicated or advanced stitching skills. With just a few simple stitches, one can easily create stunning designs and add depth and texture to their embroidery work.
Apart from its aesthetic value, the couching stitch also serves functional purposes in embroidery. By laying down threads on top of the fabric it adds strength and stability to delicate fabrics that may not hold up well with traditional stitching methods. This makes it an ideal technique for embellishing and strengthening fabrics such as silk, velvet, or even lace.
10 Methods How to Do a Couching Stitch
1. Gather Your Supplies
Before you begin your coaching stitch, make sure you have all the necessary supplies. You will need a needle, thread, and fabric. If you are using a thicker thread, such as yarn or ribbon, you may also need a tapestry needle with an eye large enough to accommodate the thread. You will also need scissors to cut the thread when you are finished.
2. Thread Your Needle
Once you have gathered all your supplies, thread your needle with the desired color of thread. Make sure to leave a tail at least two inches long so that it is easier to tie off when you are finished stitching. However, if you are planning on using the couching stitch for decorative purposes and do not need to tie off your thread, you can omit this step.

3. Mark Your Design
If your design includes multiple couching stitches, mark out where each one should go on the fabric before beginning to stitch. This will help ensure that all of your stitches are even and in the right place. However, if you are only stitching one couching stitch, you can simply start at one end of the design and work your way across.
4. Begin Stitching
Begin by inserting the threaded needle into the fabric at one end of your marked design and pulling it through until there is about an inch of thread left on the back side of the fabric. Then insert the needle into the other end of your marked design and pull it through until there is about an inch of thread left on this side as well. This creates a loop that will form the basis for your couching stitch.
5. Insert Needle Through Loop
Insert your needle through both sides of this loop and pull it through until there is only a small amount of slack in the loop itself (about 1/8 inch). This will secure the loop in place while allowing some movement within it for added texture to your design.
Next, continue with your pattern by inserting the needle back through the fabric where you want to create your next couching stitch. Make sure to keep the loop in place while pulling the needle through to maintain tension and prevent any slack from forming.
6. Create Additional Loops
Continue creating additional loops along your marked design by repeating steps 4 and 5 until you reach either end of your design or until you have created as many loops as desired for texture and dimension in your work.
Make sure to keep each loop slightly slack so that they can move freely without being too tight or too loose against each other or against other elements in your design (such as beads).
7. Secure Threads
When you have reached either end of your marked design or when all desired loops have been created, secure both ends by tying them together with a knot or two, making sure not to pull them too tightly so that they can still move freely within their looped positions on either side of each other without becoming too tight against each other or against any other elements in your work (such as beads).

8. Finish Off Ends
Once both ends have been secured with knots, use scissors to trim off any excess threads from either side so that they do not show once complete work is finished up later on down the line (or before if desired). Though it may seem like small details, this step ensures that the final product looks clean and professional.
9. Add Beads (optional)
If desired for additional texture and dimension within your work, add beads between each looped position along either side after securing both ends with knots but before trimming off excess threads from either side (as mentioned above).
Additionally, before and after couching around your beads, try using a single or double cross stitch to secure each bead in place for even more stability.
10. Secure Work With Iron-On Adhesive (optional)
Finally, if desired for extra security and stability within larger works such as quilts or wall hangings, apply iron-on adhesive along either side over each individual couching stitch position after adding beads (if applicable) but before trimming off excess threads from either side (as mentioned above).
This helps ensure that each individual couching stitch remains securely in place even after multiple washings over time!
Things to Consider When Learning How to Do a Couching Stitch
When it comes to learning how to do a couching stitch, there are a few key things to keep in mind. Whether you are new to stitching or have some experience under your belt, these tips can help you improve your technique and get the most out of this versatile embroidery stitch.

Choose the Right Materials
One of the most important aspects of creating a successful couching stitch is using the right materials. The material you use as your base fabric should be sturdy and able to withstand the weight of the threads being couched down on top. You also want to make sure that your couching thread is strong enough to hold everything in place, but thin enough to create a smooth, even line.
Practice Proper Tension
The tension of your stitches is crucial when it comes to mastering the couching stitch. If your stitches are too loose, they will look sloppy and can easily come undone.
On the other hand, if your stitches are too tight, they can pull on your base fabric and distort the design. It may take some practice to find the right tension for your individual stitching style, so don’t be afraid to experiment.
Use the Right Technique
There are a few different techniques you can use when doing a couching stitch, so it’s important to find one that works best for you. Some people prefer to wrap their couched thread around their needle before pulling it through, while others prefer to simply lay the thread on top and secure it with a stitch.
Try out different techniques and see which one feels most comfortable and produces the best results for you.
Conclusion
Now that you have a better understanding of how to do a couching stitch, you can start practicing with the tools provided in this post. With the proper preparation and practice, you can be confident about your stitch work. You may choose to try more complex designs or check out the many tutorials online with tips and hints on how to make awesome patterns.

Don’t be discouraged by mistakes, as it is all part of learning something new. Put on some great music and let yourself get into the groove of doing a couching stitch! Most importantly, never forget—practice makes perfect! We hope that this blog post has taught you to do a couching stitch and gotten you ready for your next project! Good luck and happy stitching!