
Are you looking for a creative way to decorate your home this fall season? One craft that is sure to bring autumnal cheer to any room of the house is a wire pumpkin. Ready to get into the Fall spirit? Get creative with your decorations this season by making a unique wire pumpkin. Not only is it an eco-friendly and sustainable way to decorate for Fall, but you’ll have the satisfaction of knowing that you made something totally one-of-a-kind yourself!
In this blog post, we’re going to walk you through exactly how to put together your very own decorated wire pumpkin – complete with step-by-step instructions on how to decorate a wire pumpkin and photo illustrations. So grab some supplies, sit back, relax, and let us show you just how easy it can be to create a beautifully handcrafted holiday decoration. In this blog post, we’ll be discussing how to effortlessly assemble and decorate your own wire pumpkin so you can enjoy the beauty of fall all season long!
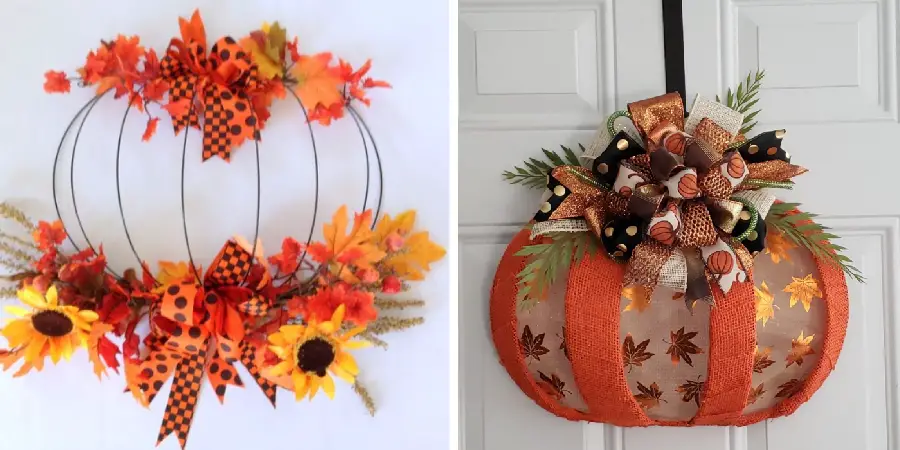
Things to Remember While Decorating a Wire Pumpkin
Before you begin, keep in mind that a wire pumpkin is an easy way to create a stunning decoration for your home this Fall. The key is to start with the right supplies and tools, then take your time while decorating the pumpkin with whatever colors, materials, or decorations you choose.
Materials Needed
- Wire (any type of wire will work)
- Craft glue
- Assorted decorations (such as ribbons, faux flowers, leaves, or other holiday accents)
- Scissors and/or wire cutters
10 Instructions on How to Decorate a Wire Pumpkin
1. Gather Supplies
Gather supplies and tools needed for the project. The right materials and tools will make the project much easier, so it’s important to have everything on hand before you start. Keep in mind to have some extra wire and decorations in case of any mistakes.

2. Cut the Wire
Use a pair of scissors or a wire cutter to cut the wire into equal-length sections. Depending on how big you want your pumpkin, each section should be at least 12 inches long. While cutting the wire, keep in mind that each piece should have at least one loop at one end and a single tail at the other end.
3. Create the Frame
Once you’ve cut all of your wire pieces to size, it’s time to create the frame of your pumpkin. Lay out four pieces of wire in an X shape, then twist the loops at each end of the wire together. Make sure to leave a few inches of space between the base of the pumpkin and the top for added stability.
4. Add Wire Sections
Next, you’ll need to add more sections of wire in order to form your pumpkin shape. Take two pieces of wire and wrap them around one another until they form a loop. Then, secure the two loops together by twisting them around one another.
5. Connect All of your Loops
Once you’ve added all of your wire sections and created the frame for your pumpkin, it’s time to connect all of the loops together. To do this, simply twist each pair of wires at each end together until they’re secured.
6. Secure the Wire
Once all of your loops are connected, you’ll need to secure the wire. To do this, use some craft glue (or hot glue if necessary) to make sure that none of the wires come apart when the pumpkin is moved or manipulated.
7. Add Decorations
Now it’s time to start decorating your pumpkin! Get creative and add whatever decorations you want to make a unique design. Add any ribbons, faux flowers, leaves, or other holiday accents that you desire.
8. Wrap with Ribbon or Yarn

To give your pumpkin an added layer of texture, consider wrapping some ribbon or yarn around it. This will not only give your pumpkin a beautiful fall look but also help to secure any of the decorations you’ve added.
9. Hang or Place
Once you’re finished decorating and securing your wire pumpkin, it’s time to hang or place it in its new home! Consider adding the decorated pumpkin to a larger Fall vignette or display in your home.
10. Enjoy!
Now it’s time to sit back and enjoy the beauty of your new wire pumpkin decoration! It’s a great way to add some festive fall vibes to any room in the house – and all you need is some creativity and patience. So grab your supplies and get started today!
We hope this blog post has inspired you to create your very own wire pumpkin decorations. Now that you know how it’s time to grab some supplies and get crafting! Have fun creating a unique piece of Fall decor for your home!
8 Safety Precautions to Follow
When it comes to decorating a wire pumpkin, there are certain safety precautions that must be taken. Here are 8 tips for keeping your craft safe and secure:
1. When using scissors or other sharp objects to cut the wire, make sure to wear protective gloves and eye protection. Scissors and other cutting tools can pose a hazard if they come into contact with your skin or eyes.

2. Make sure to pay attention when working around the wire pumpkin, as certain edges may be sharp and can cause injuries if handled without caution. Paying attention to the details of your work can help you avoid having any accidents.
3. Make sure to wear protective clothing such as long pants, a long-sleeved shirt, and closed-toe shoes when working with wire and other sharp objects. This will help keep you safe from any accidental cuts or scrapes.
4. When using glue, a hot glue gun, or any other adhesive to attach items to the wire pumpkin, make sure that the area is well-ventilated. Adhesives can give off fumes that can be harmful if inhaled.
5. Make sure to place your work on a sturdy surface, such as a crafting table or desk, so it doesn’t slip and cause injury while in progress. Also, use a comfortable chair that supports your back and arms while you work.
6. Avoid touching your face or eyes until you’ve finished working with the wire and all of the items used to decorate the pumpkin. This will help reduce any potential hazards from coming into contact with your skin.
7. Only use age-appropriate tools and materials when crafting a wire pumpkin. Small pieces and wire can pose a choking hazard if ingested or put in the mouth and should therefore be used with caution and under adult supervision.
8. Use extra caution when using candles, lightbulbs, or any other source of fire near the wire pumpkin. Make sure to keep these items away from flammable materials such as fabric, paper, or Styrofoam.
By following these steps, you’ll be able to craft a beautiful wire pumpkin without any safety concerns. Have fun and enjoy the process of creating something that is uniquely yours!
Frequently Asked Question
How Long Will It Take to Finish the Project?
The amount of time it takes to complete the project will depend on how intricate or simple you’d like to make your wire pumpkin. If you plan on going with a more complicated design, such as adding multiple layers of foliage and accents, then the process could take anywhere between one to two hours. However, if you’re looking for an easier approach and don’t plan on including any intricate details, then the project should take approximately an hour. Regardless of how long it takes, you’re sure to have a beautiful wire pumpkin when it’s finished!
Are There Any Tips for Making the Process Easier?
Yes! Before starting, it might be useful to plan out how you’d like the wire pumpkin to look. You can draw out a basic design on paper or create a more detailed sketch. This will help ensure that all of your decorations and accents are in the right places when you begin decorating. Additionally, make sure to use appropriately sized wire cutters or scissors for cutting the wire so that it’s easier to manipulate. Finally, take your time and enjoy the creative process!

Conclusion
Gathering materials for this craft is easy and budget-friendly — you can usually find necessary tools at home or your local dollar store. Once you have the materials, get ready to have some fun! This craft is a great way to get into the fall spirit and embrace the upcoming harvest season. And remember, it doesn’t matter if your wire pumpkin looks different from others — just make sure to express yourself through its design.
When it’s all said and done, not only will your effort bring a festive touch to your home decor, but it will also be an enjoyable reminder of a job well done. So don’t hesitate – give this project a go now! Whether you’re looking for a unique way to display autumn colors or are in need of some last-minute DIY decorations, making wire pumpkins can help kick-start your holiday prep. Besides bringing cheer to the room, this seasonal decoration is sure to bring out the crafting enthusiast in all of us. Follow the steps on how to decorate a wire pumpkin above and get to work crafting a wire pumpkin of your own!