
Venturing into the realm of crocheting offers the opportunity to bring a touch of whimsy and creativity to life, especially when delving into the enchanting world of character-inspired creations.
Among the captivating figures that hold a special place in our hearts, Oogie Boogie, the mischievously iconic antagonist from “The Nightmare Before Christmas,” stands out as a unique and intriguing crochet project. In this article, we delve into how to crochet oogie boogie, guiding you through the steps to transform yarn into a lovably eerie masterpiece.

Whether you’re an experienced crocheter or a newcomer to the craft, crafting your own Oogie Boogie allows you to infuse your creation with the essence of this beloved character, resulting in a distinctive and charming piece of art. So, gather your yarn, hooks, and enthusiasm, as we unravel the steps to crochet the enigmatic Oogie Boogie, stitch by stitch.
Yarn Selection and Colors for Oogie Boogie
When it comes to crocheting Oogie Boogie, the yarn selection should be an important part of your project. You’ll want to choose a yarn that is lightweight and soft. Popular selections for this project include cotton yarns or baby-weight acrylic blends, but you can also use any type of yarn that you prefer.
As far as colors go, you’ll want to pick a shade of green, black, and yellow. These colors are essential for giving your Oogie Boogie the right look and feel. Once you’ve chosen your yarn, it’s time to start crocheting!
Tools and Supplies Needed

To crochet your Oogie Boogie, you’ll need a few essential tools and supplies:
- Crochet Hooks: You will need a crochet hook that matches the size of your chosen yarn. Usually, a hook size of 4mm to 5mm works well for lightweight yarns.
- Stitch Marker: This is an important tool to help you keep track of your stitches and rounds.
- Yarn Needle: This needle is used to sew pieces together and weave in loose ends.
- Scissors: A good pair of scissors is needed to cut the yarn neatly.
- Stuffing: You will need stuffing to give your Oogie Boogie a three-dimensional shape. You can use polyester fiberfill or any other stuffing material you prefer.
- Safety Eyes: These are optional, but they can give your crochet Oogie Boogie an expressive look.
Remember to have all these supplies at hand before you start your project, to ensure a smooth and enjoyable crocheting experience.
Crochet Hook Sizes Suitable for the Project
If you plan to crochet Oogie Boogie, you will need a size H (5.00 mm) crochet hook. This is suitable for most regular yarns but there are other options available such as larger hooks that can also be used. The advantage of using a larger hook is that it will make the stitches looser which may be desirable if you want the finished product to have a bit of drape. If you are using chunkier or thicker yarns, then consider using an even larger hook such as J (6.00mm) or K (6.50 mm).

When selecting the right crochet hook size for your project, it’s important to consider which fibers and yarn weights you will be working with as this will affect the size of your stitches.
If you are unsure about which hook size to use, it’s best to take a few swatches and test out different options to find the right one for your project. In addition, make sure that when you are crocheting Oogie Boogie, you use an even tension throughout the pattern so that all pieces look uniform in size.
Finally, it’s important to remember that the finished size of Oogie Boogie will depend on the crochet hook and yarn weight you use as well as how tightly or loosely you are making your stitches. So when selecting a hook size for your project, make sure to consider all these factors before deciding which is best for you.
10 Steps How to Crochet Oogie Boogie
Step 1: Gather Your Materials
Before embarking on your Oogie Boogie crochet adventure, gather the necessary materials:
Worsted-weight yarn in various shades of burlap, green, and other colors for details.
- Crochet hooks (sizes G and H).
- Fiberfill stuffing.
- Safety eyes or black beads for Oogie Boogie’s eyes.
- Yarn needle.
- Scissors.
- Stitch markers.
- Optional: black embroidery thread for added facial details.
Step 2: Choose a Pattern
Select a crochet pattern for Oogie Boogie that suits your skill level. Patterns can be found in crochet books, and online resources, or you can even adapt existing patterns to match the character’s unique features.
When selecting a pattern, make sure to read the instructions thoroughly and look for helpful tips or helpful visual depictions. If you’re feeling up for a challenge, there are patterns available which offer more intricate details such as adding facial features.
Step 3: Crochet Oogie Boogie’s Body
Begin by crocheting Oogie Boogie’s body using burlap-colored yarn. Start with a magic ring or chain stitches to create the base. Follow the pattern’s instructions for increasing and decreasing stitches to achieve the distinctive burlap sack shape. Once you have completed the body of Oogie Boogie, stuff him with polyester stuffing to give him shape.

Step 4: Shape Oogie Boogie’s Features
Craft Oogie Boogie’s facial features using green yarn. Crochet his eyes and mouth as per the pattern instructions. These details bring his mischievous and spooky personality to life. Don’t forget his toothy grin.
Next, make Oogie Boogie’s antenna by threading two stitches with white yarn and attaching them to the top of the head. These are short and easy to work with but will bring out Oogie Boogie’s character even more.
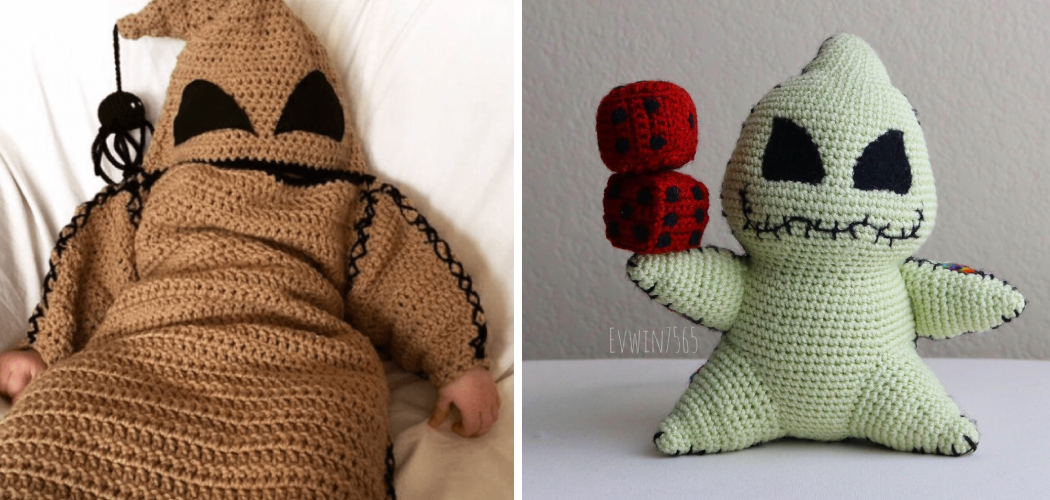
Step 5: Add Dimension with Details
Using various colors of yarn, crochet Oogie Boogie’s dice eyes, worms, and any other details specified in the pattern. These intricacies contribute to his eerie appearance. Don’t forget to use stuffing for the dice eyes and worms. Finish crocheting the details and glue them or sew them onto Oogie Boogie using a tapestry needle.
Now, you are finished with your crochet Oogie Boogie project! You can display him in your home or give him away as a unique gift. Enjoy watching everyone admire your craftsmanship!
Step 6: Craft Oogie Boogie’s Limbs
Create Oogie Boogie’s limbs using burlap-colored yarn. His arms and legs are essential for capturing his distinctive silhouette. Follow the pattern for proper shaping and attachment.
Start by crocheting 4 half-oval shaped pieces. These sections will become Oogie Boogie’s arms and legs.
To create the arms, you’ll need to start with a chain of 12 stitches in burlap-colored yarn. Single crochet across the chain, then decrease at the end of each row until you have 8 stitches left.
Step 7: Stuff and Assemble
Stuff Oogie Boogie’s body, limbs, and facial features with fiberfill to achieve the desired shape and firmness. Assemble the pieces according to the pattern, securing them in place. If you wish, sew buttons for eyes or glue on googly eyes. Sew the mouth and other facial features in place as desired.
When your Oogie Boogie is assembled, he’s ready to come alive! Whether you display him or give him as a gift, this cute crocheted creation will bring joy! Enjoy your time spent crafting Oogie Boogie and making crochet magic!
Step 8: Add the Finishing Touches
Attach Oogie Boogie’s eyes and any additional crocheted details using a yarn needle. If desired, use black embroidery thread to add finer facial details and enhance his expression.
Use a needle and thread to attach some stuffing in his body and tail for extra shape and structure. Lastly, add a loop at the top of his head with yarn so that he can be hung up as a decoration or used as an ornament on the Christmas tree!
Step 9: Personalize Your Oogie Boogie

Feel free to add your personal touch to your crocheted Oogie Boogie. Experiment with different yarn colors or textures to create unique variations of this classic character. You can also attach buttons or beads around his facial features for added detail. Whatever your choice, it’s sure to bring a smile to everyone who sees this creation!
Step 10: Showcase Your Masterpiece
Display your completed Oogie Boogie with pride. Whether he graces your Halloween décor, becomes a gift for a fellow fan, or takes a place of honor on your shelf, your crocheted creation is a testament to your crafting skills and your love for the whimsical world of “The Nightmare Before Christmas.”
Conclusion
In conclusion, crocheting an Oogie Boogie can be a delightful and fun crafts project for crafters of all levels. It’s easy to get intimidated by complicated crochet patterns, but luckily with Oogie Boogies only basic stitches are needed to make a masterpiece. With the help of this tutorial, you should have all the information you need to create your own cuddly Oogie Boogie creature.
So grab your crochet needles and give it a try! Soon you’ll be making endless variations of this character that will bring smiles to anyone who sees them. The satisfaction of holding in your hands something made with your own two hands is incomparable – start crafting today and make your own unique version of how to crochet oogie boogie!