
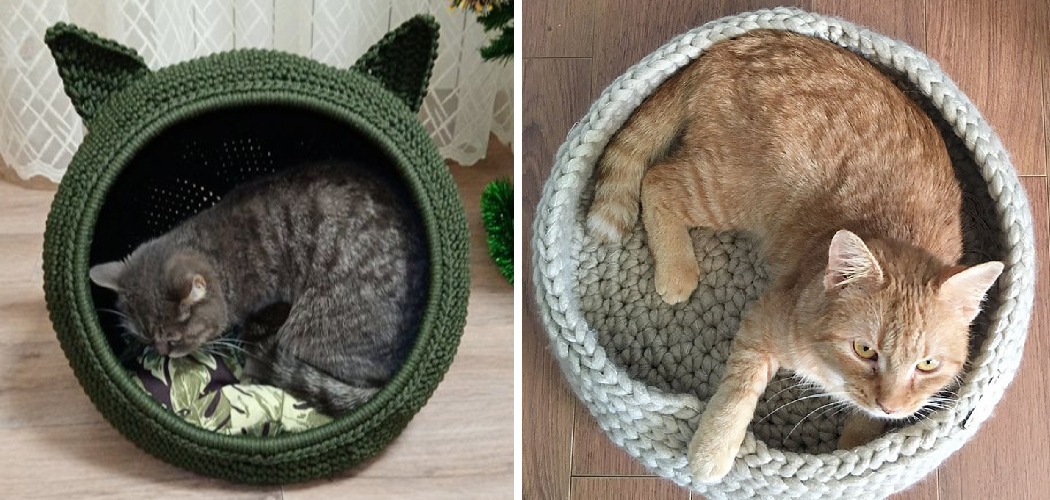
If you love cats and have some basic crochet skills, why not combine those two passions and create a cozy cat bed for your furry friend? Having a homemade crocheted cat bed is a great way to show your pet how much they mean to you while also saving yourself money from having to buy one.

Not only are these beds soft and comfortable, but they’re also adorable – perfect for any feline that loves napping in style! In this post, I’ll show you step-by-step how to crochet cat bed that is sure to be treasured by both cats and humans alike. So let’s get crafty – start following along with my tutorial so can make an irresistibly charming cat bed for your special furball.
The Importance of a Comfortable Cat Bed
Your pet cat deserves the best of care, including a comfortable place to sleep. A good cat bed can help keep your feline friend relaxed and happy and encourage better overall health. The right size and shape of bed may even help prevent joint problems and muscle pain in cats as they get older. Additionally, having an especially cozy spot is sure to make your kitty feel safe and secure.
Crocheting your own cat bed is a great way to provide a custom-made spot just for your furry friend—plus, it’s an excellent outlet for creative expression! It doesn’t matter if you’re a novice or expert crocheter—anyone can make a fun and cozy bed for their cats.
So get out the yarn and needles and let’s get started! With these tips on how to crochet a cat bed, you’ll be able to craft something special for your pet in no time.
Materials Needed for Crocheting a Cat Bed
To crochet a cozy cat bed, you’ll need the following materials:
1. Yarn –
You can use any type of yarn to make your cat bed, but some work better than others. Look for a soft, lightweight yarn that is machine washable and easy to work with. Popular choices include cotton or acrylic blends.

2. Crochet Hook –
A size G (4mm) or H (5mm) hook will give you the right size stitches for a comfortable cat bed. Use a metal or plastic hook depending on what works best for you.
3. Stuffing –
Polyester stuffing is the easiest to find and use in this project. It’s also inexpensive and provides excellent cushioning without too much bulk.
4. Needle and Thread –
You’ll need a needle and thread to sew the edges of your cat bed together once it’s finished.
5. Scissors –
You’ll need scissors for trimming yarn and cutting it into desired lengths.
6. (Optional) Decorative Embellishments –
To give your cat bed some extra personality, you can add special decorative touches such as buttons, fabric paint, ribbons, etc.
Once you have all the necessary materials on hand, you’re ready to start crocheting! For detailed instructions on how to crochet a cat bed, please refer to our step-by-step guide. With these simple resources, you’ll have a cozy cat bed in no time!
10 Steps How to Crochet Cat Bed
Step 1: Choose the Pattern and Yarn
Select a pattern for your cat bed or create your own. Consider the size and design that would suit your cat’s preferences. Choose a super bulky weight yarn that is soft and durable, ensuring it will provide the necessary comfort and support.

Step 2: Start with a Magic Circle
Create a magic circle and secure it with a chain stitch. This will serve as the center of your cat bed. However, if you are new to crocheting a magic circle, you can start with the traditional chain stitch instead.
Start by making a foundation chain of 6 stitches. You can increase the number of stitches if you want to make your cat bed bigger. Make sure that the foundation chain is not too tight or too loose.
Step 3: Crochet the Base
Crochet single crochet (SC) stitches into the magic circle, increasing the stitches evenly until you reach the desired diameter for the cat bed. Continue working in rounds, joining each round with a slip stitch (SL ST) to the first SC. If you are using a circular hook, use the stitch marker to remember which stitch is the first of the round.
Continue crocheting in rounds until the base of the bed is as thick as you like. To make a firmer and more supportive base for your cat bed, increase each round by one more stitch than the last. When you have reached the desired thickness, finish off your work with a slip stitch and fasten off your yarn.
Step 4: Work the Sides
Crochet SC stitches in each stitch around for several rounds, maintaining the stitch count. This will form the sides of the cat bed. You can use stitch markers to keep track of the rounds if needed. Once you’ve achieved the desired height, fasten off and weave in any loose ends. Place a pillow or cushion inside for your pet’s comfort if desired. However, it is not necessary for the bed to have padding.
Step 5: Create the Wall Height
Continue crocheting SC stitches in each stitch around until the sides of the cat bed reach the desired height. This will ensure a cozy and secure space for your cat to curl up in. Once the sides have reached your desired height, work two SC in each stitch around to create a firm foundation for the next step.
To maintain consistent shape and size, be sure to measure the wall height as you crochet. Make sure that the walls are even on all four sides.
Step 6: Shape the Opening
Decide on the shape and size of the opening for your cat bed. It could be circular, oval, or any shape you prefer. To create the opening, crochet fewer stitches in a designated section of the cat bed’s wall. This will allow your cat to easily enter and exit the bed.

You can also use a single or double crochet stitch to finish the opening for a neat, finished edge. Once you have finished crocheting the walls of your cat bed, you can move onto the next step.
Step 7: Stuff the Bed
Before closing the cat bed, stuff it with fiberfill stuffing to provide cushioning and support. Fill it evenly to ensure a comfortable sleeping surface for your cat. Adjust the amount of stuffing based on your cat’s preferences.
If your cat likes a firm surface, use less stuffing. For a softer bed, increase the amount. Once you have stuffed the bed to the desired amount, continue on to the next step. Though you may be tempted to skip this step, stuffing the bed is important for your cat’s comfort.
Step 8: Close the Opening
Finish crocheting the remaining rounds until the cat bed is complete. To close the opening, cut the yarn, leaving a long tail. Thread the yarn needle and weave it through the remaining stitches. Pull tight to close the opening securely. Knot the yarn securely and cut off any excess yarn.
Your crochet cat bed is now complete! Place it in your home so that your furry friend can enjoy a comfortable spot to sleep. With care, it will last for many years and be enjoyed by your favorite feline companion.
Step 9: Add Final Touches
Take a moment to smooth out the stitches and shape the cat bed. Use your hands to fluff up the fiberfill stuffing and create an inviting and comfortable space for your cat. Adjust the shape and size if necessary.
While there is no one ‘right’ way to make a cat bed, keep in mind that cats like small and cozy spaces. However, if your cat is larger than average or is expecting kittens, you may want to make a bigger bed.
Step 10: Introduce the Cat Bed to Your Feline Friend
Place the cat bed in a cozy spot where your cat likes to rest. Encourage your cat to explore and discover the bed by adding familiar scents or treats. Allow your cat to naturally gravitate towards the bed and enjoy their new cozy haven. You may need to be patient while they get used to it – but soon enough, you’ll see your cat lounging in their new bed!

Conclusion
Crafting a cat bed is an easy and rewarding project. With the comprehensive steps provided in this blog post, you will soon have a cozy, handmade gift for your favorite fur baby to snuggle in.
With some patience and practice, you can even create knitted works of art using crocheting to make complex blankets or other items with detailed patterns and colors. Have fun exploring the many possibilities of crocheting with our guidance!
Now it’s time to put those skills into action – join us as you learn how to crochet a cat bed today! Hopefully, this article gave you some helpful tips about how to crochet cat bed successfully, so now that you have the proper knowledge on how to get the job done, why not give it a try today?