
Today, more and more people are choosing to get creative with their hobbies. One craft that is gaining in popularity is crocheting, and it has a variety of uses and projects you can work on! From scarves to hats to animals, the possibilities for crochet creations are endless.

Today we’ll be discussing how to crochet a horse and use this versatile technique to create your own adorable horse figurines or stuffed animal. No matter your skill level, you will find all of the instructions needed here to make a beautiful handmade customized creation that everyone in your life would love!
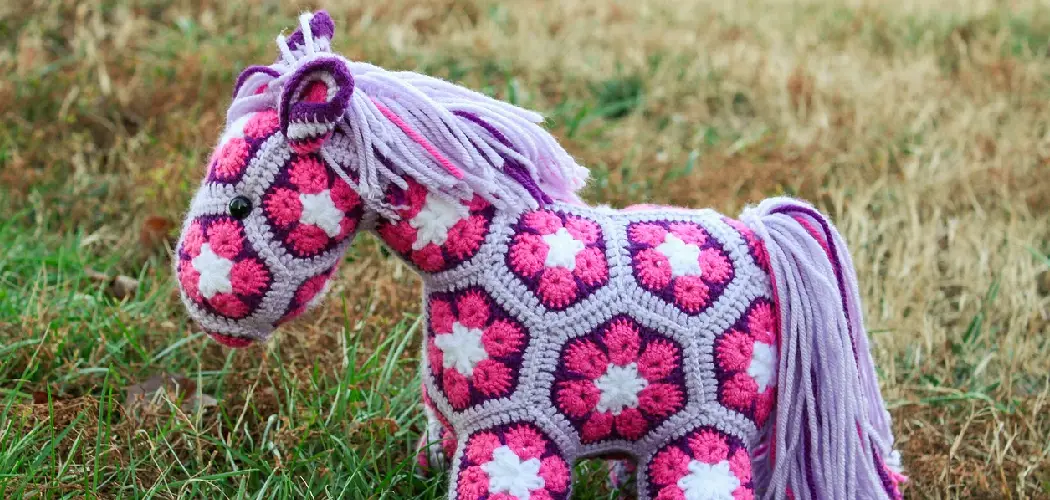
The Beauty and Artistry of Crocheted Horses
Creating crocheted horses is a challenging yet rewarding endeavor. With the right materials and techniques, you can make beautiful, lifelike horse figures that will last for years. Crocheting a horse requires patience and practice to get the desired results. The end result, however, pays off with its beauty and artistry – making it worth the effort.
When it comes to picking out yarn colors for your project, allow yourself some creative freedom. Whether you choose classic bay or chestnut shades of brown or something more unique like blue pinto spots or purple mane streaks, your design options are endless! Take some time to research different horse breeds and color patterns so you can come up with an original design all your own.
When it comes to stitching, the sky is the limit! Crocheting a horse can be an opportunity to try out different stitches and techniques like intarsia, tapestry crochet, or even 3-Dimensional crocheting. Taking your time to learn the basics of crochet will make it easier for you to create your unique version of a horse with accuracy and finesse.

Materials Needed for Crocheting a Horse
- Before you start crocheting a horse, it is important to make sure you have all of the necessary supplies. The materials needed for this project include:
- Crochet hook in size G or H (4mm to 5mm).
- Yarn in colors of your choice you will need one color for the body and mane of the horse, as well as additional colors for accents such as eyes and nostrils. Worsted-weight yarn works best for this project.
- Tapestry needle with an eye large enough to thread the yarn through.
- Polyester fiberfill stuffing material.
- Safety eyes or other small items that can be used for eyes on the finished product (optional)
- Stitch markers to help keep track of stitches (optional)
You may also want to have scissors, pins, and stitch holders on hand. With the right supplies in hand, you are ready to crochet a horse!
10 Steps How to Crochet a Horse
Step 1: Crocheting the Horse’s Body
Start by creating the horse’s body using the main color yarn. Begin with a magic circle, then crochet single crochet (SC) stitches into the circle until you reach the desired size for the body. Slip stitch (SL ST) to the first SC to join the round. Repeat this process until you achieve the desired height for the body. However, remember that you will be adding legs and a neck to the body, so try not to make it too tall.
Step 2: Shaping the Horse’s Head
Continue working on the body rounds to shape the head. Gradually decrease the number of stitches in each round to create a tapering effect for the head. You can achieve this by crocheting two single crochet stitches together (SC2TOG) at specific intervals. Stuff the head with fiberfill as you go to give it a three-dimensional shape.
When you get to the neck of the horse, add some extra stuffing and shape it with your hands. Now start crocheting around the neck and gradually decrease the number of stitches to form the horse’s muzzle. Make sure that you keep stuffing the head so it maintains its shape.
Step 3: Crafting the Horse’s Ears
Crochet two separate ear pieces using the same yarn color as the body. Start with a chain, then work single crochet stitches into the chain to create the ear shape. Once the ears are complete, sew them securely to the sides of the horse’s head, making sure they are evenly positioned.

Once the ears have been attached, use a contrasting yarn color to add details such as realistic fur texture. To do this, crochet small loops around the edges of the ears. You may also want to add a few extra stitches along the edges of each ear for extra texture and detail.
Step 4: Designing the Horse’s Mane
Choose a contrasting color yarn for the horse’s mane. Starting at the top of the horse’s head, create a row of loops by chaining and slip stitching back along the head. Adjust the length and density of the loops to achieve the desired mane style.
You can also experiment with different yarn textures for added texture and flair. When you are happy with the mane design, tie off the yarn and secure it in place.
Step 5: Crafting the Horse’s Tail
Select a yarn color for the horse’s tail that matches or complements the mane. Create a long chain of stitches, then single crochet into each chain stitch to form the tail. Adjust the length and thickness of the tail according to your preference. Once complete, attach the tail securely to the back of the horse’s body.
Additionally, you can attach a few ropes or twine strands to the beginning of the tail for an added texture.
Step 6: Adding Eyes to the Horse
Decide whether you want to use safety eyes or embroider the eyes. If using safety eyes, follow the manufacturer’s instructions to attach them securely to the horse’s head.
If embroidering the eyes, use a tapestry needle and contrasting yarn to sew on the eyes, creating the desired expression and placement. Make sure the eyes are securely attached and evenly placed. Securely fasten off any yarn ends to the back of the head with a yarn needle.
Step 7: Giving the Horse a Nose and Mouth
Using a yarn needle and yarn, embroider a small nose at the appropriate spot on the horse’s snout. You can create a simple triangular shape or experiment with different designs. Embroider the mouth using the same technique, creating a smile or any expression you desire.

Take your time to achieve the desired look. Although it may be tempting to cut the extra yarn, make sure to leave a long tail that can eventually be woven into the horse’s mane. Your horse’s face is now complete!
Step 8: Adding Details and Features
To make the horse more lifelike and appealing, consider adding additional details and features. This could include embroidering nostrils, adding eyelashes, or creating patches or markings using different yarn colors. Let your creativity guide you as you customize the horse to your liking.
When you’ve added all the details that you want, take a step back and admire your handiwork! You have now created a beautiful and unique toy horse that both you and your little one can enjoy.
Step 9: Finishing Touches
After completing all the crocheting and embroidery, weave in any loose yarn ends using a yarn needle. Trim any excess yarn with scissors, being careful not to cut the stitches or the horse itself. Take a moment to inspect the horse, ensuring all the parts are secure and the finishing touches are neat.
Once you’ve ensured the horse is in excellent shape, it’s time to have fun! Your unique crocheted horse is ready to be shown off to friends and family. Enjoy the sense of accomplishment that comes with creating a one-of-a-kind masterpiece!
Step 10: Enjoy Your Crocheted Horse
Congratulations! You’ve successfully crocheted a horse. Take a moment to admire your creation and enjoy the satisfaction of completing this charming project.
Whether you keep it as a decoration, gift it to a loved one, or give it to a child to enjoy as a toy, your crocheted horse will bring joy and delight for years to come. Before putting it away, take a few pictures of your horse for lasting memories. And when you’re ready for another project, why not make a few more horses in different colors.

Conclusion
As you can see, crocheting a horse is an easier task than it may seem at first glance. With the help of the right materials, a simple crochet pattern, and a lot of patience and creativity, you will be able to bring your dreams to life in the form of an adorable little horse!
Who knows what other masterpieces you’ll be able to create with your newfound skills? Thanks for joining us on this crafty adventure as we learn how to crochet a horse!
If you’d like further resources, or would like more tips and advice on crafting horses from our experts, please check out our website for more information. Thank you for sticking around until the end – we hope we’ve been able to convince you that crocheting a horse is just as easy as one-two-three – now all it takes is some practice and you’ll have your own perfect little pal galloping away soon enough!