
Are you looking for a unique way to express your creativity and add stylish flare to your wardrobe? Crocheting is a great craft enjoyed by people of all ages for centuries. And while crochet may not be as flashy or modern as other needlecrafts, it can still create amazing pieces!

Whether a beginner or a seasoned veteran, this guide will teach you how to crochet a sweater vest! Just follow these simple steps, and you’ll have your amazing piece of clothing in no time.
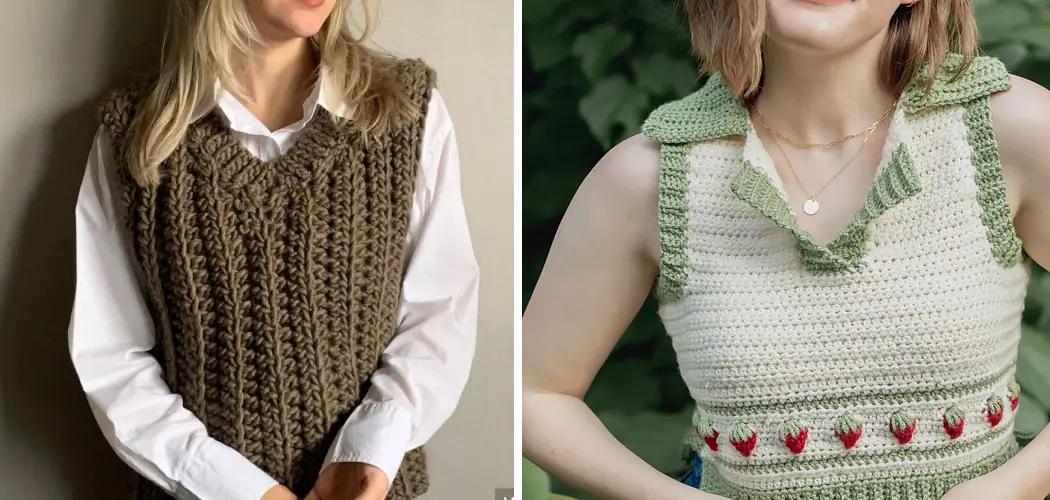
Today, we will show you how to make one of the oldest forms of crochet – the timeless sweater vest. So grab your yarn and hooks because this will be an exciting journey learning how to turn strands of thread into beautiful garments!
What Will You Need?
Before starting your sweater vest project, you’ll need to ensure you have the right materials. Here’s a list of items that will be helpful during this process:
- Yarn or Thread in Your Color of Choice
- Crochet Hook
- Scissors
- Tape Measure or Ruler
- Needle and Thread (for Sewing Pieces Together)
Once you have your supplies, you’re ready to start crocheting!
10 Easy Steps on How to Crochet a Sweater Vest
Step 1: Choose Your Pattern
Choosing the right pattern is the first step in your crochet sweater vest project. There are plenty of free patterns available online for all skill levels. Select a pattern that suits your ability to ensure that your crafting process is more enjoyable. Once you’ve selected your pattern, read through it thoroughly to familiarize yourself with the required stitches and techniques.

Step 2: Prepare Your Yarn
After selecting your pattern, it’s time to prepare your yarn. Decide the color or colors you wish to use for your sweater vest. The beauty of crochet is the freedom to incorporate as many or as few colors as you want. Unravel the yarn, but be careful not to tangle it.
Cut your yarn according to the length specified in your chosen pattern. Remember, it’s always better to have extra than to run out in the middle of your project. Once your yarn is prepared, you’re ready to begin crocheting.
Step 3: Begin Crocheting
Now that your yarn is ready, it’s time to begin crocheting. Start by making a slipknot, then place the loop on your hook. This is your starting point. Follow the instructions given in your chosen pattern closely. Remember, patience and consistency in your stitches are the keys to a well-crocheted sweater vest. Don’t rush the process.
Take your time to ensure that each stitch is uniform and tight enough to hold but not too tight to distort the shape of your vest. Continue crocheting following the pattern until you complete the first part of your sweater vest.
Step 4: Continue with the Pattern
Once you’ve completed the first part of your sweater vest, it’s time to continue with the pattern. This might involve crocheting the back piece or starting on the front pieces of the vest. Again, follow your chosen pattern closely and note any changes in stitches or techniques required.
As you progress, your sweater vest will start to take shape. Remember to maintain even tension throughout your work to ensure a uniform look. Once you’ve completed this step, you’ll be halfway through your crocheting project.
Step 5: Join the Pieces
After you’ve completed crocheting all the individual pieces of your sweater vest (usually a back piece and two front pieces), the next step is to join these parts together. Lay out your crocheted parts flat, aligning the shoulders and sides. Using your needle and yarn, sew the shoulder pieces together first, keeping the alignment as precise as possible.

Next, sew up the sides, leaving appropriate spaces for the armholes described in your chosen pattern. Ensure that your stitches are secure and neat to prevent any future fraying or unraveling. Once all the pieces are joined, you’ll be able to see the basic shape of your sweater vest.
Step 6: Add the Finishing Touches
Now that your sweater vest is taking shape, it’s time for the finishing touches. Depending on your chosen pattern, this could include adding a decorative border, buttons, or pockets. For a simple border, you can use a basic crochet stitch, such as a slip stitch or single crochet, to go around the edges of the vest.
This adds a neat finish and can also improve the fit of your vest. If your pattern includes buttons, sew them on at this stage, ensuring they align correctly with any buttonholes. Remember, these finishing touches help personalize your vest and add an extra touch of flair, so don’t be afraid to get creative.
Step 7: Check the Fit
Before you complete your sweater vest, it’s important to check the fit. Try it on and examine it in the mirror. Check if the vest fits correctly around your shoulders, chest, and waist. It should not be too tight or too loose. Move around to ensure the armholes are large enough and the length is to your liking.
If you find any areas that need adjustments, now is the time to make those changes. Remember that crochet is forgiving; you can always unravel a few stitches to fix any problems.
Step 8: Make Any Necessary Adjustments
Don’t be dismayed if you’ve identified areas that need adjustments during the fitting process. This is a common part of creating a bespoke garment. You should add or remove a few rows, adjust the position of the buttons, or even alter the armholes for a more comfortable fit.
Remember, the beauty of crochet is its flexibility. With a little patience, you can make the necessary adjustments to ensure your sweater vest is exactly how you want it. After making the adjustments, try it one more time to confirm everything is right.

Step 9: Final Touch-ups
At this stage, your sweater vest is complete. Now is the time to pay attention to the finer details. Examine your vest for any loose threads or yarn tails. For a clean finish, weave these ends back into your crochet work using your hook or a yarn needle. This will ensure they don’t hang out and affect the overall appearance of your vest.
If you’ve added any embellishments like buttons or pockets, double-check that they’re securely attached and aligned properly. After you’ve made these final touch-ups, your handmade crochet sweater vest should look polished and ready to wear.
Step 10: Enjoy Your New Sweater Vest
Congratulations! You have successfully crocheted your very own sweater vest. It’s time to wear it and enjoy the fruits of your labor. Whether you’re styling it for a casual outing or a formal event, your handmade vest will surely add a unique and personal touch to your outfit.
Remember, learning how to crochet a sweater vest is as much about the journey as it is about the final product. So, don’t be disheartened if your first few attempts aren’t perfect.
By following the steps outlined in this guide, you should now have all the information you need to crochet your own sweater vest. With time and practice, you can perfect the art of crocheting and create amazing garments for yourself or as gifts.

5 Additional Tips and Tricks
- Make sure you have enough yarn for your project. It can be easy to underestimate how much yarn you need, so purchase extra, just in case.
- Create a gauge swatch before beginning your project. This will help you ensure that the finished product comes out as close to your desired size.
- Use stitch markers to help track where you need to place the stitches. This will make it easier for you to complete the project accurately.
- Be sure to take regular breaks while crocheting. This will help keep your hands from getting tired or sore.
- When finished, block the sweater vest so that the stitches are even throughout. This will help to give your final product a more polished look.
These tips and tricks should make crocheting a sweater vest much easier for you! With the right supplies, tools, and knowledge, you can create a beautiful finished project that will surely be enjoyed for years to come.
5 Things You Should Avoid
- Don’t pull too tightly on the yarn while crocheting, as this can distort the shape of your stitches.
- Don’t rush through any steps in the process – take your time and ensure each step is done correctly.
- Remember to slip stitch at the end of a row when specified in the pattern – this will help keep the shape of your project consistent.
- Remember to count your stitches and check your gauge regularly to ensure you maintain the correct number of stitches for the pattern.
- Don’t forget to weave in any loose ends after completing your project; this will help the sweater vest look neat and professional.
Following these tips will help you create a beautiful and long-lasting sweater vest. With patience and practice, you can become an expert in crocheting sweaters!
5 Ideas for Decorating a Crocheted Sweater
Once you’ve completed your sweater vest, it’s time to add the final touches to make it unique and special. Here are five ideas for decorating a crocheted sweater:

- Add Buttons: Buttons can be a simple and stylish add-on to your sweater vest. They can be functional, as a closure on the front, or purely decorative. You can choose buttons that match the yarn or opt for contrasting ones to make a statement. Antique buttons can add a vintage charm, while brightly colored or uniquely shaped buttons can add a fun, playful element. Remember to crochet buttonholes if you plan on using them as closures.
- Embroidery: You can add embellishments to your sweater vest with embroidery thread or yarn. Use simple stitches like a chain stitch, lazy daisy stitch, French knots, and cross-stitch to create intricate patterns on the front or back of the garment.
- Patches: Add patches to the sweater vest for a unique look. You can choose patches that match the color of the yarn or add ones with bright colors and fun designs.
- Appliques: Create an applique to embellish the sweater vest. This could be anything from a heart, star, flower, or animal shape. Sewing on ready-made pieces is a quick option, or you can crochet your appliques and attach them to the sweater.
- Embellishments: Add sparkle and shine with beads, sequins, or glitter to make the sweater vest stand out. These can be sewn onto the fabric or added as trimmings around hems and collars for a more subtle effect.
These ideas for decorating a crocheted sweater vest will help you create a unique and eye-catching garment.
Is It Easier to Knit or Crochet a Sweater?
If you’re curious whether it’s easier to knit or crochet a sweater, the answer depends on your preference. Both knitting and crocheting have unique techniques that can be challenging in their way. Ultimately, the decision comes down to which method you feel more comfortable with – both can create beautiful sweaters!

For a beginner, start cropping a sweater vest. This project requires fewer supplies and tools than a full-size sweater, making it easier for new crafters to learn the ropes. Plus, it’s still an impressive finished product that can be worn season after season!
Overall, either technique can be used to create stunning sweaters. Whether you knit or crochet is up to you – just remember that practice makes perfect! With enough practice and patience, you’ll create beautiful garments in no time.
Conclusion
There you have it, a simple and straightforward guide on how to crochet a sweater vest. Crocheting is a rewarding hobby that can give anyone the satisfaction of making something with their own hands.
Don’t be afraid to challenge yourself, as there are endless techniques and patterns for you to explore. Hallmark your special projects by personalizing them with embroidery, weaving, and other techniques. Whether you want to make something just for yourself or someone else, crochet is a great way to express yourself through handmade garments.
So grab your yarn, pick up some hooks, and start crafting away! Who knows what wonderful creations will follow?