
Transform your living space into a cozy haven by adding a touch of handmade comfort with a crocheted yarn rug. Crocheting a rug not only allows you to infuse your home with personal style but also provides a practical yet artistic way to showcase your crafting skills.

Whether you’re a crochet enthusiast seeking a new project or a beginner eager to explore the world of yarn art, crocheting a rug offers a creative journey that results in a functional and aesthetically pleasing addition to your home decor.
In this article, we’ll guide you through the process of how to crochet a rug with yarn, from selecting the right materials and choosing the perfect pattern to mastering the stitches required for a sturdy and visually appealing rug.
Whether you envision a colorful mandala-style rug or a minimalist design, let’s embark on the rewarding adventure of crafting a unique crocheted rug that brings warmth and character to your living space.
Crocheting a Rug and Its Functional and Decorative Uses
Crocheting is the perfect craft to make beautiful items that are both functional and decorative. Rugs made with yarn can be used for many purposes, ranging from home decorations to cozy blankets during outdoor camping trips. Whether you want something comfortable for your living room or a stylish accent piece for your patio, crocheting a rug with yarn is an excellent choice!
Before starting your project, you will need to make sure that you have all the necessary supplies. This includes yarn, a crochet hook, scissors and measuring tape. The amount of yarn needed depends on the size of rug you want to make but most projects require at least two skeins of yarn. Once you’ve gathered your supplies, it’s time to begin!
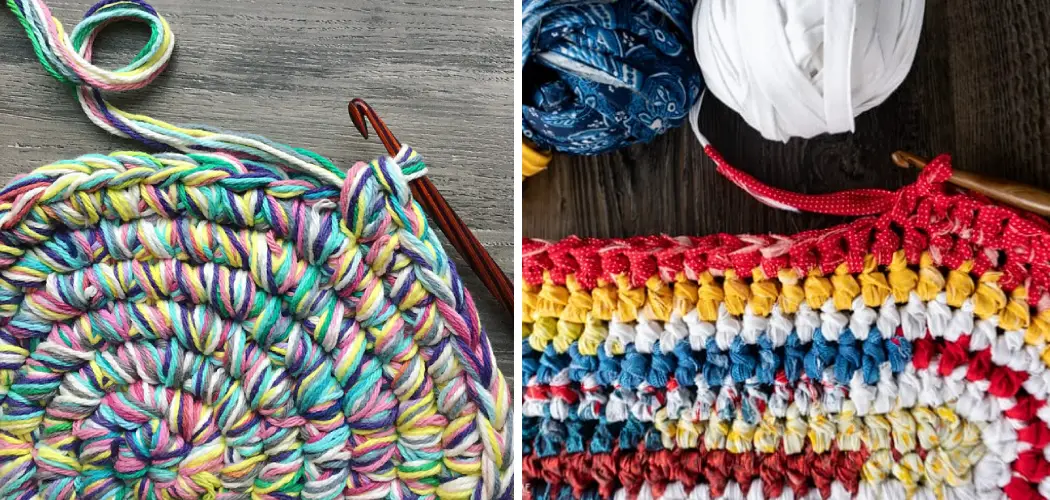
The first step is to create a foundation chain. This will serve as the base for your rug and needs to be the same length as the desired width of the rug. To make sure that you crochet an even amount of stitches, use a measuring tape or count as you go.
Once the foundation chain is complete, you can start crocheting in rounds. For a simple pattern, you can start with single crochets and then switch to alternating double crochets. This will create a textured rug that is both cozy and stylish.

By varying your yarn or stitch patterns, you can easily customize your rug to fit any space in your home. If you’re feeling adventurous, try adding some fun touches such as fringe or tassels. The possibilities are endless and crocheting a rug will be sure to give you hours of crafting fun!
The Customization and Creativity of Making a Yarn Rug
Making a rug out of yarn is an excellent way to customize and personalize your home decor. Whether it’s for the living room, bedroom or even bathroom, you can use many different colors and patterns to create something that is truly unique. If you like being creative and crafty, this is a great project for you!
Yarn rugs are also quite inexpensive, since all you need is yarn and some basic crochet skills. You can use many different stitches to create a pattern that stands out and suits your style. From single crochet to double crochet and even the Tunisian stitch, you’ve got plenty of options to choose from.
Not only do yarn rugs look great, they’re also very durable. The yarn fabric is thick and sturdy which ensures that the rug can handle plenty of foot traffic and last for many years to come.
If you’re interested in giving it a try, make sure to have all the materials handy before starting your project. You’ll need a crochet hook, scissors, measuring tape, yarn and a large eye needle. It’s also a good idea to make a test swatch before starting the rug, so that you can get an idea of how large it will be and the stitch pattern you’d like to use.

List of Materials Required for Crocheting a Yarn Rug
Here is the list of materials you will need for crocheting a yarn rug:
- Yarn: Choose a sturdy, durable yarn. Bulky or super bulky weight is best for rugs. You’ll need a substantial amount, so make sure to check your pattern for the exact amount.
- Crochet Hook: A larger hook is typically used for rug projects. An ‘N/P – 15’ or ‘Q’ might be suitable, depending on the weight of your yarn.
- Scissors: A pair of sharp scissors is essential for cutting the yarn.
- Yarn Needle: This is necessary for weaving in ends.
- Stitch Markers: These are helpful for keeping track of rounds or stitches, especially in larger projects.
- Rug Pattern: A detailed pattern will guide you through each step of the crochet process. Choose one that matches your skill level and design preference.
- Optional: Non-Slip Rug Pad or Backing – To keep your rug securely in place on the floor.
Yarn Choices Suitable for a Rug Project
When it comes to crocheting a rug with yarn, there are plenty of different options for you to choose from. You can find a wide variety of colors and textures available in wool blends, cotton or acrylic.
Some rugs may even be made with recycled fibers such as t-shirt yarn or old jeans! Whatever your preference is for making your rug, remember that the choice of yarn is important for making sure that the finished product is sturdy and durable.
When looking for a yarn to use, take into consideration how much wear and tear your rug will be exposed to. You may need to opt for a thicker or stronger material if you plan on having people walk on it frequently or if it will be placed in an area prone to heavy foot traffic. Thicker yarns such as wool are great for this purpose and can be easily manipulated to make a rug with unique designs.

Another factor to consider when choosing the right type of yarn is how much of it you need for your project. If you are making a large rug, opt for larger skeins or balls of yarn so that you won’t have to worry about running out of materials in the middle of your project.
On the other hand, if you plan on making a rug with intricate designs, consider using finer yarns such as lace or fingering weight so that your stitches will look more even and detailed.
No matter what type of yarn you decide to use for crocheting your rug, make sure that you use the right hook size to ensure that your project turns out perfect. The type of yarn will determine what size hook is appropriate for it, so make sure you check the recommended sizes on the label before beginning your rug.
11 Steps How to Crochet a Rug with Yarn
Step 1: Select Your Yarn
Choosing the right yarn is paramount when it comes to crocheting a rug. Consider the durability, texture, and ease of maintenance. Opt for a yarn that can withstand the wear and tear of foot traffic and is easily washable.
Cotton or cotton-blend yarns are popular choices for their durability and versatility. Additionally, take into account the color palette that harmonizes with your existing decor or creates a statement piece.
Step 2: Determine Rug Size and Shape
Before embarking on your rug-making journey, decide on the dimensions and shape of your rug. Measure the area you intend to place the rug to determine the ideal size. Whether you prefer a rectangular, circular, oval, or even asymmetrical design, choose a shape that complements your space and meets your aesthetic goals.

Step 3: Choose a Stitch Pattern
The stitch pattern you select will influence the overall appearance and texture of your crocheted rug. Opt for stitches that not only offer visual appeal but also contribute to the durability of the finished rug. While basic stitches like single crochet or half double crochet create a sturdy fabric, exploring more intricate stitches like the popcorn or shell stitch can add depth and dimension to your rug.
Step 4: Gather Materials
In addition to your chosen yarn, ensure you have the appropriate crochet hook for the yarn weight you’re using. Having a pair of quality scissors and a tapestry needle for weaving in ends is essential. If your design involves multiple colors, make sure you have all the required shades on hand.
Step 5: Create a Foundation Chain
Start by creating a foundation chain with the number of stitches necessary to achieve the width of your rug. For circular or oval rugs, you may need to work a few rounds of single crochet stitches into the starting chain. This foundation will set the stage for your rug’s size and shape.
Step 6: Work the First Row
Following the stitch pattern you’ve chosen, work the first row of stitches into the foundation chain. Be attentive to the pattern instructions to ensure proper stitch placement and tension.
Step 7: Continue Stitching Rows
Continue crocheting rows according to your selected stitch pattern until your rug reaches the desired length. Consistency in stitch size and tension is key to creating a uniform and professional-looking fabric.

Step 8: Change Colors
If your design calls for color changes, transition between colors seamlessly by incorporating new colors at the end of a row. Weave in loose ends as you go along to minimize finishing work later and ensure a clean and polished appearance.
Step 9: Shape and Finish the Rug
To shape a rectangular rug, maintain straight edges by crocheting evenly along the sides. For circular or oval rugs, follow the pattern instructions for shaping. Once your rug has reached the desired size, finish off the last row and fasten off the yarn.
Step 10: Weave in Ends and Block
Weave in all loose ends using a tapestry needle. Blocking your rug is essential to ensure a polished and even appearance. Depending on the type of yarn, consider wet blocking or steam blocking. Pin your rug to a blocking mat in the intended dimensions and allow it to dry completely.
Step 11: Enhance with Additional Details (Optional)
For a personalized touch, consider adding optional details to your crocheted rug, such as a decorative border, fringe, tassels, or even appliqué embellishments. These finishing touches can amplify the design and provide an extra layer of style.
Safety Precautions for Crocheting a Rug with Yarn
When crocheting a rug with yarn, it’s important to take the utmost safety precautions to ensure that you don’t get hurt. Before getting started, make sure you have the right equipment and supplies for your project.
Check that all of your materials are properly working, and avoid using any old or damaged items. Additionally, you should always wear protective gloves when crocheting, as the yarn can be sharp and you don’t want to risk getting injured.

When it comes to storing your supplies, make sure they are kept away from children as well as any pets who might try to get their paws on them. Also, store your finished rug somewhere that’s free from dust or debris. This will help it last longer and maintain its quality.
Conclusion
In conclusion, crocheting a rug with yarn is an enjoyable and fulfilling craft project. Not only will you be creating something beautiful to decorate your house, but you will also be learning a skill that can be enjoyed for many years.
Taking the time to learn how to choose the right yarn for the project and understand the necessary steps involved in crocheting a rug will help ensure that your end result is something you will be proud of.
Even if it’s your first time attempting this type of project, with careful practice and dedication, you can succeed in making a unique and gorgeous rug! Now that you know how to crochet a rug with yarn, it’s time to embrace this challenge and show off your talent as a crafter! Don’t forget to have fun while creating beautiful pieces of art with yarn. Good luck with your next ambitious new crochet project!