
Embrace the charm of handmade warmth with the art of crocheting a ribbed hat. Crocheting a ribbed hat not only offers a practical accessory for colder days but also presents an opportunity to explore texture and style in your crafting endeavors.

Whether you’re an experienced crocheter or a newcomer to the world of yarn, creating a ribbed hat allows you to showcase your skills while fashioning a versatile and fashionable headwear piece.
In this article, we will guide you through the step-by-step process of how to crochet a ribbed hat, from selecting the ideal yarn and mastering the foundational stitches to understanding the techniques that create the distinctive ribbed pattern.
Whether you’re crafting for yourself or creating thoughtful gifts for loved ones, let’s embark on a creative journey to craft cozy ribbed hats that effortlessly blend functionality and style.
Crocheting a Ribbed Hat and Its Classic and Textured Look
When you want to add texture to your DIY wardrobe, look no further than the classic ribbed hat. This stylish accessory is an easy way to break up the solid color of any outfit and add a bit of flair without having to go overboard. Plus, with just a few simple stitches, you can learn how to crochet a ribbed hat quickly and easily!
This tutorial will walk you through the steps of making a ribbed hat with any yarn and hook size that you have on hand. You’ll start by creating the main body of the hat, then move onto adding a brim for extra style. By following these instructions, you’ll be able to customize your own ribbed hat in no time!

The Warmth, Comfort, and Style of Ribbed Crochet Patterns
Once you’ve mastered the basics of crochet, one of the best and most versatile patterns to learn is ribbing. This classic crafting technique produces a finished product that is light, stretchy, and contains an alternating series of loops and ridges.
Ribbed crochet can be used for all manner of items like sweaters, hats, scarves, shawls, blankets, and more. In this guide, we’ll go over the basics of how to crochet a ribbed hat.
First you’ll need to gather your materials: one skein of worsted weight yarn in the color of your choice, an H/8-5mm crochet hook, scissors, and a tapestry needle for weaving in your ends.
To begin, make a slip knot on the hook and chain four stitches. Then yarn over with the hook and draw through one loop to form a single crochet stitch, repeating this step until you have two loops left on the hook. Next, yarn over again and pull through both loops on the hook.
This is called a single crochet decrease and will form your first ribbing stitch. After that, chain one stitch and create a single crochet decrease in the next two stitches. This completes one full set of ribbing.
Continue this pattern until your project is as wide as you need it to be. For a hat, the circumference should be slightly larger than the head size of the person who will be wearing it. As you work, count your stitches periodically to check that the number of ribs matches up with what you planned.
When the ribbing is complete, change your single crochet decrease to a single crochet stitch and make sure to finish off at the end of a row.

Yarn Choices Suitable for Ribbing and Hat Structure
Once you have your pattern ready and chosen the size that will best suit your needs, it’s time to pick the yarn for your project. When looking for suitable yarn for ribbing specifically, it’s always a good idea to look for a yarn with some elasticity or “give.” A wool blend is generally great because of its natural elasticity, but any other type of yarn will work as long as it has some stretch to it.
You also want to consider the texture of your yarn in order to get a nice ribbed finish on your hat. Once you’ve picked the perfect yarn for you, you can begin crocheting and putting together the structure of your hat.
Begin by making a chain row that’s the same length as the circumference of your hat. This will form the foundation for the rest of your hat-making. After you’ve made the chain, turn it and in each stitch single crochet four times – this is what will create the ribbing pattern on your hat.
Continue with this until you reach your desired height of the hat. You can also experiment with increasing or decreasing stitches in order to get a slightly different ribbing effect if desired. Once you’ve reached the desired height, slip stitch your last row to the first row and fasten off securely.
Now it’s time to put together the top of your hat – this part requires some basic knowledge of decreasing stitches. Chain one stitch and, in the next stitch, single crochet two times.
Move on to the next stitch and single crochet twice again before skipping a stitch – this will form a decrease that’s necessary for shaping the top of the hat. Continue repeating this pattern until you have reached the end of your row and then fasten off securely once you reach the end.

11 Steps How to Crochet a Ribbed Hat
Step 1: Gather Your Materials
Before diving into the crocheting process, gather the necessary materials:
Yarn Selection: The first step in creating a ribbed hat is choosing the right yarn. Opt for a soft, warm yarn that feels comfortable against the skin. Worsted weight yarn is commonly used for hats due to its balance of warmth and stitch definition. Consider the color that best suits your personal style or matches your winter wardrobe.
Crochet Hook: Equally important is selecting an appropriate crochet hook. Check the yarn label for the recommended hook size. Keep in mind that a smaller hook size will create a tighter ribbing pattern, while a larger hook size will result in a more relaxed texture.
Stitch Marker: A stitch marker is an essential tool that helps you keep track of the beginning of each round, especially when working in continuous rounds.
Scissors: A pair of sharp scissors is essential for cutting the yarn cleanly and neatly.
Tapestry Needle: This needle will come in handy for weaving in loose ends and ensuring a polished finish.
Step 2: Choose the Ribbing Pattern

Selecting the ribbing pattern is a crucial step in creating a ribbed hat. The ribbing pattern adds both texture and elasticity to the hat’s band. Two popular ribbing patterns are the single crochet ribbing, also known as the waistcoat stitch, and the alternating front post and back post double crochet ribbing. The former creates a dense, snug fabric, while the latter yields a stretchy, textured pattern.
Step 3: Measure for Sizing
Before you start crocheting, it’s important to determine the appropriate hat size. Measure the circumference of the recipient’s head or consult a hat sizing chart to ensure a proper fit. Keep in mind that crochet fabrics are naturally stretchy, so aim for a snug measurement that provides a comfortable yet secure fit.
Step 4: Start with a Ribbed Band
Begin your ribbed hat by crocheting a band that will sit at the bottom edge of the hat. This band not only contributes to the aesthetic appeal of the hat but also influences its stretchiness. The number of stitches you start with for the band will vary based on the ribbing pattern and the hat size.
Step 5: Work the Ribbing Stitch
Once you’ve established the ribbed band, follow the pattern you’ve chosen to create the ribbing texture. If you’re using the single crochet ribbing, work single crochet stitches into the back loop only of each stitch.
This creates a compact and structured ribbing. If you’re working with the front post and back post double crochet ribbing, alternate between these two stitches to achieve the ribbed effect. The front post stitches create raised columns, while the back post stitches create recessed columns.
Step 6: Join and Begin the Body
After you’ve completed the ribbed band, join the ends to form a loop and start crocheting in the round. This circular construction eliminates the need for a seam and creates a seamless transition from the ribbing to the body of the hat. Follow the stitch pattern for each round according to your chosen ribbing pattern.
Step 7: Increase for the Crown

As you crochet the body of the hat, you’ll eventually need to shape the crown. Depending on your pattern, you may need to increase stitches in order to create a wider diameter for the crown.
Common increase techniques include making two stitches into the same stitch (known as an increase stitch) or working increases at specific intervals. These additional stitches accommodate the shape of the head while maintaining the ribbing pattern.
Step 8: Continue Crocheting
With the crown increases complete, continue crocheting rounds without further increasing. The length of the body will determine the final height of the hat. Be sure to maintain the ribbing pattern established in the band for a consistent and cohesive design.
Step 9: Shape the Crown
Once the body of the hat has reached the desired length, it’s time to shape the crown. This involves decreasing stitches to taper the hat’s top. Begin by following your pattern’s instructions for decreasing.
Depending on the pattern and your desired crown shape, you may work single or multiple decreases evenly spaced around the hat. This gradual reduction of stitches narrows the opening of the hat while maintaining the ribbing pattern.
Step 10: Fasten Off and Weave in Ends
When only a few stitches remain, fasten off the yarn, leaving a tail of yarn for weaving in. Thread the tail onto a tapestry needle and weave it through the remaining stitches to secure them. This step ensures that the stitches won’t unravel. Additionally, weave in any loose ends from color changes and the starting band to achieve a polished and neat appearance.
Step 11: Add Optional Embellishments
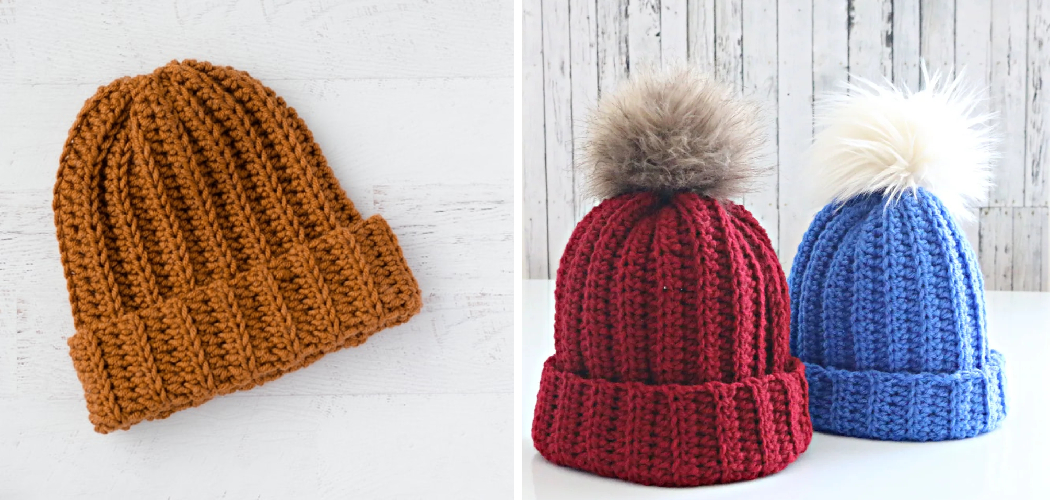
While your ribbed hat is already a versatile and stylish accessory, you can further enhance its aesthetic appeal by adding optional embellishments. Consider attaching a pom-pom to the crown, incorporating a faux fur pompom for a touch of luxury, or sewing on a decorative button to one side of the hat. These embellishments can elevate the hat’s overall design and showcase your personal creativity.

Some Common Mistakes to Avoid
If you’re new to crocheting, there are some common mistakes that can be easy to make and hard to undo. To create a ribbed hat, it’s important to pay close attention to your stitches and the size of your yarn.
First, make sure the tension of your stitches is consistent throughout your project. If they are too loose or too tight, you’ll end up with a hat that won’t fit properly.
Second, be sure to use the correct size yarn for your project. If you use a yarn that is too thick or too thin for the pattern you are following, it will throw off the measurements and make it difficult to achieve the desired results.
Conclusion
Crafting is a wonderful way to express your creativity. Crocheting, in particular, can be both fun and therapeutic. Taking on the challenge of how to crochet a ribbed hat can give you creative space to practice a new skill and have something practical to show for it.
It is an awesome opportunity to learn something new that will last you years of enjoyment and compliments from friends and family.
Plus, you’ll have some gorgeous handmade designs to share with others who are interested in learning how to crochet. Not only do we get a feeling of accomplishment and mastery when we successfully whip up items like hats with crochet needles, there’s also something incredibly satisfying about having crafted all these delicate accessories of our own devices.