
Building a Lego snowman is a delightful activity that combines the joy of playing with Legos and the charm of a winter favorite. With a little imagination and a handful of Lego bricks, you can create a cute and whimsical snowman that will bring a touch of winter wonder to your Lego collection or seasonal decorations.
In this article, we will explore how to build a lego snowman, providing step-by-step instructions and creative tips to guide you through the process.

Whether you’re a seasoned Lego builder or new to the world of brick creations, building a Lego snowman is a fun and rewarding project that will spark your creativity and add a playful touch to your Lego world. So, gather your Lego bricks, put on your imagination hat, and let’s dive into the snowy world of the Lego snowman building.
The Joy of Building Lego Snowmen
Building a Lego snowman is an activity that can bring joy to children and adults alike. It is the perfect way to get creative while spending quality time with your family or friends. With just a few simple pieces, you can create a unique snowman that’s sure to bring smiles and cheer on even the coldest of days!
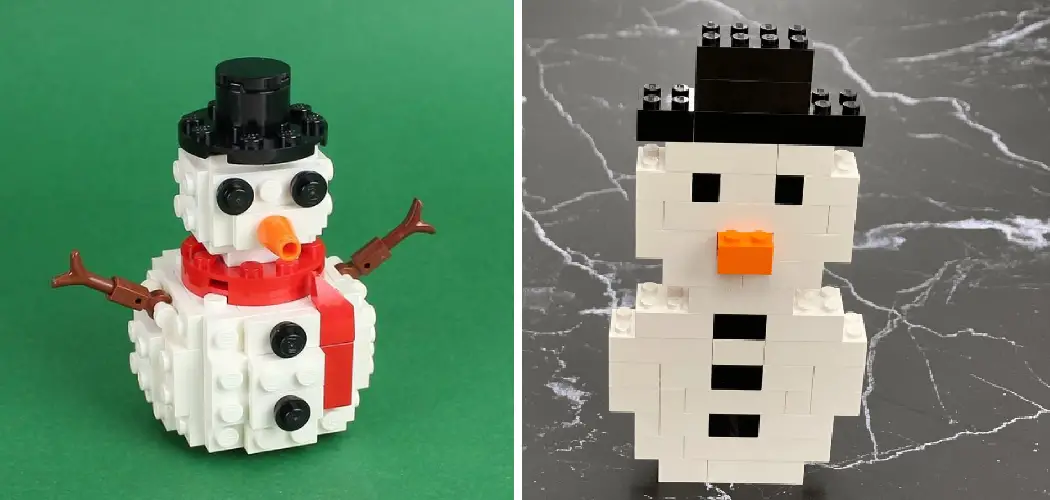
Start by gathering some basic pieces. You’ll need white and black Lego bricks, a red brick for the snowman’s nose, and two round bricks – one large and one small – for his eyes. If you have extra pieces like hats or scarves lying around they can also be used to create a unique look.
Next, start assembling your Lego snowman. Begin by building the base using white and black bricks, alternating colors to create a classic design. Use red pieces for the snowman’s nose and round pieces for his eyes. You can also add on accessories such as hats or scarves if desired.
Benefits of Lego Snowman Building
Building a Lego snowman can be a fun and enjoyable activity for both young and old alike. Not only is it an entertaining, creative project to take on, but it also offers numerous benefits.
For starters, building a Lego snowman allows you to practice fine motor skills and hand-eye coordination, as well as problem-solving skills such as spatial awareness, planning and design. It also helps to boost confidence and self-esteem as you build something that you can be proud of.
Lego snowman building is also a great way to encourage creative thinking and imagination as you come up with unique designs for your Lego snowman. Having the opportunity to express yourself creatively in this way can also help to reduce stress and anxiety.

In addition to all these benefits, Lego snowman building can also provide a great bonding activity for families and friends. Working together to build something fun can build strong relationships and create treasured memories that will last for years to come.
Overall, building a Lego snowman is an enjoyable activity that can offer numerous benefits in terms of creativity, problem-solving and relationship building. So grab your Legos, and get creative!
Importance of Selecting the Appropriate Lego Bricks
When building a Lego snowman, the first and foremost step is selecting the right bricks. The size of the bricks should be appropriate for the desired snowman height; using too small or too large pieces may lead to an out-of-proportion construction. Additionally, it is important to opt for lightweight bricks that will not cause your snowman to become top-heavy.
Finally, look for colors that are suitable for a wintery landscape – white, gray, black and blue are all good choices. This way you can create a beautiful and balanced finished product! With these tips in mind, you’ll have no problem finding the perfect Lego bricks to build your snowman.
Once you’ve gathered your materials, it is time to build! Begin by constructing the base of your snowman by stacking circles of Lego blocks. You can use two or three circles depending on how tall you want your snowman to be.
Once the base is completed, attach arms to your creation and decorate with buttons, eyes, a carrot nose, and whatever other accessories you wish. The beauty of creating a Lego snowman is that you have complete control over its look – let your creativity run wild! Finally, finish off the project with a hat perched atop the head; this will give your construction an extra dose of personality!
10 Steps How to Build a Lego Snowman
Step 1: Gather Your Bricks
Start by gathering the necessary Lego bricks for your snowman. Look for white bricks of various sizes to represent the body, head, and limbs of the snowman. Additionally, gather smaller bricks in different colors for the details like eyes, nose, buttons, and accessories.

Step 2: Build the Base
Begin by constructing the base of the snowman. Stack larger white bricks to form a solid foundation. You can use flat bricks to create a stable surface, ensuring the snowman stands upright.
Step 3: Create the Body
Continue building the snowman’s body by stacking additional white bricks on top of the base. Gradually decrease the size of the bricks as you move upward to represent the snowman’s body tapering toward the top.
Step 4: Construct the Head
Build the snowman’s head using white bricks of appropriate size. Attach it securely to the top of the body, ensuring a stable connection.
Step 5: Add the Face
Bring the snowman to life by adding facial features. Use small bricks or specialized Lego pieces to create the eyes, nose, and mouth. Consider using black or dark-colored bricks for the eyes and orange or carrot-shaped pieces for the nose.
Step 6: Decorate with Buttons
Give your snowman a playful touch by adding buttons to its body. Use small, colored bricks to represent the buttons running down the front of the snowman’s body.
Step 7: Build the Arms
Construct the snowman’s arms using appropriate-sized white bricks. Attach them securely to the sides of the body or head, depending on your desired design. You can position the arms straight down or angled outward for a more dynamic pose.
Step 8: Accessorize
Enhance the character of your Lego snowman by adding accessories. Consider including a top hat, scarf, or broom made from Lego bricks. Get creative and use different colors to personalize your snowman’s accessories.
Step 9: Incorporate Details
Add the finishing touches to your snowman by incorporating additional details. Use smaller bricks or specialized pieces to create features like a mouth, eyebrows, or even a pipe. These details will add personality and make your snowman unique.
Step 10: Display and Play
Once your Lego snowman is complete, find a special spot to display it. Whether on a shelf, a winter-themed Lego scene with Christmas Tree, or as a standalone decoration, your snowman will bring a touch of whimsy and joy to any setting. Additionally, embrace the opportunity for imaginative play by incorporating your snowman into winter-themed Lego adventures.

Things to Consider When Building a Lego Snowman
1. Building Blocks:
Before you start building your Lego snowman, you’ll need to have a good selection of building blocks available. You’ll need enough pieces in a range of sizes and shapes to create your snowman’s body, head, arms, and any other details you want to add. If you don’t have enough Lego bricks on hand, consider purchasing some specifically for the project.
2. Color:
Lego blocks come in a variety of colors, so if you’re looking for an extra-festive look for your creation, choose bright shades that reflect the joys of the season – white snowmen with red hats or scarves can be especially eye-catching! Or, go for a more subtle look by using grey and brown pieces to resemble real snow.
3. Accessories:
You can also spice up your Lego snowman by adding accessories such as hats, scarves, and buttons. Consider using different colors and sizes to make your snowman even more unique. Finally, you can also add a carrot for the nose or create some kind of holiday-themed sign to top it off!
4. Stand:
If you want your Lego snowman to stand on its own, make sure to include a base plate or stand for beneath it. This will help to secure the snowman in place and ensure it can be displayed without falling over.
By following these tips and using your creativity, you’ll be able to build an adorable Lego snowman that will bring cheer to your home during the winter season! Have fun and happy building!

Conclusion
Building a Lego snowman is a fun and creative way to get into the holiday spirit! Plus, it’s an easy way to bond with kids or friends. You can use different types of techniques to create this unique work of art. It requires minimal effort and allows your creativity to flow.
The possibilities are endless when it comes to Lego snowmen – so don’t be afraid to explore different textures and colors that embellish your snowman.
Anyone can learn how to build a Lego snowman, and it’s sure to put a smile on your face. So why not take the time this holiday season to craft your own unique creation? With just a few pieces of Lego, you can make yourself the coolest snowman around!
You Can Also Check This Out to Finish Knitting a Hat on Circular Needles