
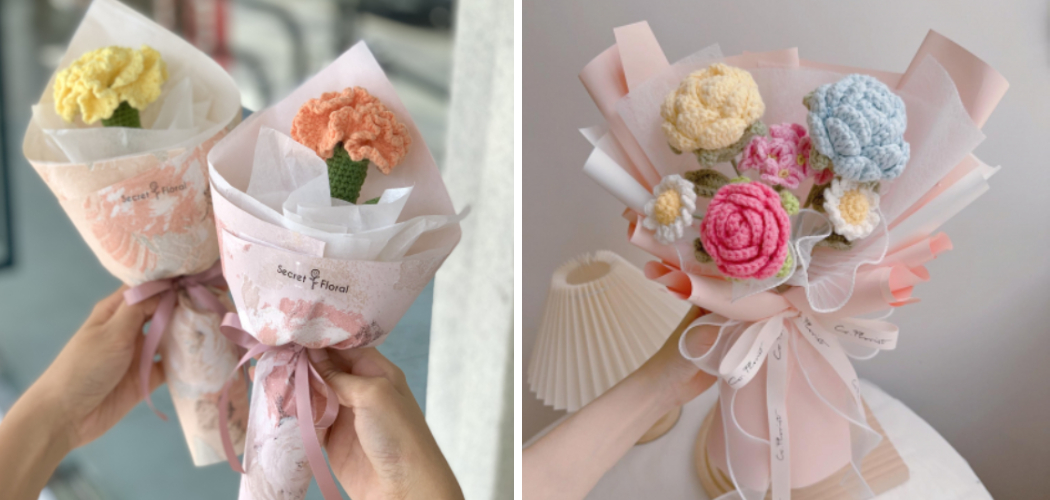
Are you looking for a unique way to add beauty and flair to your home, wardrobe, or arts-and-crafts project? Unleashing your inner crafter is the best way to go about it, and learning how to crochet a carnation allows you to do just that! Not only are these lovely flowers incredibly detailed – they’re also sure to make any design look beautiful.

Whether you already know how to crochet, need an extra creative outlet, or want something new and fun, this tutorial will show you exactly what steps can help you get started on a stunning crocheted carnation. Just in time for spring!
In this blog post, We will cover from start to finish. Keep reading to learn more about how to crochet a beautiful carnation.
What Will You Need?
Before you can start on your carnation, you will need to collect all the materials and tools necessary. You should ensure you have everything ready before beginning so as not to lose momentum in the process.
- Yarn or thread
- Crochet hook
- Tapestry needle
- Scissors
- Stitch markers (optional)
With all your supplies in hand, you’ll be ready to go!
8 Easy Steps on How to Crochet a Carnation
Step 1: Make the Base
The first step in creating a carnation is to make the base. This will form the foundation of your flower and will be visible from the top. You must keep it neat so that all of the other stitches look good.
To begin, start with a slipknot and chain 6. Then, skip the first 3 chains and make a single crochet into the fourth chain from your hook. After that, make one single crochet in each of the next two chains. Now, you’ll have three stitches in total.
Step 2: Make the First Petal
The second step is to create your first petal. To do this, you’ll need to increase by making two single crochets into the last stitch of your base. This will give you four stitches in total. Now, chain two and make a single crochet in the same stitch as before (where you increased). After that, make another single crochet in the next stitch and then chain two again.

Step 3: Create More Petals
Now, it’s time to start creating more petals to give your carnation its characteristic fullness. For the third step, you’ll turn your work and make two single crochets in the chain space from the previous row. Then, make a single crochet in the next stitch. Repeat this pattern until you have a total of five petals.
Remember, a carnation typically has a lot of petals, so don’t hesitate to add more if you want a denser look. Once you’ve completed this step, your carnation is starting to take shape!
Step 4: Layering the Petals
The fourth step is to layer your petals. Carnations are known for their dimensional and ruffled petals; this is where your crochet flower begins to take on that distinctive appearance. To start, chain one, then make a single crochet in the same stitch. This will anchor your yarn, ready for the next layer.
Now, work your way around the previous layer of petals, using the spaces between the stitches to add another petal, using the same method. Once you’ve finished this layer, slip-stitch in the first single crochet of the round to secure it. Your flower is becoming more and more like a carnation with each added layer.

Step 5: Continue Layering
The fifth step continues the last step, layering more petals. This step brings out the fullness and depth of the carnation, so don’t stop here! As with the previous steps, chain one and make a single crochet in the same stitch to anchor your yarn. Continue to work around the flower, adding another layer of petals.
Remember to use the spaces between stitches to guide where to place your next petal. Once you’ve completed this step, slip-stitch in the first single crochet to secure your work. By now, your crocheted carnation should have a lovely, full appearance.
Step 6: Securing the Carnation
The sixth step involves securing your beautiful crocheted carnation. After you’ve finished creating as many layers of petals as you desire, it’s time to secure your work. Cut the yarn, leaving a long tail. Thread this tail on your tapestry needle and make a few stitches at the base of the flower to hold everything in place.
Be sure to weave in the yarn end through the stitches at the back of the flower for a neat finish. Now, admire your handiwork – you have just crocheted a carnation!

Step 7: Add a Stem and Leaves
The seventh step brings your crocheted carnation to life by adding a stem and leaves. This will give your flower a more realistic appearance and a fun way to incorporate different colors into your project. Begin by making a slip knot with green colored yarn and chain 30 for the stem.
For the leaves, chain eight and make a single crochet into the second chain from the hook, followed by half double crochet in the next, double crochet in the next two, half double crochet in the next, single crochet in the next, and a slip stitch in the last chain.
Step 8: Attach the Stem and Leaves to the Carnation
The eighth step involves attaching the stem and leaves to your crocheted carnation. Start by threading the tail end of your stem through the tapestry needle and inserting it through the base of the carnation. Pull it all through and adjust it as needed to ensure it’s securely attached.
Next, attach your leaves to the stem by tying them into place with the yarn tail. Be sure to position them in a way that looks natural and balanced. Once everything is securely fastened, snip off the excess yarn. Now, your crocheted carnation is complete with a stem and leaves!
Following these eight easy steps, you can create your own beautiful crocheted carnation! Not only is this project a fun way to learn and practice different crochet techniques, but it’s also rewarding to see the result. You can make several of these flowers in various colors for a bouquet or even as a one-of-a-kind gift.

5 Additional Tips and Tricks
- When working on the petals of your carnation, use a tighter tension for a more delicate look.
- Insert crochet hooks into the hole at the center of a flower to make sure it is symmetrical.
- Ensure you have enough yarn to finish crocheting your entire carnation, as running out of yarn in the middle can lead to uneven edges.
- To make the petals of your carnation look more realistic, sew a few strands of yarn in the middle for a ruffled effect.
- When joining two halves of a flower, use an invisible stitch to keep the seam line from showing. This can give your project a professional finish.
With these tips in mind, you’re ready to embark on your journey of crocheting a carnation. Whether you are making one for yourself or a special someone, the process is sure to be enjoyable and rewarding!
6 Things You Should Avoid
- Be generous when crocheting your carnation – take your time to make sure it looks neat and polished.
- Be careful not to over tighten or pull the yarn too hard, as this can cause the petals to be distorted.
- Using the wrong type of yarn for a project can lead to unsatisfying results – be sure to use a type of yarn that is suitable for the pattern you’re following.
- Remember to stuff your carnation’s center with batting or stuffing after you’ve finished crocheting it, as this can make it look more realistic and fluffy.
- Avoid using too many strands at once when joining two halves together, as this can make the seam line too visible.
- Always measure the gauge of your crochet hook before starting a project, as this can help ensure that you’re following the pattern correctly.
By following these tips, you can crochet your carnation with ease and create a beautiful final product that you can proudly display in your home or give away as a gift!
Conclusion
Crocheting a carnation may only be for some, but it can be an enjoyable and rewarding hobby. Although it may take some time initially to learn to crochet a carnation properly, taking the skill to the next level can be one of the most rewarding experiences you could have.
As with any craft or skill, practice makes perfect, so don’t be discouraged if you struggle at first – keep learning and try different things to produce your ideal flower! You will feel a great sense of accomplishment when you can proudly hold a well-crafted crocheted carnation.
Hopefully, the article on how to crochet a carnation was useful in helping you understand the basics of this craft and giving you some tips on how to make your carnation look its best. Now, it’s time for you to get out there and start crocheting your beautiful flower! Good luck, and have fun!