
If you’ve ever mastered an intricate crochet project, you know the pride that comes with turning a few balls of yarn into something truly unique and beautiful. But even if your piece looks like it can be used in a million different ways, there will come a time when blocking is necessary to get the desired effect.

Blocking can help make the fabric softer or firmer, more durable, or more malleable — all of which are important elements of any crocheted item. However, understanding how to correctly block your projects is key!
In this blog post, we will discuss why blocking is important as well as walk through step-by-step instructions on how to block a crochet item so that they look it’s absolute best!
What is Blocking?
Blocking is a process used to help set the shape and firmness of your crochet item. It helps to emphasize texture, the definition in stitches, and drapes, as well as give crocheted items more stability and evenness. Once blocked, the item should have a better-finished look and fit than before it was blocked.
Tools and Materials You Will Need to Block a Crochet Item
- Spray the bottle with water
- Blocking mats (optional)
- Measuring tape or ruler
- Pins
- Towels (optional)
- Iron (optional)
Step-by-Step Guidelines on How to Block a Crochet Item
Step 1: Prepare Your Item for Blocking
Before you start the blocking process, make sure your item is completely finished and ready for blocking. This means that all ends have been woven in and any laundering or washing has been completed. Preparing the item beforehand will make the blocking process easier and more effective.
Step 2: Wet or Steam Your Item
Once your item is ready for blocking, you need to wet it down with either water from a spray bottle (for wool items) or steam from an iron (for acrylic items). If you have chosen to use a spray bottle, be sure to mist the item with just enough water to dampen it, not drench it. This step is important because it helps the item to hold its shape better while being blocked.

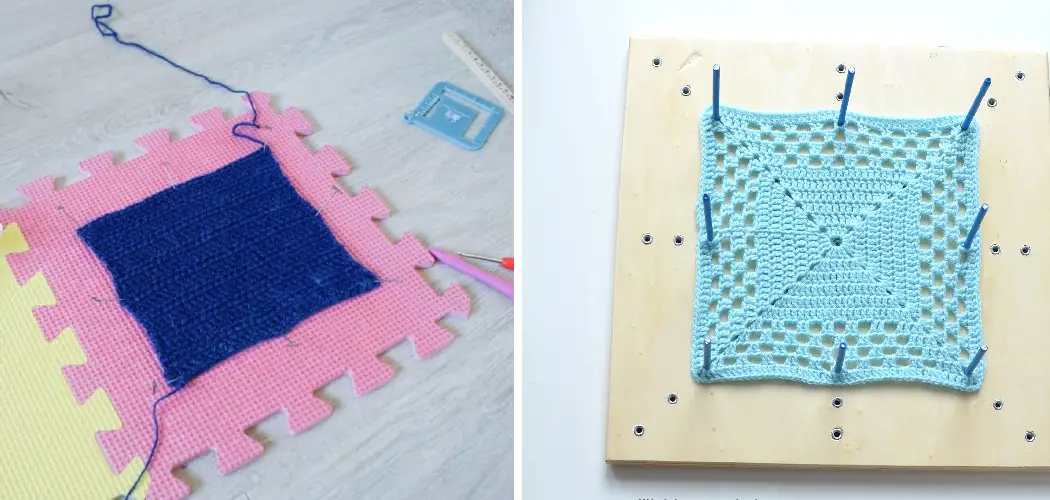
Step 3: Pin Your Item
Once your item is wet or steamed, you will need to pin it down onto a blocking surface. If you have access to blocking mats (which are specially made for this step), that would be ideal. However, if not, you can use any flat surface such as a towel or cardboard. Make sure to measure the item before pinning it and keep in mind that more pins are needed for intricate shapes.
Step 4: Allow Your Item to Dry
Now comes the hard part – waiting! After your item is pinned down and properly measured out, you must allow it to dry completely. Depending on the type of yarn you used, this could take anywhere from a few hours to a couple of days. Be patient and make sure your item is fully dry before unpinning and removing it from the blocking surface.
Step 5: Unpin Your Item
Once your item is completely dry, you can carefully unpin it and remove it from the blocking surface. Now, you should have a beautiful, properly shaped, and blocked crochet item that is ready to use. So go ahead and show it off!
Blocking is an important step when crocheting any item because it ensures that your work looks as good as possible. Follow these steps each time you finish a project and you’ll be sure to get a great outcome every time – guaranteed!
Additional Tips and Tricks to Block a Crochet Item
1. Use a foam mat for blocking. This will provide extra cushioning and padding for the item, which will prevent it from stretching too far or distorting its shape.
2. Try using large pins to secure your crochet piece in place on the foam mat while blocking. These pins are easy to maneuver and can help you adjust the shape of the item until it’s just right.
3. When blocking a large crochet piece, consider using multiple foam mats placed side-by-side. This will give you more room to work with and allow for smoother shaping of the item.
4. For extra precision, try using measuring tools such as rulers or tape measures when blocking your item. This will help ensure that it is perfectly shaped to the desired size.

5. If your crochet piece has lacy or intricate elements, try using blocking wires to shape the item. Blocking wires are thin and flexible and can help you achieve the perfect look for any delicate crochet piece.
6. When blocking a finished project, it is important to keep in mind that the fabric may shrink slightly after being washed or blocked. To prevent this, try dampening the item before blocking it and allow for some extra room when measuring its size.
7. If you’re planning to give your crochet piece as a gift, consider using a decorative blocking board or mat. This will make it look more professional and ensure the recipient is wowed by your work!
8. After all, is said and done, don’t forget to take a few photos of your finished piece! This will help you remember how it looked after blocking and can also be used as a reference for future projects.
9. To make sure your item retains its shape, consider using a fabric stiffener such as starch or sizing when blocking. This will help keep your crochet piece looking its best for longer.
Following these tips and tricks will help you achieve the perfect blocked crochet item every time! Whether it’s a delicate lace shawl or an intricate toy, these techniques will ensure you get a beautiful result. Happy crafting!
Things You Should Consider to Block a Crochet Item
- Blocking requires that you use the right material for your crochet piece. Make sure to choose one that is compatible with the project.
- You should also select a blocking board that is appropriate for the size of your crochet item and take into account its shape. It is recommended to use foam boards, interlocking mats, or cardboard covered in felt when blocking items like sweaters and shawls.
- Establish an even tension across the entire item by stretching it out evenly on the board.
- Determine how much stretching you need to do based on the stitch pattern and yarn used in your project.
- Pinning the crochet piece securely is essential for a consistent result. Place pins every few inches at even intervals to ensure that the item blocks correctly.
- Allow your crochet item to air dry completely before unpinning it from the blocking board.
- Finally, don’t forget to remove any pins when you’re done blocking!

Following these considerations will help you get the best possible results when blocking your crochet items. Once blocked, your item should look great and wear better for longer. Happy crocheting!
Precautions Need to Follow for Blocking a Crochet Item
- Follow the manufacturer’s instructions for washing and drying as certain yarns require special care.
- Lay out the item on a flat surface and pin it with rust-proof pins into the desired shape to keep it in place while blocking. If needed, use steaming or ironing to ensure that the pattern is set correctly.
- Pin evenly and symmetrically, taking care not to stretch out your work more than necessary.
- Moisten the item with water or steam lightly before pinning it. This will help keep the shape and prevent stretching out of the fabric while blocking.
- Let the item dry completely, in its pinned position, before unpinning. If using a steamer, hold it away from the pins and allow for air movement to avoid damage to them.
- Once the item is completely dry, unpin it and admire your beautifully blocked piece of work!
Following these precautions will help ensure that your crochet items are blocked well and you can enjoy a beautiful crafting project for years to come.

Frequently Asked Questions
What is Blocking?
Blocking is a process used in crochet to help even out your stitches and ensure they’re all the same size. It also helps to make your project look neater and more professional. Blocking involves stretching and pinning the item so that it takes on its desired shape. Once the item is blocked, it should remain in that shape until you unblock it.
Why Should I Block My Crochet Item?
Blocking your crochet item gives it a polished look and ensures that all of your stitches are even. Blocking also helps to open up the stitches, allowing them to show more detail and texture. Additionally, blocking can help make it easier for you to seam two pieces together, as it will ensure the pieces fit perfectly.
How Do I Block a Crochet Item?
The steps for blocking a crochet item will vary depending on the yarn and fibers it is made from. Generally, however, you will want to start by preparing your project by wetting it with water or steam. Once it has been dampened, lay out the item on a flat surface and pin it into the desired shape. Allow the item to dry completely before unpinning and enjoying your finished project.
Is Blocking Necessary for Every Project?
Blocking is not necessary for all crochet items, but it can be a helpful step to make sure your project looks its best. If you are making a garment or other item that requires specific measurements and shaping, blocking will help ensure those specifications are met. Additionally, if you want to open up the stitches and give them more detail, blocking is a great way to do that.
Can I Block Any Type of Crochet Item?
Yes, you can block any type of crochet item as long as it is made from fibers or yarns that can be blocked. Acrylic and other synthetic blends are not usually able to be blocked, so if your item contains these materials, it is best to avoid blocking. Additionally, some animal fibers such as mohair cannot be blocked and will require a different type of finishing process.

How Should I Store My Blocked Crochet Item?
Once you have finished blocking your item, it is important to store it properly. If possible, keep the item in a flat position and make sure that nothing is pushing against it. Additionally, if you are storing an item with fabric pins or wires, these should be removed first as they can cause damage over time.
Conclusion
Blocking can be intimidating at first, but once you get the hang of it, it will become easier and more enjoyable. Remember that blocking is an essential part of completing any crochet project and it is a necessary step to ensure your work looks its best.
Whether you are new to blocking crochet items or you are experienced in the craft, every crocheter should practice blocking items to achieve their desired result.
So take the time to block your crocheted project today to achieve the perfect texture, shape, and size! And make sure to go back and review our blog post on How to Block a Crochet Item if you ever need a refresher. With a bit of practice and experimentation, soon enough you will be working with confidence knowing just how much blocking can enhance the look of your finished projects.