
Iron-on vinyl has revolutionized the world of crafting, offering a simple and versatile way to personalize garments, accessories, and home decor. Whether you’re a seasoned crafter or a novice looking to explore the creative realm of heat transfer projects, mastering the art of weeding iron-on vinyl is essential for achieving impeccable results.
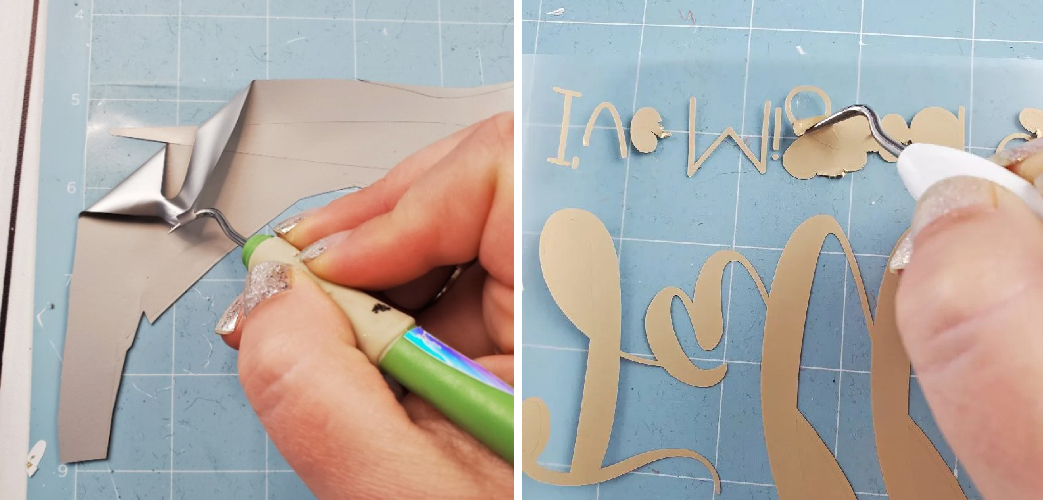
Weeding refers to the process of removing the excess vinyl from the carrier sheet, leaving behind only the desired design that will adhere to your chosen surface. While it may seem like a straightforward task, weeding requires patience, attention to detail, and the right tools.

In this comprehensive guide, we will delve into the step-by-step process of how to weed iron on vinyl, share valuable tips to avoid common pitfalls, and unleash the potential to create stunning, professional-looking designs that will stand the test of time. So, let’s get ready to dive into the world of weeding and elevate your iron-on vinyl projects to a whole new level of precision and perfection!
Definition and Purpose of Iron-On Vinyl
Iron-on vinyl—also known as heat transfer vinyl (HTV)—is a crafting material that can be used to customize all sorts of items, such as t-shirts, bags, and more. It is made of a polyurethane layer and a heat-sensitive adhesive. When heated up, the adhesive will activate so that it sticks to the fabric permanently.
Weeding iron on vinyl is a process of removing the excess material after printing or cutting. This helps to make sure that your design looks neat and professional, making it easier to showcase your work. To weed iron on vinyl correctly, you’ll need a few tools:
- A pair of tweezers or weeding tool
- An x-acto knife or a craft blade
- Heat transfer tape
Applications and Uses of Iron-On Vinyl
Iron on vinyl is a versatile material that has many uses. Not only can it be used to create custom apparel, but it can also be used for DIY projects and crafts. It’s easy to cut and weed, making it a great choice for creating unique designs and logos. Iron on vinyl is perfect for decorating t-shirts, bags, hats, and other clothing items. It’s also great for creating decals, wall art, signs, and other home decor projects.
Iron on vinyl is available in a variety of colors and finishes, from matte to gloss and glitter. You can choose the right finish for your project, whether you want something subtle or more eye-catching. It’s also easy to customize the colors and designs to create a one-of-a-kind look.
Iron on vinyl is easy to use, allowing you to quickly add custom designs to your projects. To apply the vinyl, simply place it onto fabric with an iron or heat press. The material will adhere securely and last through multiple washes. This makes it ideal for creating permanent designs that won’t fade or peel off over time.

Iron on vinyl is a great way to add unique and personalized designs to your projects. You can easily create custom apparel and home decor items with this versatile material. Whether you’re creating t-shirts for a special occasion, wall decals for your child’s bedroom, or any other project, iron on vinyl can help you make it happen.
Importance of Properly Weeding Iron-On Vinyl
Weeding your iron-on vinyl can make a big difference when it comes to the final product. It is essential to properly weed away all of the excess material that could negatively affect the look and feel of your design. Weeding helps ensure that only the desired elements remain in place, creating a professional and polished outcome.
When weeding iron-on vinyl, you should use a weeding tool or tweezers to carefully remove the unwanted material from your design. Make sure to take extra care when weeding around intricate details as these can be easily damaged if not handled with precision.
Additionally, properly aligning and stabilizing your piece of iron-on vinyl before beginning the weeding process can ensure that it remains in place and that you have a clean look.
Once you are finished weeding, you will want to give your iron-on vinyl one final press with an iron or heat press. This step helps ensure that the remaining pieces of material properly adhere to the fabric and create a strong bond. It also helps set and secure any details that may have shifted during the weeding process.
With a little bit of care and attention, you can create beautiful designs with iron-on vinyl that will last for many years to come! So don’t forget the importance of properly weeding your iron-on vinyl before applying it to fabric. Doing so can help take your project from good to great!
10 Methods How to Weed Iron on Vinyl
1. Gather the Right Tools:
Begin your weeding journey by assembling a comprehensive set of tools. A high-quality weeding tool is your best ally, available in various styles, such as hook, pointed, or tweezer-shaped. Each tool has its purpose, aiding in the removal of different types of vinyl. Equipping yourself with a bright light source and a magnifying glass will enhance your ability to identify intricate details.

2. Choose the Right Vinyl and Settings:
Selecting the right type of vinyl is pivotal in determining the ease of weeding. Vinyl materials vary in thickness, texture, and composition, making some easier to weed than others.
Smooth or matte vinyl tends to be more forgiving during the weeding process, while specialty vinyl, such as glitter or holographic, may require more effort and precision. Adjusting the settings on your cutting machine (if you’re using one) is vital to achieving clean cuts that facilitate easy weeding.
3. Cut with Precision:
Accurate cutting is the foundation of successful weeding. Ensure your vinyl is securely adhered to a high-quality cutting mat, and check your design in the cutting software to verify the correct size and orientation. When dealing with intricate designs, reducing the cutting speed can lead to cleaner cuts and smoother weeding.
4. Weed from the Outside In:
Embark on the weeding process by starting from the outer edges of your design and working your way toward the center. This technique minimizes the risk of accidentally lifting essential design elements while removing the excess vinyl. Proceed with caution, using gentle and deliberate motions to avoid damaging the design or carrier sheet.

5. Use the Right Technique for Intricate Designs:
When faced with intricate designs, employing the right technique can save you valuable time and effort. Consider utilizing the weeding box or grid method. This approach involves creating a small box or grid around the design, effectively breaking it down into manageable sections.
It prevents accidentally lifting nearby elements and provides a guide for aligning the design accurately during the heat application process.
6. Reverse Weed for Multi-Layer Designs:
For multi-layer designs, reverse weeding can be a game-changer. Rather than removing the excess vinyl, carefully peel away the negative space around the design, leaving the desired elements on the carrier sheet. This technique streamlines the alignment and application of each layer, resulting in a polished and seamless final product.
7. Utilize Transfer Tape or Masking Sheets:
The use of transfer tape or masking sheets can significantly simplify the weeding process, especially for intricate or multi-layer designs. After weeding each layer, apply transfer tape or a masking sheet over the vinyl to keep the design intact while working on additional layers. This ensures the vinyl remains aligned correctly during the heat application process, resulting in a precise and cohesive outcome.

8. Weed on a Flat and Clean Surface:
Maintaining a flat and clutter-free work surface is essential for a successful weeding experience. Ensure you have adequate lighting to spot intricate details, and remove any debris that may hinder the process. A clean and organized work area enhances your focus and allows you to weed with greater accuracy and efficiency.
9. Weed with Patience and Precision:
Weeding iron-on vinyl demands patience and precision. Rushing through the process can lead to costly mistakes, causing damage to the vinyl or design. Exercise steady hands and undertake small, deliberate movements to avoid tearing or distorting the design. If you encounter particularly challenging sections, take breaks to maintain a steady hand and clear mindset.
10. Practice and Learn from Mistakes:
As with any skill, practice is the key to mastery. Expect a learning curve and don’t be disheartened by initial challenges. Take note of any mistakes or difficulties you encounter during the weeding process and use them as valuable learning opportunities. Over time, your proficiency will improve, and you’ll achieve cleaner cuts and more efficient weeding.
Things to Consider When Weeding Iron on Vinyl
Weeding iron on vinyl can be a tricky process if you are not familiar with the material. Here are a few things to consider when weeding iron on vinyl:
- Heat Transfer Vinyl (HTV): HTV is designed to be applied onto fabrics and other materials, so it’s important that you use a low-temperature setting and take extra caution when weeding.
- Types of Vinyl: Be sure to check the type of vinyl you are working with as some types require a higher temperature setting and/or special tools for weeding.
- Time and Patience: Weeding can be tedious, so allow yourself adequate time and patience! Take breaks if needed, especially if your eyes become blurry or you become frustrated.
- Weeding Tools: Special tools like tweezers and weeding hooks can make the process much easier, so it’s worth investing in a few of them.
- Practice Makes Perfect: As with any new skill, practice makes perfect when it comes to weeding iron on vinyl! The more you do it, the better your end result will be.
- Preserve the Design: It’s important to make sure you do not accidentally pull away the design when weeding, so take extra caution and work carefully.

Some Common Mistakes When Weeding Iron on Vinyl
Weeding iron on vinyl is a simple process, but there are some common mistakes to avoid when you’re starting out. Here are a few tips that will help you get the best results:
- Don’tweddingPress Too Hard. This can cause your design to warp or stretch, and it won’t look as good. Use a light pressure and more of a tapping motion to ensure accuracy.
- Don’t. This can cause your wedding lines to be uneven or choppy, leaving you with a finished product that looks sloppy. Move slowly and steadily as you follow the design as accurately as possible.
- Follow The Design Carefully. It’s important to stay as close to the design as possible when weeding so that you don’t accidentally remove pieces you need or leave behind any unwanted areas.
- Look for Holes and Tears in the Vinyl. Before you begin weeding, check for any holes or tears in the vinyl surface that could cause problems later on. If you see any, it’s best to start over with a new piece of vinyl.
By following these tips when weeding iron on vinyl, you can ensure that your finished product looks professional and polished. With a little bit of practice, you’ll be an expert at weeding iron-on vinyl in no time!

Conclusion
After reading this blog post, you should now be more familiar with the process of weeding iron on vinyl. Crafting with iron-on vinyl is so rewarding and the possibilities are endless.
With patience and practice, you’ll soon find out how to best use all your tools and techniques to create beautiful designs with iron on vinyl. Now that you know how to weed iron on vinyl, it’s time for you to put it into practice!
If need a bit of extra help while weeding your iron on vinyl, there are many craft communities online where crafters can find advice from experts or other crafters who have been in the same situation before. Don’t be afraid to reach out to them; they may offer tips that could take your crafting game to the next level. Happy weeding!