
Are you wondering how to weave in ends garter stitch? Whether you are a beginner or an experienced knitter, weaving in your ends is an important step for any project.

Weaving in ends is an essential part of any knitting or crochet project. Not only does it give your work a neat and tidy finish, but it also allows the pieces to be stitched together more easily.
If you are working with garter stitch—or any other type of stitch for that matter—it’s important to make sure the ends are woven securely so they won’t come loose after washing and wear and tear over time. Luckily, weaving in ends doesn’t have to be tricky if you take the right steps!
In this post, we’ll discuss how to properly weave in ends when working with garter stitch so you can feel confident your projects will look their best for years to come.
What Will You Need?
Before we get started, let’s go over the materials you will need to weave in your ends successfully:
- A tapestry needle
- The yarn tail you want to weave in
- Scissors
Once you have all of these items gathered, you are ready to begin!
10 Easy Steps On How to Weave in Ends Garter Stitch
Step 1. Cut Off the Yarn Tail
Start by cutting off the yarn tail from your work. The easiest way to do this is to leave a few inches of extra yarn before you cut it, making it easier to weave in without worrying about how much slack you have left. Be careful not to cut it too short, as this could cause loose ends.
Step 2: Thread the Tapestry Needle
Next, thread the tapestry needle with the yarn tail. Make sure you take care to keep the thread taut and even throughout this step so your weaving looks neat and professional! You can use a dab of hot glue to secure the yarn onto the needle if you need extra security.

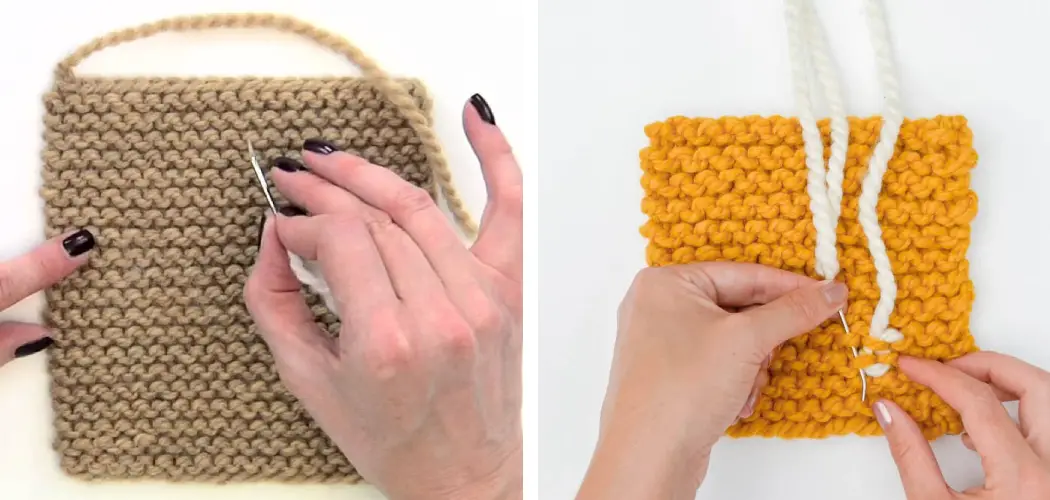
Step 3: Begin Weaving
Start by taking the threaded needle along one row of garter stitches. Insert the needle under two stitches next to each other (as if you are making a knot), then slide it up to the next two stitches and repeat. Continue this weaving pattern until you reach the end of the row, then turn around and go back in the opposite direction.
Step 4: Secure the End
Once you have worked your way back to where you started, take a few extra stitches through nearby loops to anchor them in place. This will help keep your ends secure. If you need to, you can use hot glue to ensure everything is held together properly.
Step 5: Trim Excess Yarn Tail
Finally, trim away any excess yarn tail that is sticking out from your weaving. You should leave about an inch or so to give it a neater finish. And there you have it—you’ve now learned how to weave in ends garter stitch!
Step 6. Try Another Technique
There are many other ways to weave in garter stitch ends if you want to explore different techniques. Some people prefer to use a tapestry needle and thread the yarn through the loops at either end, while others opt for using a crochet hook and weaving it in as they would with any crochet project. Experiment and see which method works best for you!

Step 7: Finish Up
Once you have finished weaving in your ends, give your work a final inspection. Make sure that all of your stitches are secure and that nothing is coming loose. If everything looks good, then you can move on to the next step—adding fringe or tassels, if desired.
Step 8: Seamless Finish
For a truly seamless finish, use your tapestry needle to sew the loose ends of your yarn into the body of your work. You can do this by stitching through a few loops in the same direction as you did for weaving in the ends. Then, cut off any excess yarn, and you’re all done!
Step 9: Secure Your Work
Finally, if you want to ensure that your work is extra secure, you can add a few crochet stitches around the joins where two pieces are sewn together. This will help keep everything tightly together—especially important for garments and other accessories that will see lots of wear and tear over time.
Step 10: Enjoy Your Handiwork
And that’s the way to weave in ends garter stitch! Now, you can enjoy your beautiful finished piece knowing that it will look its best for years to come. Congratulations on a job well done!
By following these 10 easy steps, you can create flawless garter stitch projects with professional-looking weaving in ends. With a few simple supplies and some practice, you’ll soon be an expert at weaving in ends. So, go ahead—give it a try! You won’t be disappointed!
You Can Check It Out to Hold Knitting Needles and Yarn
5 Additional Tips and Tricks
- When weaving in ends in a garter stitch, it can be helpful to use a blunt yarn needle or tapestry needle. This will help ensure the ends don’t fray or unravel.
- Make sure you weave in the ends securely so they don’t pop out of your fabric. You can do this by anchoring them several times and ensuring each end is woven under multiple stitches.
- To make the job easier, try using a crochet hook to anchor the stray strands more tightly into place before securing them with your yarn needle.
- If your working piece has an uneven edge that may cause difficulty when weaving in ends, use an extra strand of yarn and work a row of single crochet stitches along the edges. This will create a smoother edge that’s easier to work with.
- After weaving in your ends, ensure they are all sewn securely and cut off any excess yarn. Make sure you don’t knot the ends together or leave them hanging loose, as this may cause your knitting to unravel over time.

With these tips and tricks, weaving in your garter stitch ends should be no problem! Happy knitting!
5 Things You Should Avoid
- Don’t pull too tightly while weaving in the ends. It is important to keep your stitches loose even as you work them, so they look neat when finished.
- Avoid using a single strand of yarn for weaving in ends, as this can cause unsightly bulges in your fabric. Instead, use two strands for a more professional look.
- Don’t skip any steps: it’s important to ensure each stitch has been woven properly before moving on to the next one. Otherwise, the weave won’t be secure and could come undone easily.
- Don’t leave long tails hanging from the sides of your fabric; weave in at least 2-3 inches on each side to ensure longevity and reduce bulkiness in your fabric.
- Finally, don’t rush through the process; weaving in ends takes patience and care, so take your time and ensure each stitch is done properly to avoid mistakes. With a few simple steps, you’ll have perfect garter stitches in no time! Happy knitting!
By following these tips, you can ensure that your project looks professional and neat when finished. Weaving in ends is an important part of any knitting project, so be sure to spend the extra time doing it right for the best results! Good luck and happy knitting!
What Can I Use Instead of Tapestry Needle?
If you don’t have a tapestry needle on hand, there are several other tools that you can use to weave in your ends instead. For instance, small crochet hooks, bobby pins or even a needle with an eye large enough to fit the yarn strand can work just as well.
Just make sure the tool you choose is smooth and sharp so that it won’t snag or fray your yarn. Additionally, try using two strands of yarn for weaving in ends, as this will help keep them from unraveling over time.

Whether you’re using a tapestry needle or another tool for weaving in ends garter stitch projects, it’s important to remember to take your time and ensure that each stitch is securely woven in. With a few extra steps and some patience, your finished project will look neat and professional! Good luck and happy knitting!
Conclusion
There are many ways to finish a project, and the method you choose will depend on the piece you are making. For garter stitch projects, weaving in the ends is a simple and tidy way to finish things up. By following these steps, you can weave in your ends quickly and easily, making your finished product look neat and professional. Give it a try next time you work on a garter stitch project!
Hopefully, the article on how to weave in ends garter stitch has been helpful in guiding you through the process. With a few simple steps and some patience, you’ll have perfect garter stitches in no time! Happy knitting!
You Can Check It Out to Embroider on Denim