
Sewing can be a relaxing, therapeutic experience, but the frustration of making a mistake can ruin the fun. Seam rippers are valuable tools that can help you fix issues like wrong stitches, uneven seams, skipped stitches, and thread tangling without having to do everything over from scratch. However, using a seam ripper properly is a skill that requires patience, care, and some insider tips. In this blog post, we’ll explore the most effective techniques on how to use seam ripper like a pro and achieve flawless results.

Can You Use a Seam Ripper?
For those unfamiliar with sewing, a seam ripper may seem like a mysterious and intimidating tool. However, once you know how to use it, you will wonder how you ever lived without it. Seam rippers are small hand-held devices that easily remove stitches from fabric. Whether you are trying to fix a mistake in your sewing project or repurpose a piece of clothing, a seam ripper is a must-have tool in any sewing kit. With a little practice, you will become a pro at using this simple yet versatile gadget.
Why Should You Use Seam Ripper?
When it comes to sewing projects, the seam ripper might be your best friend. If you want to get a seamless finish, this tool is essential. It’s perfect for easily undoing any stitches you may have made a mistake on to improve your project’s quality. Seam ripping is much easier and quicker than unraveling stitches by hand, saving you time and energy.
Using a seam ripper can also give you more creative freedom because it allows you to experiment with different designs and fabrics without worrying about making mistakes. In other words, a seam ripper is an indispensable tool for any sewer and can help you achieve a refined and professional look.
How to Use Seam Ripper: Tips and Techniques for Effortless Success
1. Choose the Right Seam Ripper
There are different types of seam rippers with various sizes, shapes, hooks, and blades. Some are designed for heavy threads, while others are more delicate for lightweight fabrics. Before you start using a seam ripper, make sure you select the one that suits your project’s requirements. You don’t want to damage your fabric with a dull or unsuitable blade or hurt yourself with an uncomfortable handle. Try different seam rippers until you find the one that feels comfortable and efficient in your hand.

2. Position Your Project Properly
Seam ripping can be a tricky process, so make sure you set up your project to make it easier. For instance, you can pull the thread tight to see the stitch better or angle your project to have better access to the seam. If you’re ripping a long seam, using pins or clips to secure the fabric on both sides to avoid wavy edges is essential. Moreover, avoid pulling the fabric too hard or pressing the blade too firmly to avoid damaging the fibers.
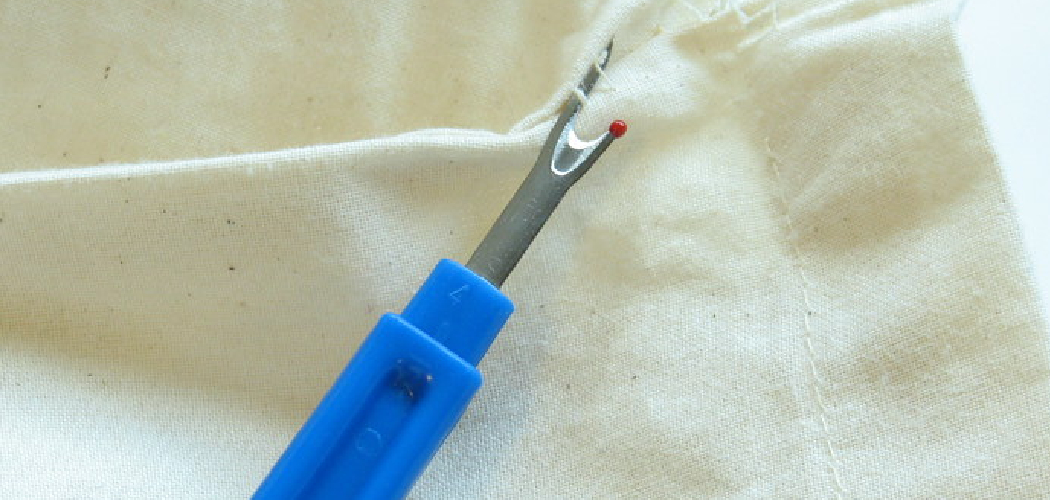
3. Ripping the Stitch
Once you’re ready to rip the seam, keep your seam ripper at a 45-degree angle with the fabric and insert the hook under the thread. Then, gently tug the thread with your other hand to loosen the stitch and slide the blade’s tip through the thread. Keep the seam ripper parallel to your project, and avoid cutting the fabric or pulling the thread behind the blade. Once you reach the end of the stitch, use the seam ripper tip or your finger to remove the remaining fibers.
4. Cleaning up The Seam
After you’ve removed the incorrect stitch, you might need to tidy up the seam by removing excess threads, knots, or frayed edges. Use a lint roller or a small brush to remove the fibers and trim the edges with scissors or a rotary cutter, depending on your project’s needs. If your seam ripper has a flat side, you can run it along the seam to press it open and straighten it out.
5. Staying Positive and Patient
Seam ripping can be frustrating, especially when working on a challenging project or under a deadline. However, it’s crucial to stay positive and focused on the end result, even if it takes longer than expected. Take breaks, listen to music, or practice deep breathing exercises to reduce stress and maintain a positive attitude. Remember that mistakes happen, and seam ripping is an opportunity to learn and grow as a seamstress.
6. Practice Makes Perfect
Like any other skill, using a seam ripper requires practice and patience. Don’t be discouraged if you first make mistakes or struggle with certain techniques. With time and practice, you’ll develop your own rhythm and become more efficient in ripping seams cleanly and accurately. Keep practicing on different fabrics, stitches, and projects to improve your skills and gain confidence in using a seam ripper.

7. Don’t Forget to Care for Your Seam Ripper
Lastly, taking care of your seam ripper is essential to ensure its longevity and efficiency. Always clean the blade after use, as thread fibers and fabric particles can accumulate on it over time, making it dull and less effective. You can use a pin or a soft cloth to remove the debris and sharpen the blade periodically with a sharpening stone or emery board. Remember to store your seam ripper safely away from children and pets, preferably in its original case or a protective cover.
5 Considerations Things When You Need to Use Seam Ripper
1. Type of Fabric
When using a seam ripper, the type of fabric you are working with is an important factor to consider. Different fabrics require different levels of force when ripping seams, so it’s important to know what type of fabric you are working with before starting. For example, delicate fabrics such as silk and chiffon require a gentler approach with a smaller blade, whereas thicker fabrics such as denim or canvas need a larger blade and more force.
2. Thread Type
The type of thread used in the seam also plays an important role when using a seam ripper. If the thread is made from synthetic materials, such as polyester or nylon, then it will be more difficult to cut through than natural fibers, such as cotton or linen. Additionally, if the thread has been treated with any chemical finishes, it may also be more difficult to cut through.

3. Blade Size
The size of the blade on your seam ripper is another important consideration when using this tool. Generally speaking, the larger the blade size, the easier it will be to rip through thicker fabrics and threads; however, a larger blade can also cause more damage if not used carefully on delicate fabrics and threads. It’s best to start with a smaller blade and work your way up if needed.
4. Safety Features
When using any sharp tool, there is always some risk involved; therefore, it’s important to ensure that your seam ripper has safety features to help prevent accidents while you’re working. Look for features such as non-slip grips and recessed blades for added protection against cuts and slips while you’re working.
5. Comfortability
Finally, comfortability is an important factor when selecting a seam ripper since you will likely be using it for extended periods while sewing or mending clothes or other fabric items. Look for ergonomic handles that fit comfortably in your hand and have enough grip so that they don’t slip out while you’re working
Benefits of Using a Seam Ripper
Using a seam ripper could save you from a lot of frustration and time when sewing. It is a small but effective tool that you can use to remove stitches from your fabric without damaging it. Whether you are a beginner or an experienced sewer, a seam ripper allows you to correct mistakes, alter a garment’s fit, or reuse fabric. Using a sharp seam ripper, you can easily remove unwanted stitches or wrong threads and have a stress-free experience while sewing.
This tool is a must-have in your sewing kit because it can save you from the headache of starting all over again. Additionally, a seam ripper can create new designs and patterns by undoing seams and repurposing fabric. Investing in a high-quality seam ripper is a wise decision as it will help you achieve a polished and professional finish in your sewing projects.
Some Common Mistakes People Make When Trying to Use Seam Ripper
Using a seam ripper can be a tricky task. Mistakes are common, especially when you are a beginner. One of the most common mistakes people make is using too much pressure. You don’t need to be forceful, as the blade can easily cut through the thread. Another error people make is using the seam ripper too deep, ripping through the fabric.
Instead, keep it shallow and close to the stitch, only removing the thread. Another common mistake is not using sharp blades. Blunt blades can damage the fabric, so it’s crucial to replace the blade often. Lastly, not holding the fabric firmly when using the seam ripper can cause the fabric to bunch up and become distorted. These tips will ensure everything goes smoothly and that mistakes are easily fixable.

Conclusion
Using a seam ripper can seem daunting at first, but with practice and the right techniques, you can become a seam-ripping pro in no time. By choosing the right seam ripper, positioning your project correctly, ripping the stitches carefully, cleaning up the seam thoroughly, and staying positive and patient, you can fix any sewing error with ease and confidence.
Remember that seam ripping is not a punishment but a way to improve your skills and achieve perfect sewing results. So, embrace your seam ripper, and happy sewing! Thanks for reading our post about how to use seam ripper.